Overview
- Big Data is becoming bigger by the day, and at an unprecedented pace
- How do you store, process and use this amount of data for machine learning? There’s where Spark comes into play
- Learn all about what Spark is, how it works, and what are the different components involved
Introduction
We are generating data at an unprecedented pace. Honestly, I can’t keep up with the sheer volume of data around the world! I’m sure you’ve come across an estimate of how much data is being produced – McKinsey, Gartner, IBM, etc. all offer their own figures.
Here are some mind-boggling numbers for your reference – more than 500 million tweets, 90 billion emails, 65 million WhatsApp messages are sent – all in a single day! 4 Petabytes of data are generated only on Facebook in 24 hours. That’s incredible!
This, of course, comes with challenges of its own. How does a data science team capture this amount of data? How do you process it and build machine learning models from it? These are exciting questions if you’re a data scientist or a data engineer.
And this is where Spark comes into the picture. Spark is written in Scala and it provides APIs to work with Scala, JAVA, Python, and R. PySpark is the Python API written in Python to support Spark.
One traditional way to handle Big Data is to use a distributed framework like Hadoop but these frameworks require a lot of read-write operations on a hard disk which makes it very expensive in terms of time and speed. Computational power is a significant hurdle.
PySpark deals with this in an efficient and easy-to-understand manner. So in this article, we will start learning all about it. We’ll understand what is Spark, how to install it on your machine and then we’ll deep dive into the different Spark components. There’s a whole bunch of code here too so let’s have some fun!
Here’s a quick introduction to the world of Big Data in case you need a refresher. Keep in mind that the numbers have gone well beyond what’s shown there – and it’s only been 3 years since we published that article!
Table of contents
What is Spark?
Apache Spark is an open-source, distributed cluster computing framework that is used for fast processing, querying and analyzing Big Data.
It is the most effective data processing framework in enterprises today. It’s true that the cost of Spark is high as it requires a lot of RAM for in-memory computation but is still a hot favorite among Data Scientists and Big Data Engineers. And you’ll see why that’s the case in this article.
Organizations that typically relied on Map Reduce-like frameworks are now shifting to the Apache Spark framework. Spark not only performs in-memory computing but it’s 100 times faster than Map Reduce frameworks like Hadoop. Spark is a big hit among data scientists as it distributes and caches data in memory and helps them in optimizing machine learning algorithms on Big Data.
I recommend checking out Spark’s official page here for more details. It has extensive documentation and is a good reference guide for all things Spark.
Installing Apache Spark on your Machine
1. Download Apache Spark
One simple way to install Spark is via pip. But that’s not the recommended method according to Spark’s official documentation since the Python package for Spark is not intended to replace all the other use cases.
There’s a high chance you’ll encounter a lot of errors in implementing even basic functionalities. It is only suitable for interacting with an existing cluster (be it standalone Spark, YARN, or Mesos).
So, the first step is to download the latest version of Apache Spark from here. Unzip and move the compressed file:
tar xzvf spark-2.4.4-bin-hadoop2.7.tgz
mv spark-2.4.4-bin-hadoop2.7 spark
sudo mv spark/ /usr/lib/
2. Install JAVA
Make sure that JAVA is installed in your system. I highly recommend JAVA 8 as Spark version 2 is known to have problems with JAVA 9 and beyond:
sudo apt install default-jre
sudo apt install openjdk-8-jdk
3. Install Scala Build Tool (SBT)
When you are working on a small project that contains very few source code files, it is easier to compile them manually. But what if you are working on a bigger project that has hundreds of source code files? You would need to use build tools in that case.
SBT, short for Scala Build Tool, manages your Spark project and also the dependencies of the libraries that you have used in your code.
Keep in mind that you don’t need to install this if you are using PySpark. But if you are using JAVA or Scala to build Spark applications, then you need to install SBT on your machine. Run the below commands to install SBT:
echo "deb https://dl.bintray.com/sbt/debian /" | sudo tee -a /etc/apt/sources.list.d/sbt.list
curl -sL "https://keyserver.ubuntu.com/pks/lookup?op=get&search=0x2EE0EA64E40A89B84B2DF73499E82A75642AC823" | sudo apt-key add
sudo apt-get update
sudo apt-get install sbt
4. Configure SPARK
Next, open the configuration directory of Spark and make a copy of the default Spark environment template. This is already present there as spark-env.sh.template. Open this using the editor:
cd /usr/lib/spark/conf/
cp spark-env.sh.template spark-env.sh
sudo gedit spark-env.sh
Now, in the file spark-env.sh, add the JAVA_HOME path and assign memory limit to SPARK_WORKER_MEMORY. Here, I have assigned it to be 4GB:
## add variables
JAVA_HOME=/usr/lib/jvm/java-8-openjdk-amd64
SPARK_WORKER_MEMORY=4g
5. Set Spark Environment Variables
Open and edit the bashrc file using the below command. This bashrc file is a script that is executed whenever you start a new terminal session:
## open bashrc file
sudo gedit ~/bashrc
Add the below environment variables in the file:
## add following variables
export JAVA_HOME=/usr/lib/jvm/java-8-openjdk-amd64
export SBT_HOME=/usr/share/sbt/bin/sbt-launch.jar
export SPARK_HOME=/usr/lib/spark
export PATH=$PATH:$JAVA_HOME/bin
export PATH=$PATH:$SBT_HOME/bin:$SPARK_HOME/bin:$SPARK_HOME/sbin
export PYSPARK_DRIVER_PYTHON=jupyter
export PYSPARK_DRIVER_PYTHON_OPTS='notebook'
export PYSPARK_PYTHON=python3
export PYTHONPATH=$SPARK_HOME/python:$PYTHONPATH
Now, source the bashrc file. This will restart the terminal session with the updated script:
## source bashrc file
source ~/.bashrc
Now, type pyspark in the terminal and it will open Jupyter in your default browser and a Spark context (it is the entry point of the Spark services) will automatically initialize with the variable name sc:
What are Spark Applications?
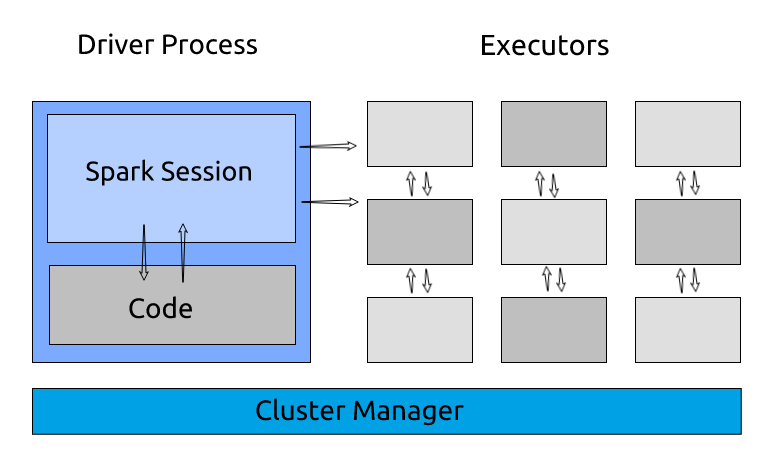
A Spark application is an instance of the Spark Context. It consists of a driver process and a set of executor processes.
The driver process is responsible for maintaining information about the Spark Application, responding to the code, distributing, and scheduling work across the executors. The driver process is absolutely essential – it’s the heart of a Spark Application and maintains all relevant information during the lifetime of the application
The executors are responsible for actually executing the work that the driver assigns them. So, each executor is responsible for only two things:
- Executing code assigned to it by the driver, and
- Reporting the state of the computation, on that executor, back to the driver node
Then what is a Spark Session?
We know that a driver process controls the Spark Application. The driver process makes itself available to the user as an object called the Spark Session.
The Spark Session instance is the way Spark executes user-defined manipulations across the cluster. In Scala and Python, the Spark Session variable is available as spark when you start up the console:
Partitions in Spark
Partitioning means that the complete data is not present in a single place. It is divided into multiple chunks and these chunks are placed on different nodes.
If you have one partition, Spark will only have a parallelism of one, even if you have thousands of executors. Also, if you have many partitions but only one executor, Spark will still only have a parallelism of one because there is only one computation resource.
In Spark, the lower level APIs allow us to define the number of partitions.
Let’s take a simple example to understand how partitioning helps us to give faster results. We will create a list of 20 million random numbers between 10 to 1000 and will count the numbers greater than 200.
Let’s see how fast we can do this with just one partition:
It took 34.5 ms to filter the results with one partition:
Now, let’s increase the number of partitions to 5 and check if we get any improvements in the execution time:
It took 11.1 ms to filter the results using five partitions:
Transformations in Spark
Data structures are immutable in Spark. This means that they cannot be changed once created. But if we cannot change it, how are we supposed to use it?
So, In order to make any change, we need to instruct Spark on how we would like to modify our data. These instructions are called transformations.
Recall the example we saw above. We asked Spark to filter the numbers greater than 200 – that was essentially one type of transformation. There are two types of transformations in Spark:
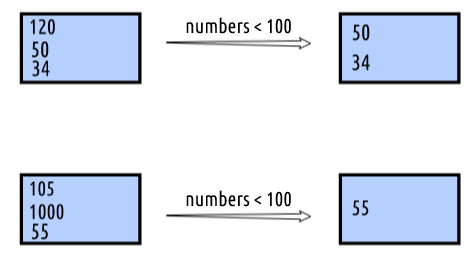
- Narrow Transformation: In Narrow Transformations, all the elements that are required to compute the results of a single partition live in the single partition of the parent RDD. For example, if you want to filter the numbers that are less than 100, you can do this on each partition separately. The transformed new partition is dependent on only one partition to calculate the results
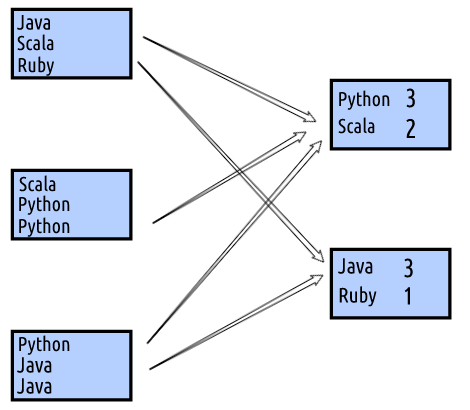
- Wide Transformation: In Wide Transformations, all the elements that are required to compute the results of single partitions may live in more than one partition of the parent RDD. For example, if you want to calculate the word count, then your transformation is dependent on all the partitions to calculate the final result
Lazy Evaluation
Let’s say you have a very large data file that contains millions of rows. You need to perform analysis on that by doing some manipulations like mapping, filtering, random split or even very basic addition or subtraction.
Now, for large datasets, even a basic transformation will take millions of operations to execute.
It is essential to optimize these operations when working with Big Data, and Spark handles it in a very creative way. All you need to do is tell Spark what are the transformations you want to do on the dataset and Spark will maintain a series of transformations. When you ask for the results from Spark, it will then find out the best path and perform the required transformations and give you the result.
Now, let’s take an example. You have a text file of 1 GB and have created 10 partitions of it. You also performed some transformations and in the end, you requested to see how the first line looks. In this case, Spark will read the file only from the first partition and give you the results as your requested results do not require to read the complete file.
Let’s take a few practical examples to see how Spark performs lazy evaluation. In the first step, we have created a list of 10 million numbers and created a RDD with 3 partitions:

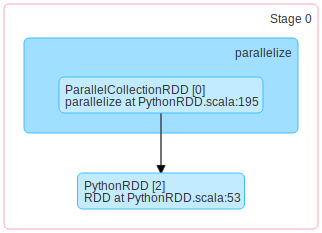
Next, we will perform a very basic transformation, like adding 4 to each number. Note that Spark at this point in time has not started any transformation. It only records a series of transformations in the form of RDD Lineage. You can see that RDD lineage using the function toDebugString:

We can see that PythonRDD[1] is connected with ParallelCollectionRDD[0]. Now, let’s go ahead and add one more transformation to add 20 to all the elements of the list.
You might be thinking it would be better if added 24 in a single step instead of making an extra step. But check the RDD Lineage after this step:

We can see that it has automatically skipped that redundant step and will add 24 in a single step instead of how we defined it. So, Spark automatically defines the best path to perform any action and only perform the transformations when required.
Let’s take another example to understand the Lazy Evaluation process.
Suppose we have a text file and we created an RDD of it with 4 partitions. Now, we define some transformations like converting the text data to lower case, slicing the words, adding some prefix to the words, etc.
But in the end, when we perform an action like getting the first element of the transformed data, Spark performs the transformations on the first partition only as there is no need to view the complete data to execute the requested result:
Here, we have converted the words to lower case and sliced the first two characters of each word (and then requested for the first word).

What happened here? We created 4 partitions of the text file. But according to the result we needed, it was not required to read and perform transformations on all the partitions, hence Spark only did that.
What if we want to count the unique words? Then we need to read all the partitions and that’s exactly what Spark does:


Data Types in Spark MLlib
MLlib is Spark’s scalable Machine Learning library. It consists of common machine learning algorithms like Regression, Classification, Dimensionality Reduction, and some utilities to perform basic statistical operations on the data.
In this article, we will go through some of the data types that MLlib provides. We’ll cover topics like feature extraction and building machine learning pipelines in upcoming articles.
Local Vector
MLlib supports two types of Local Vectors: dense and sparse. Sparse Vectors are used when most of the numbers are zero. To create a sparse vector, you need to provide the length of the vector – indices of non-zero values which should be strictly increasing and non-zero values.
Labeled Point
Labeled Point is a local vector where a label is assigned to each vector. You must have solved supervised problems where you have some target corresponding to some features. Label Point is exactly the same where you provide a vector as a set of features and a label associated with it.
Local Matrix
Local Matrices are stored on a single machine. MLlib supports both dense and sparse matrices. In a Sparse matrix, non-zero entry values are stored in the Compressed Sparse Column (CSC) format in column-major order.
Distributed Matrix
Distributed matrices are stored in one or more RDDs. It is very important to choose the right format of distributed matrices. Four types of distributed matrices have been implemented so far:
-
Row Matrix
- Each row is a local vector. You can store rows on multiple partitions
- Algorithms like Random Forest can be implemented using Row Matrix as the algorithm divides the rows to create multiple trees. The result of one tree is not dependent on other trees. So, we can make use of the distributed architecture and do parallel processing for algorithms like Random Forest for Big Data
-
Indexed Row Matrix
- It is similar to the row matrix where rows are stored in multiple partitions but in an ordered manner. An index value is assigned to each row. It is used in algorithms where the order is important like Time Series data
- It can be created from an RDD of IndexedRow
-
Coordinate Matrix
- A coordinate matrix can be created from an RDD of MatrixEntry
- We only use a Coordinate matrix when both the dimensions of the matrix are large
-
Block Matrix
- In a Block Matrix, we can store different sub-matrices of a large matrix on different machines
- We need to specify the block dimensions. Like in the below example, we have 3X3 and for each of the blocks, we can specify a matrix by providing the coordinates
Conclusion
We’ve covered quite a lot of ground today. Spark is one of the more fascinating languages in data science and one I feel you should at least be familiar with.
This is just the start of our PySpark learning journey! I plan to cover a lot more ground in this series with multiple articles spanning different machine learning tasks.
In the upcoming PySpark articles, we will see how can we do feature extraction and creating Machine Learning Pipelines and building models. In the meantime, feel free to leave your thoughts and feedback in the comments section below.
Frequently Asked Questions
To use PySpark effectively, you need a good understanding of fundamental Python concepts like data structures, control flow, functions, and object-oriented programming.
Experienced PySpark developers can earn over $100,000 per year. The average salary for a PySpark developer in the United States is $112,329 per year.
1.PySpark is a more powerful tool for processing large and unstructured data.
2. It’s faster than SQL due to distributed processing across multiple machines.
3.PySpark’s MLlib library enables machine learning tasks like predictive modeling and recommendation systems.


