

I love to snap photos on my phone regularly. Sometimes, I snap up to 10-15 images a day. If I don’t archive them, my library will be filled with too many unorganized photos, making it challenging to find the ones I want to share. It’s why I archive my private moments. Archived images are hidden from the main photo grid. But they remain in your library.
Archiving helps me sort the important photos that I want to share with others and those I prefer to keep privately for my memories. As a major foodie, I like to keep my collection private. However, I’d still like to recall some of my favorite recipes and food experiences without them appearing in my primary library view. As long as you’re using Google Photos, setting up your archive on any Android device, including Chromebooks, is easy.
Archive folders vs locked folders
When it comes to privacy, you can choose to hide certain photos in your archive folder or put them in a locked folder. Archiving only hides these photos from your view. It also helps you manage clutter.
But when it comes to privacy and security, locked folders take it a step further. Items in the locked folder don’t appear on the feed. You won’t find these images in the main grid, the collections tab or be able to search for them. The content remains secure because it can’t be accessed without your device’s primary PIN or passcode. They also can’t be shared or backed up. If you want to secure a private collection of photos for your eyes only, the locked folders function might be the one for you.
How to archive your Google Photos
If you only want to privatize a few images instead of creating a whole collection, you can do so easily through the Google Photos app. Our steps below show you how to move one photo from your Google Photos library to your archive. We also show you how to access your archived pictures for later viewing.
When you archive a photo, you aren’t deleting it. It still counts toward your 15GB storage.
How to archive a single photo
- Open the Google Photos app.
- Navigate to the Photos tab and choose a photo from your gallery.
- Tap-hold on the image.
- Scroll to the right to select Move to Archive. Alternatively, you can open a photo, select the three-dot icon, and choose Move to Archive.
To access your archived photos:
- Open the Google Photos app.
- Navigate to Collections (located at the bottom of the app).
- Tap Archive.
Tapping Go to archive after you’ve archived a photo will take you to the archived photos collection.
How to archive photos in bulk
Similar to me, you may wish to create a private collection of photos. Instead of moving your pictures one by one to add them to your archive, you can select multiple pictures to send to your archive at once. Here’s how.
- Open the Google Photos app.
- Navigate to the Photos tab (located at the bottom of the app).
- Tap-hold on an image.
- Select all the images you wish to archive.
- Scroll to the right and select Move to Archive.
Alternatively, selecting the radio button next to the photo date will also select all photos categorized by the date. I’ve used this when I’ve taken specific images that day, which helps me archive them right away. It’s handy when I am snapping photos of a celebratory feast or when I want to archive a recipe from start to finish.
How to archive your Google Photos on a computer
You can also archive and access your Google Photos on the web. It works similarly to the app. It’s especially useful to know how to do this if you already frequently use the web app and manage your Google Photos online. Before navigating to the steps below, ensure you’ve logged into the same Google account that is connected to your device.
- On your web browser, go photos.google.com.
- Navigate to a photo or an album.
-
Click the three-dot icon.

-
Select Archive.

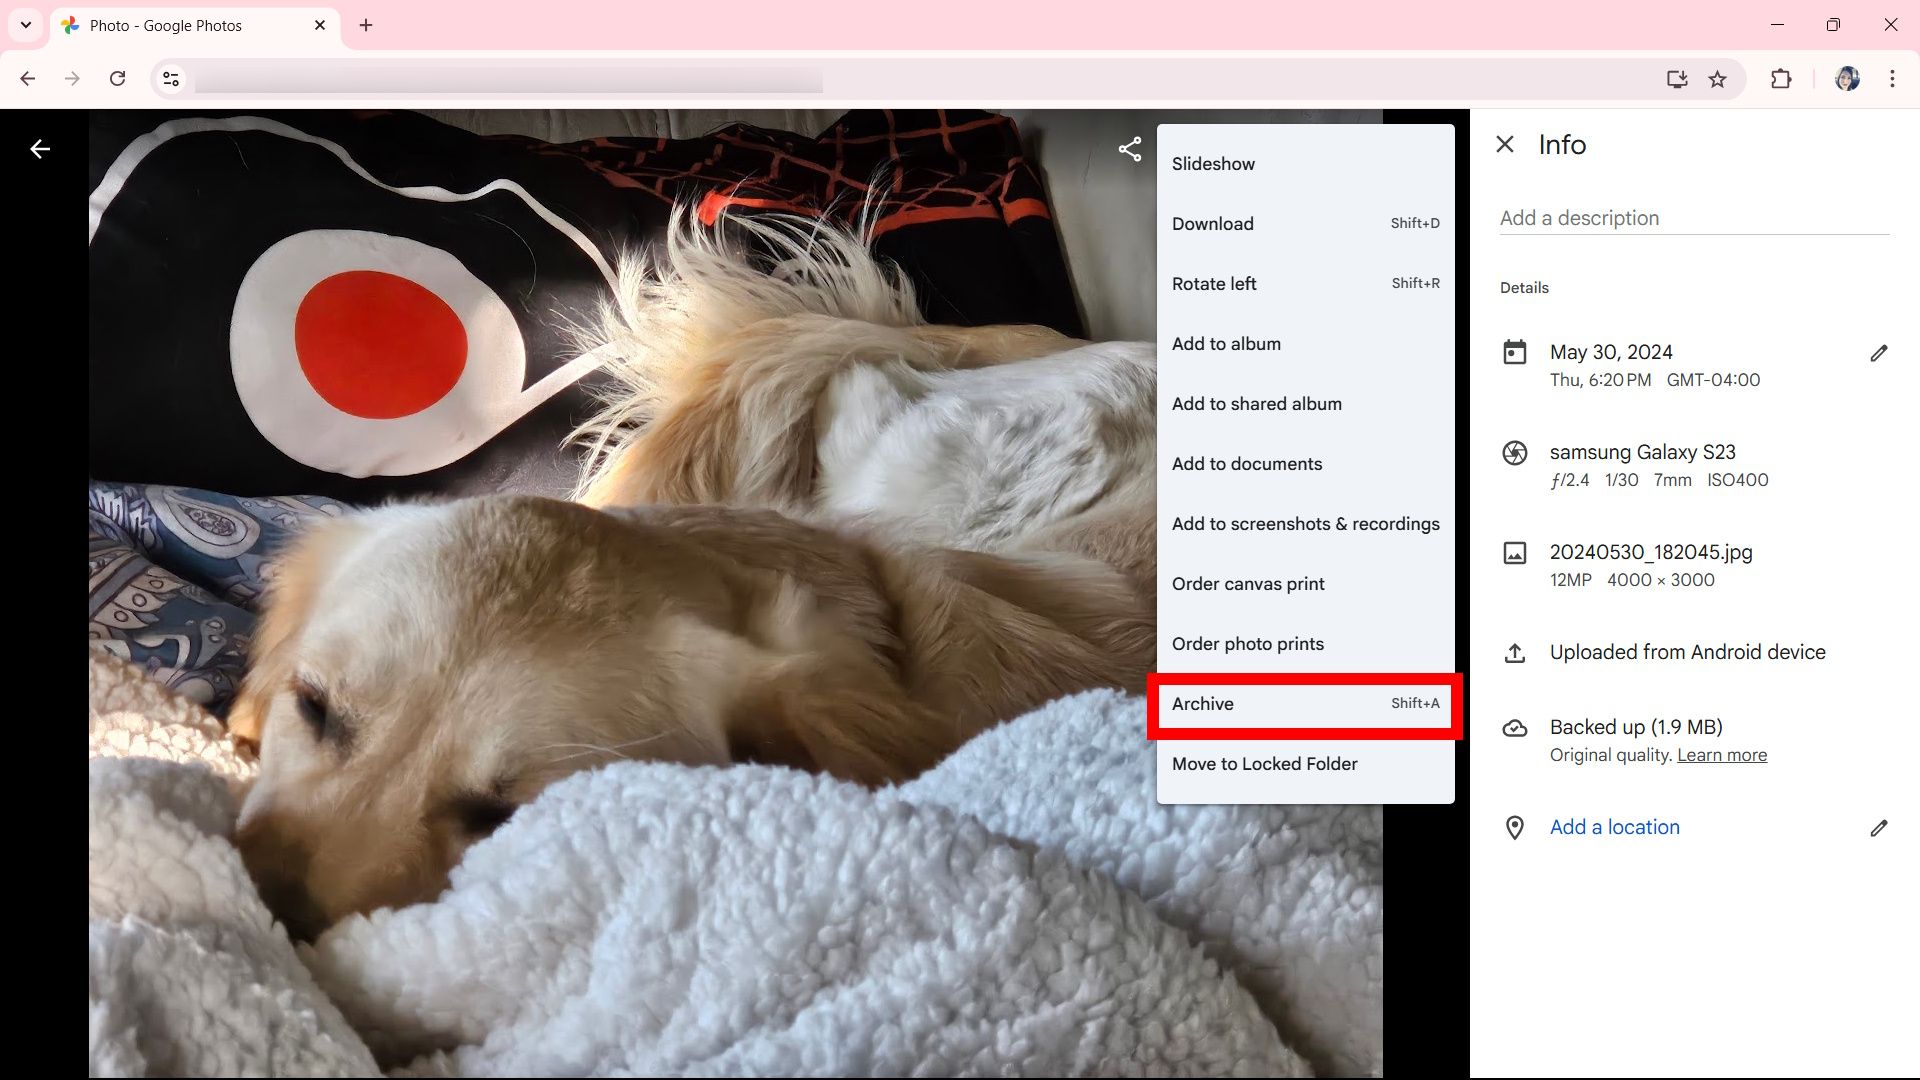
If you’re using a Windows computer, press Shift + A to archive the selected photos.
How to unarchive your photos
It’s possible you archived an image by mistake, or you’ve changed your mind. I’ve done this on more than one occasion, as I like to archive my images in bulk by selecting the date. However, sometimes, I take some photos (I sneak a few pictures of my golden retrievers) that I prefer to keep in my main library to share. If you’re like me and want to put them back in your main view, you can do so by unarchiving them. You can complete this task through the app or on your computer. Here’s how to do it.
- Open the Google Photos app.
- Navigate to Collections > Archive (located at the bottom of the app).
- Tap-hold an image or select them in bulk.
- Tap the three-dot icon in the top-right corner.
- Select Unarchive.
On a computer:
- On your web browser, go photos.google.com.
-
Choose Archive (underneath Collections) in the left panel.
-
Select a photo and click the three-dot icon.
-
Select Unarchive.


Organize meaningful moments in Google Photos
Google Photos offers numerous great features. One of these features allows you to create a timeline of your meaningful moments through the Collections tab inside the Google Photos app. You can customize those moments and share them with others, including photos and videos. Moments, formerly known as memories, are similar to albums, except that they’re tailored to utilize AI capabilities to help create and manage those collections. Moments also employ a story-like format, lending it more personality than a standard album would (think of it being similar to a scrapbook).