

Husain Parvez
Updated on: September 25, 2025
Fact-checked by Sam Boyd
Short on time? Here’s how to uninstall Wave Browser in 3 simple steps:
- Uninstall Wave Browser and End Processes: Disconnect from the internet, then go to Control Panel (Windows) or Applications folder (Mac) to uninstall Wave Browser, ensuring all associated files are removed. Open Task Manager (Windows) or Activity Monitor (Mac) to end any running Wave Browser processes.
- Clean System and Browser Settings: Disable Wave Browser startup items in Task Manager or Login Items (Mac) and remove related tasks in Task Scheduler (Windows). For Windows, use Registry Editor to delete Wave Browser entries. Reset browser settings (Chrome, Firefox, Safari), remove extensions, and clear site data.
- Run Antivirus Scan: Use a trusted antivirus like Norton to perform a full system scan to detect and remove any residual threats or potentially unwanted programs (PUPs).
Wave Browser is a potentially unwanted program (PUP) that can change your settings, track your data, and, frustratingly, reinstall itself even after you’ve removed it.
It uses persistent techniques to keep coming back, and this problem has been causing major headaches for users in 2025. Once it’s there, it opens the door to intrusive ads, search hijacking, and aggressive data collection, putting your personal information at risk.
Wave Browser also exposes your computer to malicious software and leaves you vulnerable to cybercriminals. Fortunately, you can remove Wave Browser for good by following the right steps.
Using a top-quality antivirus like Norton is the best way to remove PUPs like Wave Browser and ensure thorough protection from future threats. Norton’s plans are affordable, and you can try them risk-free with a 60-day money-back guarantee.
September 2025 Update: We updated the Wave Browser guide with steps to remove registry entries and scheduled tasks, expanded Mac instructions, added troubleshooting for recurring issues, and refreshed antivirus and privacy info.
What Is Wave Browser & Is It Safe?
At first glance, Wave Browser appears to be a harmless clone of Google Chrome. But if you’ve ever dealt with it, you’ll know the experience is far from normal. People report background processes that won’t quit, extensions that refuse to uninstall, and system changes happening without permission.
The browser is known for its intrusive ads and links, which could potentially contain malware or lead to browser hijacking. It also collects large amounts of personal data, including cookies, IP addresses, demographics, and browsing history, and it even ignores “Do Not Track” requests. This makes sensitive activities like online banking or shopping especially risky, since your information could be exposed to cybercriminals.
What makes it especially frustrating is how stubborn it is. Even after uninstalling, it has ways of sneaking back in through startup entries, scheduled tasks, and registry hooks. That’s why so many users feel like it’s impossible to get rid of.
In short, while you technically can browse the web with it, the trade-off is too high. I strongly recommend you remove Wave Browser immediately and run a full system scan if you find it on your computer.

How to Uninstall Wave Browser & Protect Your Device (Step-By-Step Guide)
Step 1. Uninstall Wave Browser
The steps for uninstalling Wave Browser vary based on whether you’re a Windows or Mac user. Before starting, disconnect from the internet. This step prevents Wave Browser from sending any additional data or re-downloading components during uninstallation. Click the operating system you’re using to jump to the most relevant steps:
Uninstall Wave Browser on Windows
Depending on what version of Windows you’re using, the steps to uninstall Wave Browser may differ. Click on the version of Windows that applies to you:
Windows 11
To remove Wave Browser from Windows 11, click on the Windows icon on your taskbar. This will open the Start menu. Next, click on the Settings icon (it looks like a gear, but you can also type “Settings” into the search bar if you can’t see it).
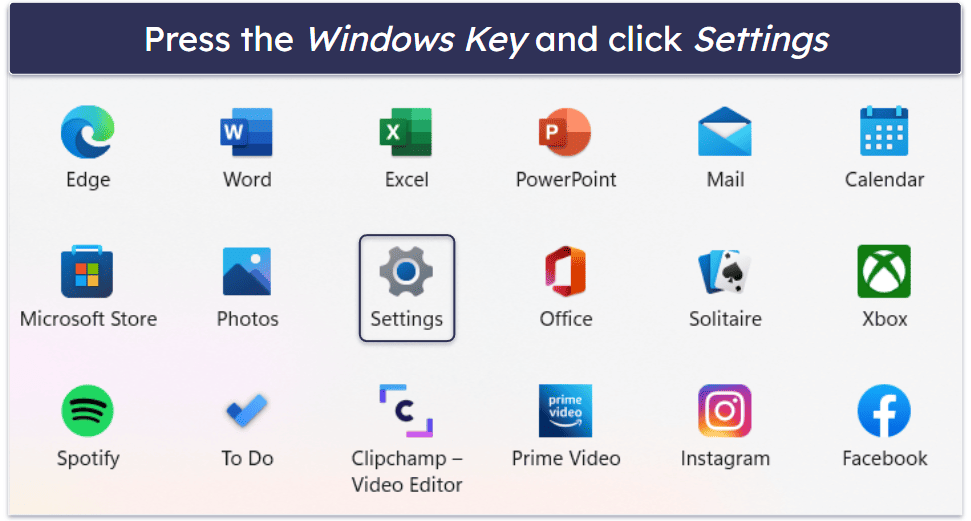
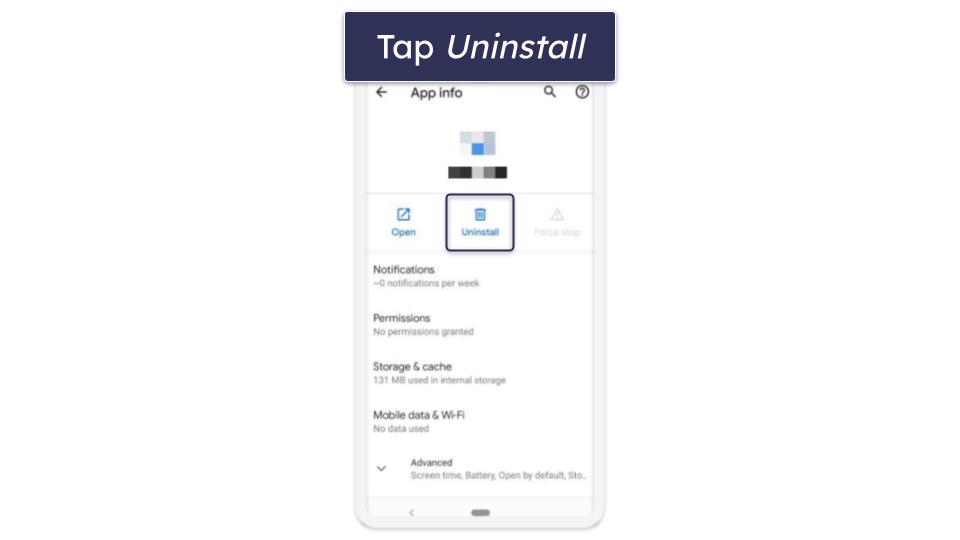
Once you’re in the Settings window, look for the Apps section on the left-hand side of the screen. Click on Installed apps to see a list of all the programs on your PC. You can either scroll through the list to find “Wave Browser” or use the search bar at the top of the page. When you see it, click on the 3 dots to the right of Wave Browser and select Uninstall. Now you need to check for and close the running Wave Browser tasks.
Windows 10
Look for the Windows icon on your taskbar and click on it. Then, find the Settings icon, which looks like a little gear, and click on it. This will open the Windows Settings app.
Once inside the app, click on Apps to see a list of all the apps you have installed on your computer. Just scroll down until you find the Wave Browser and then click Uninstall. Follow the uninstallation wizard if available, then close the running Wave Browser tasks.
Closing the Running Wave Browser Tasks
You need to stop any related processes running in the background to ensure a complete uninstall of Wave Browser.
Before ending any task, right-click the process and select Open File Location to confirm that it’s associated with Wave Browser. This step helps avoid accidentally terminating unrelated or essential system processes.
- Press Ctrl+Shift+Esc to open the Task Manager.
- Under the Processes tab, look for anything related to Wave Browser, like “Wave” or “Wavesor”. You might not see anything — but it’s best to double-check.
- Right-click any processes you’re suspicious of, select Open File Location to verify, then return to Task Manager and select End Task for confirmed processes.
Process names can vary (e.g. Wave-related tasks can be named “Wavesor”). Exercise caution when identifying processes to avoid ending unrelated tasks. If you’re new to Task Manager, generally, system processes display under a Windows Processes category, which can help distinguish them from application-related tasks.
Once done, you need to check for any Wave Browser startup tasks. If you still see processes relaunching, try repeating this step in Safe Mode.
Disabling Wave Browser Startup Tasks
- In the Task Manager, switch to the Startup tab.
- Disable any startup tasks related to Wave Browser. Again, you might not see any, but it’s worth checking to stop Wave Browser from reinstalling itself.
Deleting Scheduled Tasks Linked to Wave Browser
Wave Browser sometimes creates hidden scheduled tasks that automatically reinstall it.
- In the Windows search bar, type Task Scheduler and open it.
- Expand Task Scheduler Library in the left-hand panel.
- Look through the list for any entries referencing Wave Browser or Wavesor.
- Right-click the task and choose Delete.
Removing Wave Browser From Registry
To entirely remove Wave Browser, you may need to delete specific registry entries, as this browser often embeds itself with persistent keys.
Warning: This step is for advanced users. It’s best to proceed with caution and have a good grasp of the registry’s role in Windows systems before attempting a Windows registry cleanup. Making the wrong changes can cause system instability and other functional issues. So if you’re not sure, you can skip this step and simply run a malware scan.
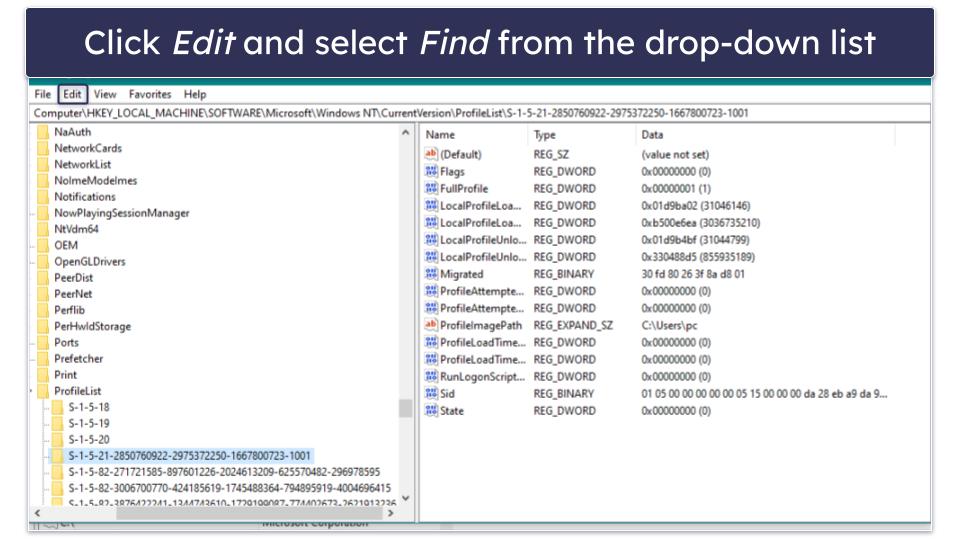
- Press Win+R, type in “regedit”, and press Enter to open the Registry Editor.
- Before making any registry changes, back up your registry. This precaution allows you to restore it if anything goes wrong, as editing the registry can impact your system’s functionality. To create a backup, after opening the Registry Editor, go to File > Export, and save the file.

- Now, continue deleting registry entries related to Wave Browser. Be careful here, as deleting the wrong thing could cause system instability.
- Click on Edit from the dropdown menu and choose Find.
- Click Edit > Find, then search for “Wave Browser.” Delete any folders related to it. Be sure to check under HKEY_CURRENT_USER and, if present, also in HKEY_LOCAL_MACHINE for folders named WaveBrowser or Wavesor.
- You’re now ready to run a malware scan on your system.
If the standard uninstall fails or Wave Browser keeps respawning, try using a tool like Revo Uninstaller in Safe Mode. This provides a deeper cleanup and can remove stubborn leftover files.

Uninstall Wave Browser on Mac
- Open Finder.
- Navigate to the Applications folder.

- Find Wave Browser, right-click it, and select Move to Trash.
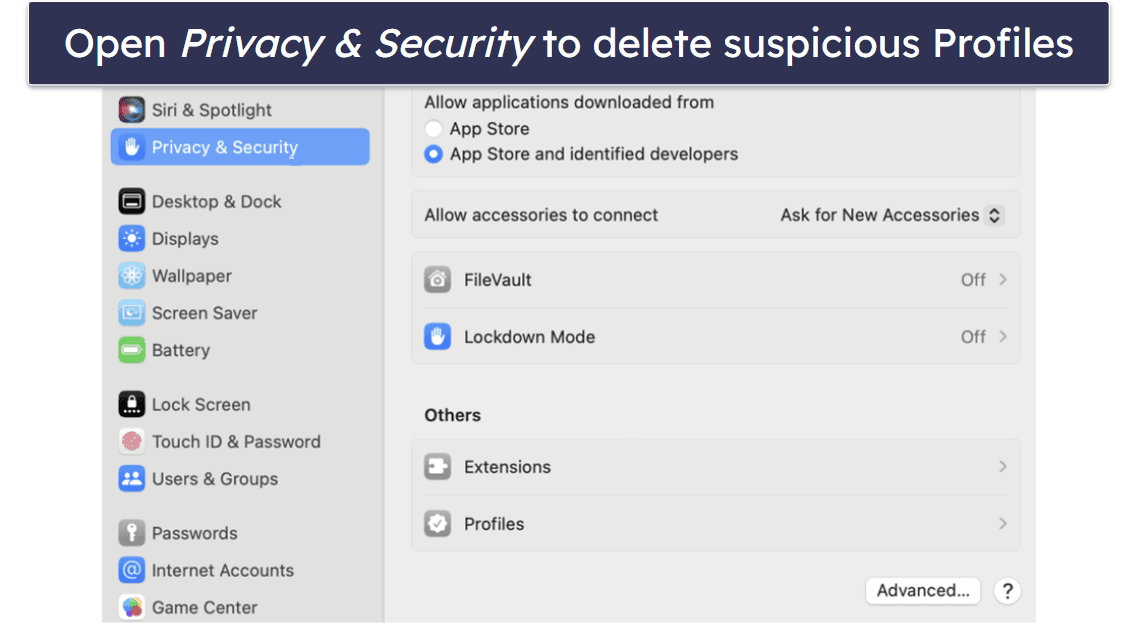
- Open System Settings > Users & Groups > Login Items. Remove Wave Browser if it appears in the list.
- Check for unwanted configuration profiles: go to System Settings > Privacy & Security > Profiles (if present). Delete any profiles linked to Wave Browser or Wavesor.

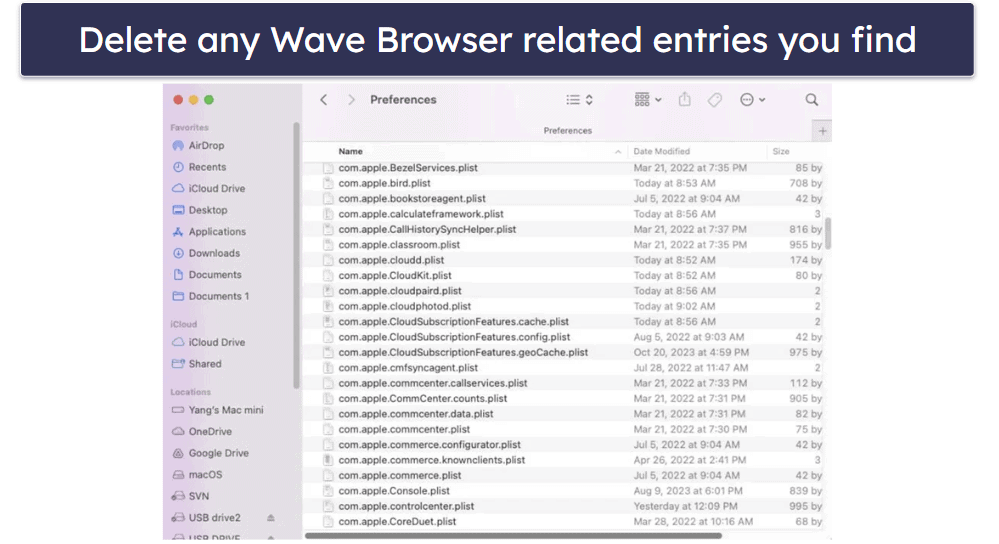
- Open Finder, press Shift+Command+G, and enter: ~/Library/Preferences/. Look for and delete any .plist files related to Wave Browser.

- If you use Safari, open it and go to Settings > Extensions to remove any suspicious extensions. Then go to Settings > Privacy > Manage Website Data and click Remove All to clear leftovers.
Step 2. Run a Full System Scan and Delete Infected Files
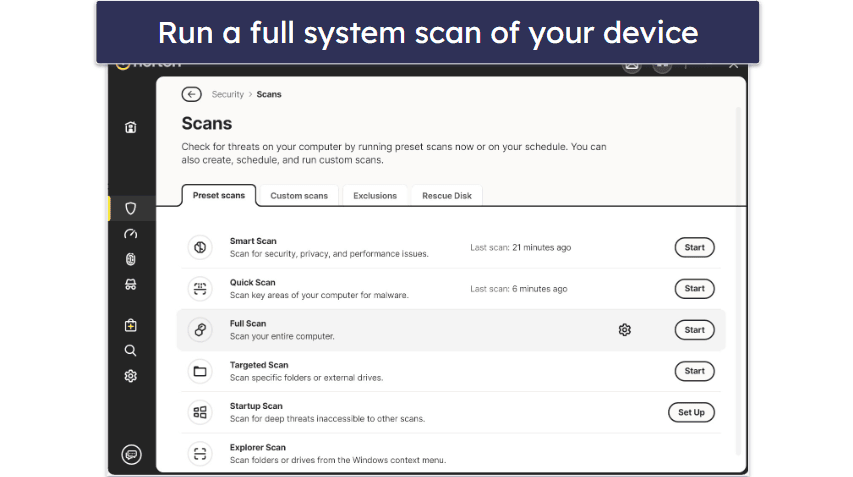
- First, use a trusted antivirus program like Norton to run a full scan of your computer. For best results, pair it with a PUP-specific tool such as Malwarebytes AdwCleaner, which is designed to detect adware and potentially unwanted programs like Wave.

- Don’t stop the scan just because it found a virus: There could be more malware hidden on your computer. Letting the scan finish ensures every instance of malware has been found and quarantined.
- Delete all the infected files: After the scan, your antivirus program will give you the option to delete everything it found. If you’re tech-savvy, you can inspect files first, but for most users it’s safest to simply remove them.
- Restart and run a second scan: Once all infected files are deleted, restart your computer and run another full system scan. Many users report that Wave remnants only show up on the repeat pass, so this step is key to making sure it’s completely gone. After you’ve deleted any more malicious files it finds, your computer should be completely free of malware. But remember, you’re not done dealing with Wave Browser yet!
- Move onto step 3. Although you’ve finished the scan and removed all instances of malware, you should still move onto step 3 and remove any leftover extensions that may still be in your web browser.

Step 3. Remove Wave Browser Extensions
Wave Browser extensions can also cause problems. They may not always be labeled “Wave,” so remove anything unfamiliar or untrusted.
Here’s how to do it:
Google Chrome
- Open Chrome.
- Click the Extensions button (it looks like a puzzle piece). If you don’t see it, click the 3 vertical dots in the top right corner of your web browser and hover your mouse over Extensions.
Note: In some versions of the Chromium browser, the vertical dots may be dashes.

- Select Extensions, then Manage Extensions.
- Remove any extensions you suspect are related to Wave Browser.
- If redirects continue, reset Chrome by going to Settings > Reset settings > Restore settings to their original defaults. You’re now ready to proceed to step 4.


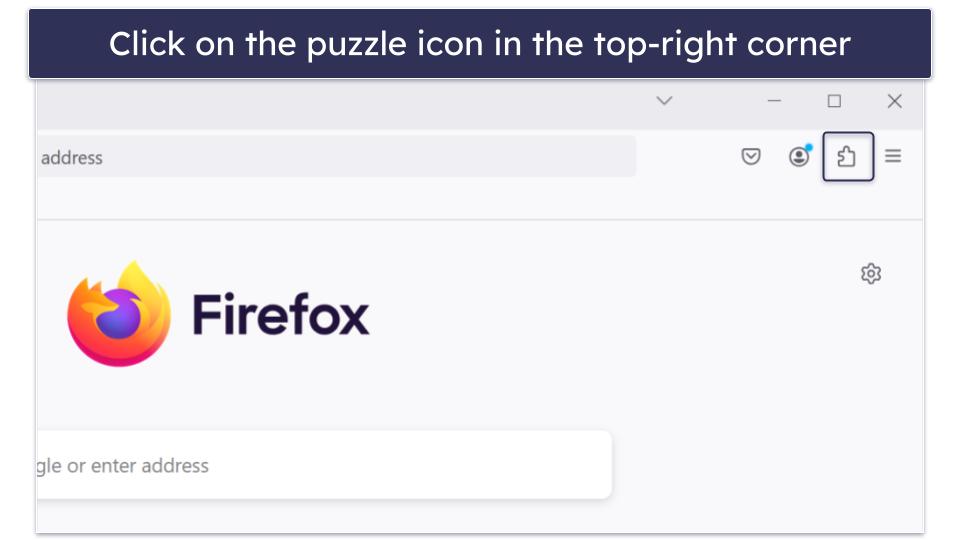
Mozilla Firefox
- Type “about:addons” in the Firefox address bar and click Extensions.
- Find the Wave extension, click the 3 dots, and choose Remove.
- This will open the list of all extensions installed in Firefox. Look for any related to Wave Browser. (If you’re unsure, click on the extension in question to read its description.)
- Remove any suspicious extensions you find by clicking the 3 dots to the right of the extension and selecting Remove.
- As an extra step, you can also reset Firefox by clicking the 3 horizontal lines and selecting Help > More troubleshooting information from the dropdown menu. (However, this removes all of your customization options in addition to your extensions.)
- Next, click Refresh Firefox… and confirm your choice.


Safari
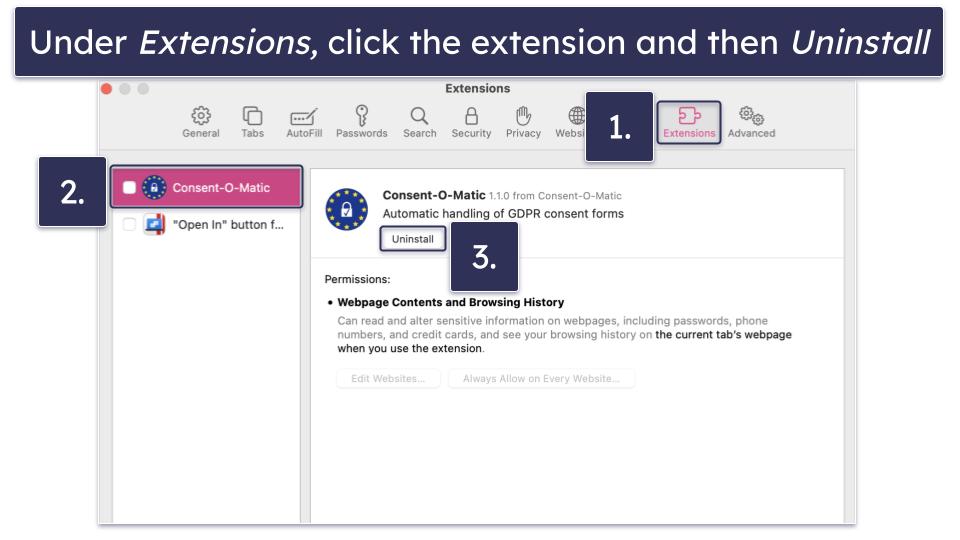
- Open Safari and click Settings from the dropdown Safari menu.
- Select the Extensions tab, and uninstall any extensions you don’t recognize, which may be related to Wave Browser.
- As the final solution, you can go to Settings > Privacy > Manage Website Data, then click Remove All to clear cached data that could keep triggering redirects

Step 4. Protect Your Device Against Future Threats
It’s important to protect your device from future threats now that you’ve removed the Wave Browser. Here’s how:
- Avoid “speed boosters” and fake cleanup tools: Wave Browser often spreads through ads that promise faster browsing or system optimization. These downloads are usually nothing more than PUP installers in disguise.
- Pay attention during software installs: Many freeware installers include Wave as a pre-checked “optional add-on.” Always choose custom install and uncheck anything you don’t recognize.
- Keep your software, OS, and drivers up-to-date: Outdated browsers, drivers, and operating systems create vulnerabilities that Wave and similar PUPs exploit. One way to avoid this is by making sure your software, operating system, and drivers are up-to-date. Outdated software can create vulnerabilities that hackers can exploit, which puts your computer at risk. Thankfully, developers often release security patches to address these issues. Just be sure to download and install them to stay protected. If you have an antivirus program like Norton, it can automatically update your programs for you and keep your computer secure.
- Get an antivirus with real-time PUP blocking: One of the best things you can do is invest in a reliable antivirus program. The right one will not only scan for infected files, but also offer real-time protection, a firewall, and automatic updates. To help, I’ve put together a list of recommended antivirus programs for you to choose from.
- Use a reputable password manager: This will help you create and store strong passwords for all of your online accounts, keeping your device secure. I recommend using a top password manager like 1Password.
- Consider a VPN with built-in ad blocking: Some VPNs, like ExpressVPN, filter malicious domains at the DNS level, blocking the ad networks that often distribute Wave Browser. It’s an optional step, but a great extra layer if you frequently download free software.
Editor’s Note: ExpressVPN and this site are in the same ownership group.
Quick Summary of the Best Antiviruses for Removing Wave Browser


What Can Happen if Wave Browser Is on Your System?
The Wave Browser, while not technically a virus, can pose significant risks to your system. Here’s what can happen if the Wave Browser is on your system:
- Unwanted ads and pop-ups. Wave Browser increases intrusive ads that disrupt browsing and often lead to phishing sites, including fake banking or crypto portals designed to steal credentials.
- Data tracking. The Wave Browser can track your data, making it accessible to cybercriminals. This could include your browsing habits, personal information, and even sensitive data like login credentials.
- Redirect loops and hijacked searches. Wave can override your search engine, forcing redirects that trap you in endless ad pages.
- Increased vulnerability to malware. While Wave Browser itself isn’t malware, it can make your computer more vulnerable to malicious software. This is because the browser can contain ads and links that may lead to malicious websites or downloads.
- High CPU/RAM usage. Users report that Wave consumes system resources excessively, slowing down PCs and draining laptop batteries faster.
- Changes to browser settings. Wave Browser can automatically become the default browser on your device and alter your browser settings without your consent. This can include changing your homepage or adding unwanted extensions.
- Potential phishing risks. The ads and links provided by Wave Browser could potentially lead to phishing sites, where hackers attempt to trick you into providing personal information.
- Compliance risks in workplaces. On corporate devices, Wave creates serious issues by running as unauthorized software that tracks browsing data, potentially violating company policies and data protection standards.
How Does Wave Browser Get Onto Your Device?
Wave Browser often finds its way onto devices through a process known as bundling. This is when the browser is included as an additional program in the installation process of other software. Many users accidentally install it because the option is hidden in the installer’s defaults.
In 2025, reports show even trickier methods:
- Pre-checked boxes in freeware installers. Most people click “Next” without unchecking these boxes, which silently approves Wave’s installation.
- Ads disguised as performance tools. Wave is often promoted through banners like “Speed up your browser” or “Boost your PC,” which trigger silent installs.
- Bundled with other PUPs. Removing one unwanted program can reinstall Wave if they’re linked together in the same installer.
- Generic or misleading publisher names. Wave may appear under labels like ISIGN International or Eightpoint, making it harder to spot in your installed apps list.
Because Wave uses these deceptive tactics, it’s not enough to just uninstall it. You also need to understand how it got there in the first place — otherwise, you risk it sneaking back in through the same methods.
What to Do if Wave Browser Comes Back
Even after following every step, some users find Wave Browser reappearing. Don’t panic, this usually means a persistence hook is still hiding. Here’s a quick fix workflow to wipe it out for good:
1. Boot into Safe Mode. This prevents Wave’s background processes from relaunching while you clean.
2. Delete scheduled tasks and startup entries. Open Task Scheduler and Task Manager > Startup to remove anything referencing Wave or Wavesor.
3. Run a PUP-specific scan. Use a tool like Malwarebytes AdwCleaner. It’s designed to catch the adware and hidden files that standard antivirus scans can miss.
4. Reset your browsers. In Chrome, Edge, Firefox, or Safari, reset settings to default and remove suspicious extensions. This clears search hijacks and hidden policy changes.
5. Clear cached data and flush DNS. Even after removal, cached files and DNS records can continue to trigger redirects.
- On Windows: open Command Prompt and type ipconfig /flushdns.
- On Mac: open Terminal and type sudo killall -HUP mDNSResponder.
Follow these steps in order, and Wave Browser should finally stay gone. If it still reappears after all this, the safest option is a fresh OS reinstall — but in most cases, the workflow above takes care of it permanently.
Frequently Asked Questions
Is Wave Browser a virus?
No, Wave Browser isn’t a virus. But it behaves like one, and has been associated with unwanted ads and redirects that can be annoying and intrusive. It forces changes to your system, tracking your data, and reinstalling itself through persistence mechanisms. That’s why many antivirus programs classify it as a PUP (potentially unwanted program).
What is Wave Browser used for?
Wave Browser is used for web browsing, similar to other browsers such as Google Chrome or Firefox. But in reality, it hijacks searches, serves intrusive ads, and collects your data. It’s not designed for safe, everyday browsing.
Why does Wave Browser keep coming back after I remove it?
Wave uses persistence tricks like scheduled tasks, registry keys, startup entries, and hidden extensions. Even if you uninstall the main program, these hooks can reinstall it automatically. Follow our troubleshooting workflow above to remove those hooks and stop it from returning.
How do I get rid of Wave Browser?
Uninstalling alone isn’t enough. Permanent removal requires deleting scheduled tasks, startup items, registry entries, leftover files, and browser extensions.
In addition to uninstalling Wave Browser from your Control Panel or Apps and Features, you may also need to remove any associated files and registry entries. You can also reset your browser settings to remove any changes made by Wave Browser. Take a look at the exact process in our step-by-step guide.
How do I protect my device from Wave Browser?
Firstly, be careful with your clicks. Avoid clicking on suspicious ads or links, which could lead to harmful websites or downloads. Also, remember to only download files from trusted sources.
You should also regularly update your software, operating system, and drivers to patch any exploitable vulnerabilities. Finally, make sure to invest in a reliable antivirus program. A high-quality program like Norton is an essential tool to help you stay protected.
Is it safe to install Wave Browser?
No. While it functions as a browser, it puts your privacy and security at risk through aggressive tracking and may contain malware and suspicious links.
It’s always recommended to use well-known and trusted browsers such as Chrome, Firefox, or Safari for a safer browsing experience.
Is Wave Browser a browser hijacker?
Yes, Wave Browser is often classified as a browser hijacker. This is due to its tendency to change browser settings without the user’s consent. It can change your default search engine and homepage and display intrusive ads, which can lead to a less secure browsing environment.


… [Trackback]
[…] Find More here to that Topic: geeksforgeeks.org/how-to-uninstall-wave-browser-complete-2025-guide/ […]