

Ana Jovanovic
Updated on: November 15, 2025
Fact-checked by Kate Davidson
Only 3 Steps (Quick + Easy) to Change Your IP Address on Mac:
- Choose a good VPN for Mac. I recommend ExpressVPN – it has the fastest speeds, servers in 105 countries, and an easy-to-use macOS app.
- Download and install the app. Follow the installation instructions provided by the VPN service to install it on your Mac.
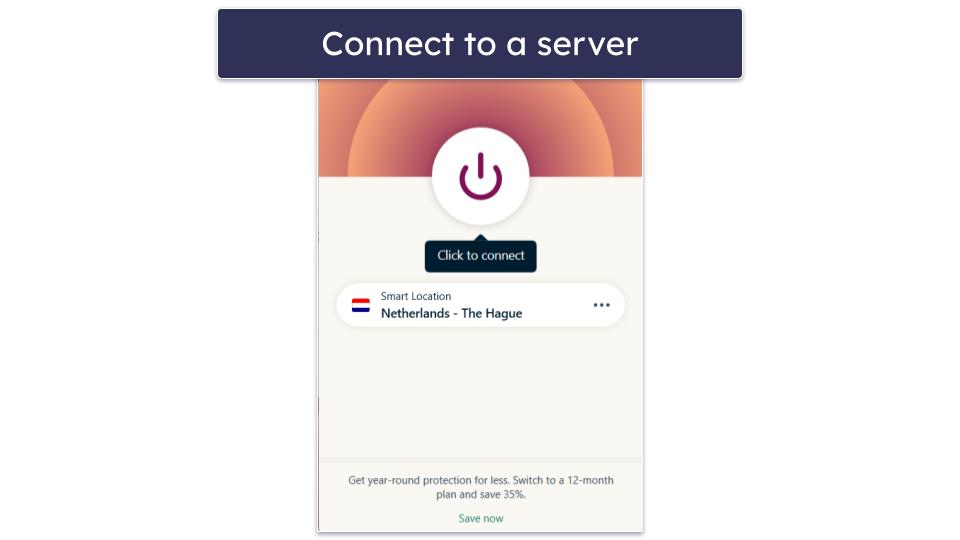
- Connect to a server. Open the VPN app, select a server in your desired location, and connect. Your IP address will automatically change to match the server’s location.
You can use several methods to change your IP address on Mac. For example, you can manually configure your IP settings, reset your router if it uses a dynamic IP address, set up a proxy server, or use a virtual private network (VPN). Each option potentially works well, depending on how much effort you want to put in and how willing you are to get technical.
As a rule, manually changing your IP address or using a proxy server requires more effort and technical ability. That’s why most people go with a VPN — it’s the simplest and fastest solution and doesn’t require any tech know-how.
A VPN like ExpressVPN makes it really easy to change your IP address without fiddling around with any network settings, and you can try it out completely risk-free. Learn how to effortlessly change your Mac’s IP address now. Editor’s Note: ExpressVPN and this site are in the same ownership group.
How to Change Your Mac’s IP Address Using a VPN
The fastest way to change your Mac’s IP address is by using a virtual private network (VPN). It’s simple to set up, requires no complex network adjustments, and provides added privacy and security. Many VPNs even offer free trials or risk-free money-back guarantees, so you can test the service before committing. Here’s a step-by-step guide to setting up a VPN.
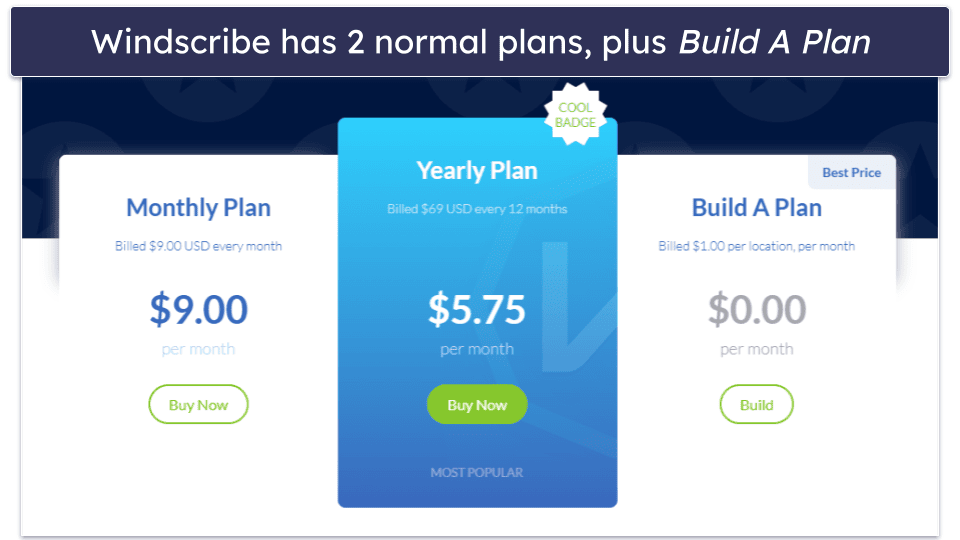
- Pick a VPN that suits your needs. Though I’ll be using ExpressVPN as an example here, it’s by no means the only good option. If you need help choosing one, you can check out our list of the top VPNs in 2025.

- Choose a plan that works best for you and sign up. Again, you don’t have to pick ExpressVPN if you don’t want to — but it does offer the best value on the market in my testing and experience.
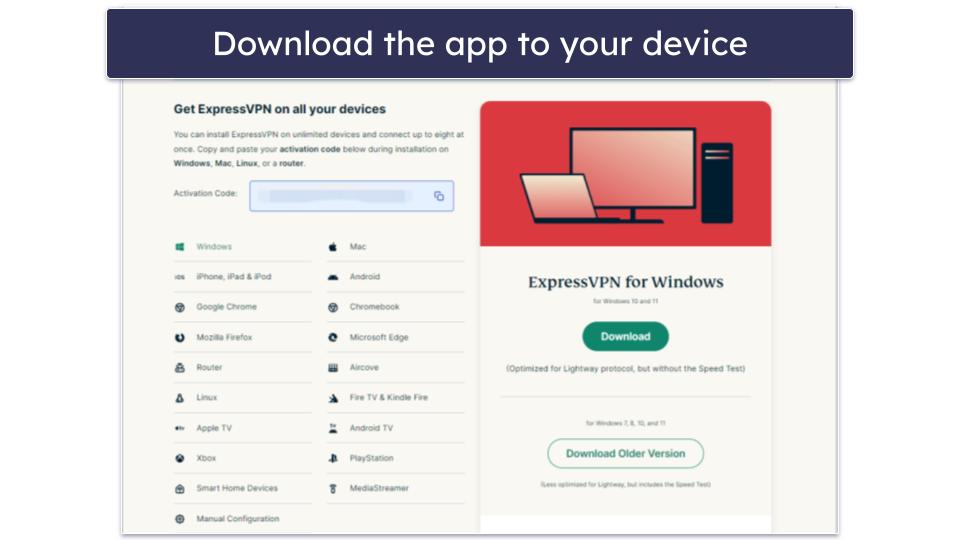
- Download the app and install it onto your Mac.
- Fire up the app and choose a new server to change your IP address — and you’re done! Your Mac is now using a different IP address.
As you can see, using a VPN is the easiest option — but if you’d like to explore other methods, check out the manual options below. Just keep in mind that these methods may take more time, involve more effort, and aren’t always guaranteed to work.

How to Change Your Mac’s IP Address Manually
Changing your Mac’s IP address manually might seem intimidating, but it doesn’t have to be. Follow this step-by-step guide to find out how.
Method 1: Restart Your Wi-Fi Router
Resetting your Wi-Fi router will change your Mac’s IP address if your ISP uses dynamic IP addresses (dynamic host configuration protocol — or simply DHCP). Most ISPs use dynamic IP addresses nowadays, but some still offer static IP addresses as an optional service.
You can use your Mac to find out if your ISP uses dynamic IP addresses. Here’s how:
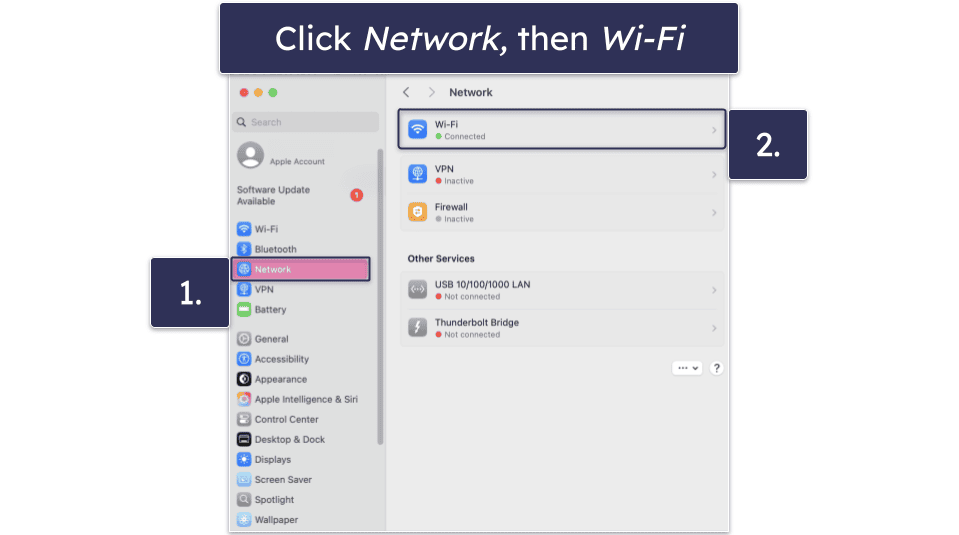
- Click the Apple logo in the top left of the menu bar, then click System Settings.

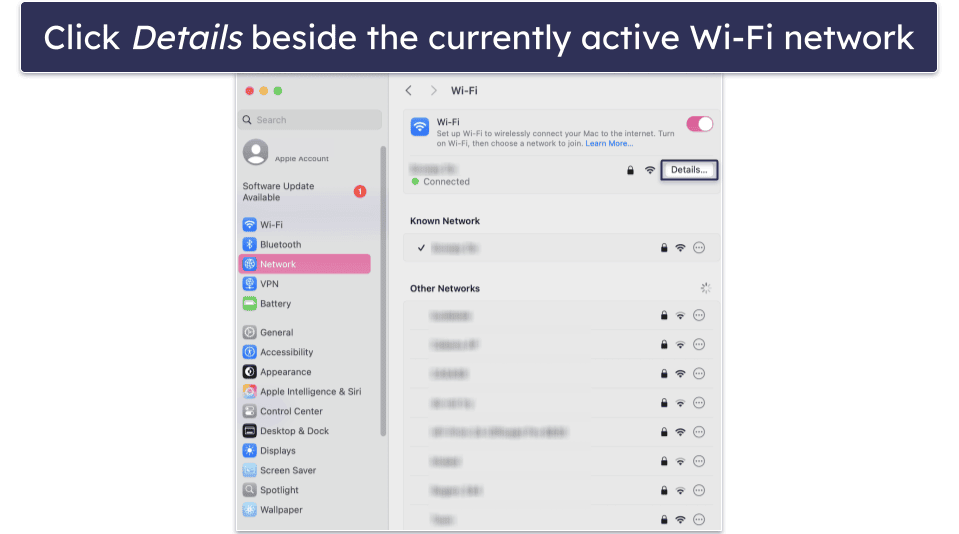
- Click Network → Wi-Fi.
- Find the network you’re connected to, then click Details.
- Click TCP/IP.
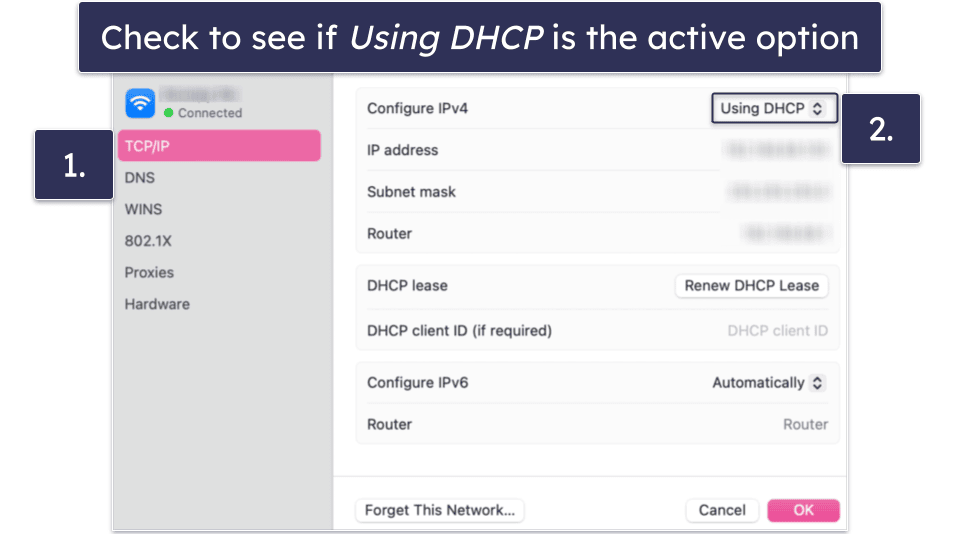
- Check to see if it says Using DHCP beside “Configure IPv4”. This indicates that your ISP uses dynamic IP addresses. If this is the case, proceed to Step 6. If you discover you have a static IP address, follow these instructions instead.
- If your ISP uses dynamic IP addresses, you can reset your router to get a new one. To do this, simply unplug it from the power source and then plug it back in. Note, however, that it may take some time for your IP address to change (this can vary from a few seconds to a few hours, depending on the ISP).
Method 2. Choose a Different IP Address
If your ISP is using DHCP, there are additional ways to change your IP address. Here’s one.
- If you haven’t already, follow steps 1–4 from Method 1 here.
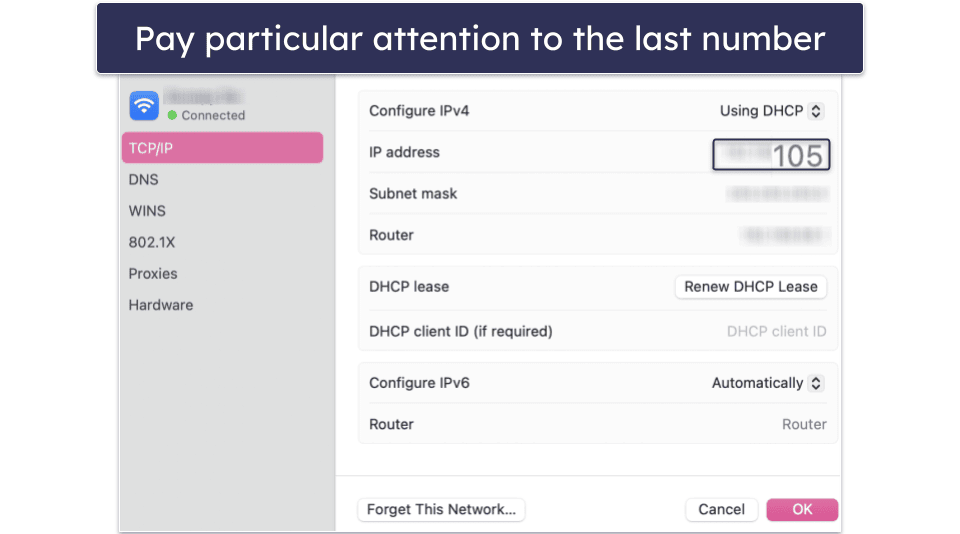
- At this point, take note of your IP address (particularly the number after the last period). It will say something like 192.168.XX.XX or 192.168.XX.XXX. Write this entire number down somewhere and keep it safe.
- Next, click the Using DHCP drop-down menu, then choose Manually.
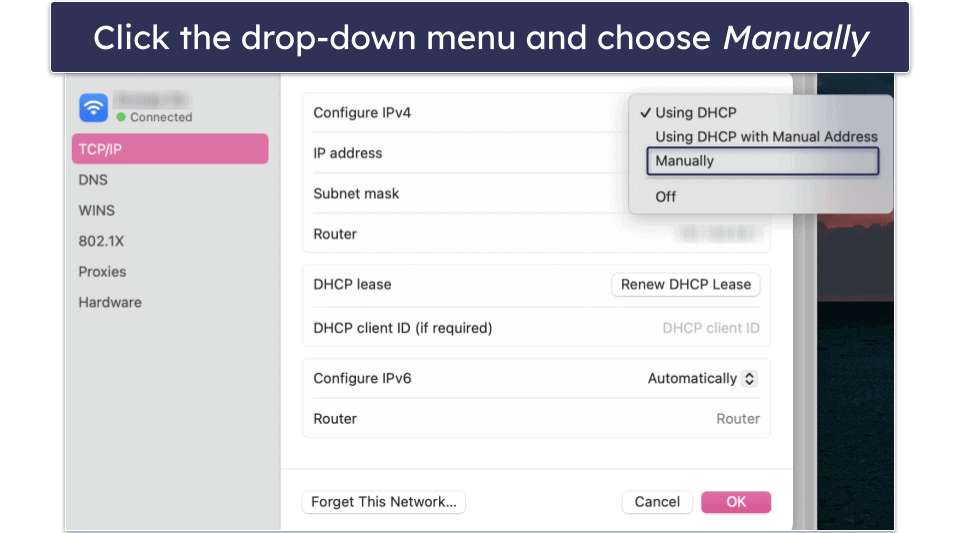
- Once you’ve chosen the manual option, enter a new IP address of your choice. Keep the first 3 sets of numbers the same; only change the final number. If the final number of your IP address is between 0 and 255, choose a new number within this range.
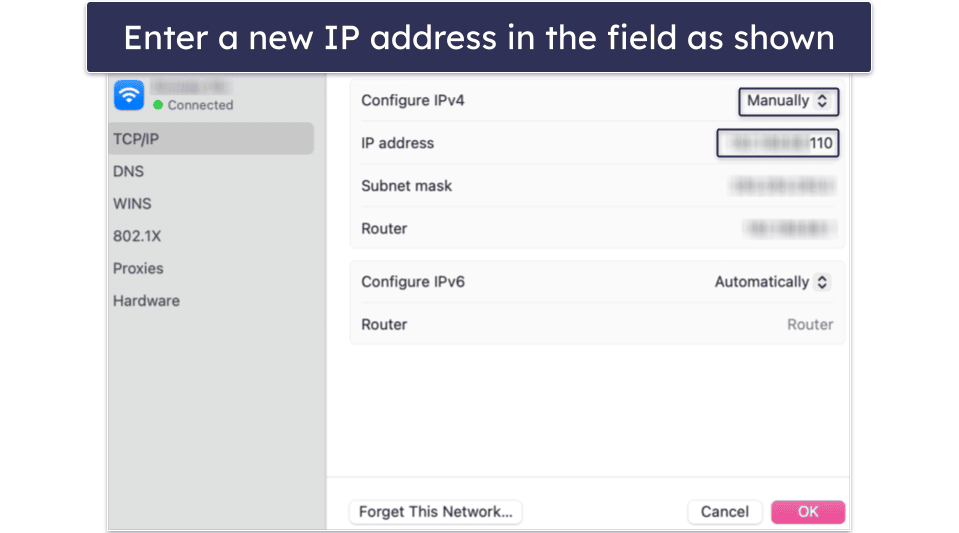
- Note: Your new chosen IP address might not work if it’s already being used by someone else — you’ll have to try it to confirm this. Once you’ve settled on a new IP address, click OK. Then, try to use the internet by opening a web page to check if it has worked. If your Mac can’t establish a connection to the internet, keep trying different IP addresses until you find one that works.
Method 3: Use a Proxy Server
Though not recommended, a proxy server can act as an intermediary between your Mac and the internet. It’ll essentially allow you to use a different IP address without directly changing your Mac’s network settings.
Proxies are a decent option for masking your IP address and accessing region-specific content, but a VPN will always be the more seamless and reliable choice. If you still want to try your hand at using a proxy, here’s how to set one up on your Mac:
- Obtain a proxy server’s address and port number. You can find free proxy servers online, but keep in mind they may be less reliable or secure. Paid proxy services may offer better performance and privacy.
- Perform steps 1–3 again here — then, come back here to continue with Step 3.
- This time, click Proxies instead of TCP/IP. If you’re using a web proxy (HTTP) or a secure web proxy (HTTPS), check the appropriate box and enter the proxy server’s address and port number. For other types of proxy (like SOCKS), select the relevant option and input the required details.

- After entering the proxy information, click OK to save your settings. Open a web browser and try to load a page to ensure the connection works.
Method 4: Switch Networks or Use Your Mobile Wi-Fi Hotspot
Changing your network is an easy way to get a new IP address. When you connect to a different network, whether it’s another Wi-Fi network or your mobile hotspot, your Mac will automatically receive a new IP address.
- Click the Wi-Fi icon, select Wi-Fi Settings, and choose another network. Enter the password if required.
- If you don’t have access to another Wi-Fi network, you can use a mobile hotspot from your phone. Create a hotspot on your smartphone, then connect your Mac to it via Wi-Fi settings. (Note: You don’t have to create a Wi-Fi hotspot on your iPhone — you just have to connect your Mac to it because it already exists. Just make sure you’re signed into the same Apple account on both your Mac and iPhone and simply connect to your iPhone like you would connect to any other Wi-Fi network.)
- Verify your new IP address. Check your current IP by Googling “what’s my IP” or going to System Settings → Network → Wi-Fi → Details → TCP/IP.
- To change your IP address again, just toggle airplane mode on and then off on your phone. Once your phone’s network resets, reconnect your Mac to the hotspot.
Method 5: Contact Your ISP
If you have a static IP address, the methods described here won’t work. Instead, you can contact your ISP to request a new address.
You can ask your ISP to switch you to a dynamic IP, which changes periodically or after a router reset.
Alternatively, you can ask your ISP to assign you a different static IP address. This might involve a small fee or require you to explain why you need the change.
Some ISPs don’t allow frequent IP changes, or might limit how often you can request a new one. If that’s the case, a VPN is by far the simplest solution.
Method 6: Clone Your MAC Address
Cloning your media access control (MAC) address can help you get a new IP address from your ISP.
A MAC address is a unique identifier assigned to your network adapter, and many ISPs use it to assign IP addresses. By cloning your MAC address, you trick your ISP into seeing your device as a new one, which prompts the assignment of a new IP address. Though every router is different, here’s a general overview of how to do it:
- Open a web browser and enter your router’s IP address to open its control panel. Usually, it’ll be something like 192.168.1.1 or 192.168.0.1. Then, log in with your credentials. Note: If you don’t know what your specific router’s IP address is, you can search for this information on Google. For example, search for “[router brand and model] default IP address and password”. Some Wi-Fi routers (such as TP-Link’s Deco mesh pods, for instance) also require you to download an app on your phone to access all settings and features.
- Look for an option like MAC Address Clone or MAC Address Spoofing in your router’s settings menu.
- Turn on the feature and input a new MAC address. You can make small adjustments to your current address, such as changing a few digits.
- Save your changes and reboot your router to apply the new settings.
Once your router restarts, your ISP should assign a new IP address to your connection. This method can be effective, but the process varies depending on your router model, so refer to its user manual for detailed instructions.
Pros & Cons of Setting an IP Address Manually
Manually setting an IP address on your Mac has its benefits, but it also comes with some downsides compared to using a VPN.
Pros
- Free of cost. Unlike some solutions, manually changing your IP address doesn’t require any additional software or subscription fees. That said, you don’t always have to pay for a VPN, either — check out our curated list of the top free VPNs.
- Greater control. You can have full control over the specific IP address you want to assign, which can be useful for troubleshooting or specific network setups.
Cons
- Time-consuming and complex. The process involves navigating through your Mac’s network settings and understanding IP address configurations, which can be confusing for beginners.
- No encryption or anonymity. While you can change your IP address, your internet activity remains unencrypted, leaving your data exposed to potential security threats.
- Trial and error. Manually choosing an IP address can involve multiple attempts to find one that works without conflicts.
For most users, the simplest and fastest way to change an IP address is by using a VPN. A VPN allows you to change your IP address with just a few clicks while encrypting your connection for added security. The best VPNs today (like ExpressVPN, for example) make this entire process super simple.
Editor’s Note: ExpressVPN and this site are in the same ownership group.
Frequently Asked Questions
How do I change my IP address on my Mac?
You can change your Mac’s IP address using several methods. You can use a VPN, manually configure your network settings, use a proxy server, or switch to a different Wi-Fi network. Which method will work best for you depends on your needs and technical comfort level.
Can I change my IP address myself?
Yes, you can easily change your Mac’s IP address yourself. The process can be as simple as restarting your Wi-Fi router, manually changing settings in your network preferences, or using a VPN. However, some methods may require a basic understanding of network configurations, while others are beginner-friendly. Overall, for most users, using a VPN is the simplest and fastest way to change an IP address, offering convenience without needing technical expertise.
How do I set my Mac IP address?
To set your Mac’s IP address manually, go to System Preferences → Network → Wi-Fi → Details. From there, choose TCP/IP and select the Manually option from the “Configure IPv4” dropdown. You can then enter a new IP address.
If you need some help with this process, check out the full guide above on how to manually change your Mac’s IP address.