This article was published as a part of the Data Science Blogathon
Introduction
Stages in Snowflake are locations used to store data. If the data that needs to be loaded into Snowflake is stored in other cloud regions like AWS S3 or Azure or GCP then these are called External stages whereas if the data is stored inside Snowflake then these are called Internal stages.
Table of Contents
1.Internal Stages
First, I will walk through in detail the Internal Stages.
Internal Stages are further divided as below
- User Stages
- Table Stages
- Internal Named stages
Before ingesting data into a table in Snowflake, data has to be loaded into a stage using the PUT command, and then it has to be loaded into the table using the COPY INTO command. Similarly, if we need to unload the data from a table, it has to be loaded into the stage using the GET command, and then it has to be exported using the COPY INTO command.
Note that there is a slight change in the syntax based on whether the local system is Unix or windows. I have used windows based system to store the local files in this article.
As of now, all the tasks are done via the SNOWSQL command-line interface. SNOWSQL is a client tool where you can install on your local machine and then connect to the snowflake. When you load the data from local to the stage, snowflake automatically compresses the file. If you check the file in the stage after loading you will see an extension of .gz all the time inside the stage.
1.a.User stages
User stages are tied to a specific user. Every user has a default stage created. We will not be able to either modify or remove these stages.
We can copy the files to these stages to load them further into the table. Once the load is completed we need to ensure to remove these files explicitly otherwise we need to pay for storage. Files in one user stage cannot be accessed by another user. So if you need to load multiple tables from a specific user then this is the best option. We need to refer to the user stages using ‘@~’
1.b.Table stages
Table stages are tied to a specific user. Whenever a table is created, then automatically table stage is created. Similar to the user stage will not be able to either modify or remove the table stage, however, we need to clean up space after the files are loaded. The table stage for a particular table cannot be accessed through another table. So if you need to load one table then you can choose the table stage. We need to refer to the user stages using ‘@%’
1.c.Internal Named Stages
These stages offer more flexibility compared to user or table stages. These are some of the snowflake objects. So all the operations that can be performed on objects can be performed on Internal named stages as well. We need to create these stages manually and we can also specify the file format options while creating the stage itself which is unlike the table or user stage. We need to refer to the user stages using ‘~’.
2.Use Case for Internal Stage
2.a.Problem Definition
Load source files from the local system into multiple tables in snowflake and then process the data. Processed data will be available in the target table. Unload the data from the target table into a file in the local system.
Note: Since the processing of data is out of scope for this article, I will skip this. I will populate the data in the target table manually. Let’s assume that aggregation of a particular employee salary.
2.b.Solution
Since we need to load multiple tables here, we can either go for the user stage or named stage. Processing the data is out of scope for this article, so I have not included that part. Assume that processed data is available in the target table. Since it is a single target table, we can use either table stage or named stage to unload the data from a table.
2.c.Steps to be Implemented
- Connect and log in to SNOWSQL.
- Load all the files from the local disk to the user stage using the PUT command.
- Load the files from the user stage to the source tables in snowflake using the COPY INTO table command.
- Unload the file from the target table into the table stage using COPY into the table stage.
- Unload the stage and copy it into the local system using GET.
- Clean all the files in the stages to avoid billing for storage.
2.d.The Architecture of the Implementation
Image source: Author
2.e.Naming Conventions
To understand easily I will use the naming conventions as below
- Source Files in local disk – F_EMP_SAL1.txt,F_EMP_SAL2.txt
- Source Tables :T_EMP_SAL1,T_EMP_SAL2
- User stages : STG_EMP_USER
- Target table: T_EMPTARGET
- Table stages: STG_EMP_TABLE
- Target file in local: F_EMP_TARGET
2.f.Pre-requisites for Implementation
- SNOWSQL should be installed in the client machine.
- Snowflake free trial account. If you do not have then check this article on how to create a free trail account on the snowflake.
- Local txt Files with content is as below:
- F_EMP_SAL1.txt
1,aaron,3000
2,vidhya,4000
- F_EMP_SAL2.txt
1,Ben,7000
2,vidhya,2000
- Source and target tables are created in Snowflake with the below script
 use role accountadmin;
 use warehouse compute_wh;
 use database DEMO_DB;
 use schema PUBLIC;
 create table T_EMP_SAL1(emp_id integer,emp_name varchar,empsal float);
 create table T_EMP_SAL2(emp_id integer,emp_name varchar,empsal float);
 create table T_EMP_TARGET(emp_id integer,emp_name varchar,empsal float);
 insert into T_EMP_TARGET
 values
  (1,'Aaron',8000),
  (1,'Vidhya',4000),
  (1,'Ben',7000);
2.g.Implementation
We will see the code used in this section
Code

#Logging into SNOWSQL

snowsql -a <>.ap-south-1.aws -u <>

#1.Load all the files from the local disk to the user stage using PUT command

use role accountadmin;

use warehouse compute_wh;

use database DEMO_DB;

use schema PUBLIC;

put file://D:SnowflakeContentF_EMP_SAL1.txt @~;

put file://D:SnowflakeContentF_EMP_SAL2.txt @~;

select * from T_EMP_SAL1;#This returns empty table

select * from T_EMP_SAL2;#This returns empty table

#2.Load the files from the user stage to the source tables in snowflake using COPY INTO table command

copy into T_EMP_SAL1 from @~/F_EMP_SAL1.txt;

copy into T_EMP_SAL2 from @~/F_EMP_SAL2.txt;

select * from T_EMP_SAL1;

select * from T_EMP_SAL2;

#3.Copy the file from target table into the table stage

copy into @%T_EMP_TARGET from T_EMP_TARGET;

select * from T_EMP_TARGET;

#4.Unload into local system using GET.

get @%T_EMP_TARGET file://D:SnowflakeContent

#5.Clean all the files in the stages to avoid billing for storage.

list @~;

rm @~ pattern='.*txt.*';
rm @%T_EMP_TARGET;
Let’s see the output now for all the above commands
Image Source – Author
Image Source – Author
2.h.Output
Let’s see if the file is exported.
Image source: Author
3.External Stage
If the files are located in an external cloud location, for example, if you need to load files from AWS S3 into snowflake then an external stage can be used.
Unlike Internal stages, loading and unloading the data can be directly done using COPY INTO. Get and Put commands are not supported in external stages. The external stage can be created via Web user interface or SNOWSQL as well. We will see how to create using the web user interface.
4.Use Case for External Stage
4.a.Problem Definition
Load files from AWS S3 into a snowflake table using an external stage.
4.b.Prerequisites
- To perform this demo, you need to have an AWS account.
- An access key and secret key to connect to AWS account.
- Create a table where data needs to be loaded in snowflake with the below script
4.c.Steps for Implementation
1.Create an AWS S3 bucket as shown below
Image source: Author
3. Create an external stage in snowflake using AWS keys
The media shown in this article are not owned by Analytics Vidhya and are used at the Author’s discretion.


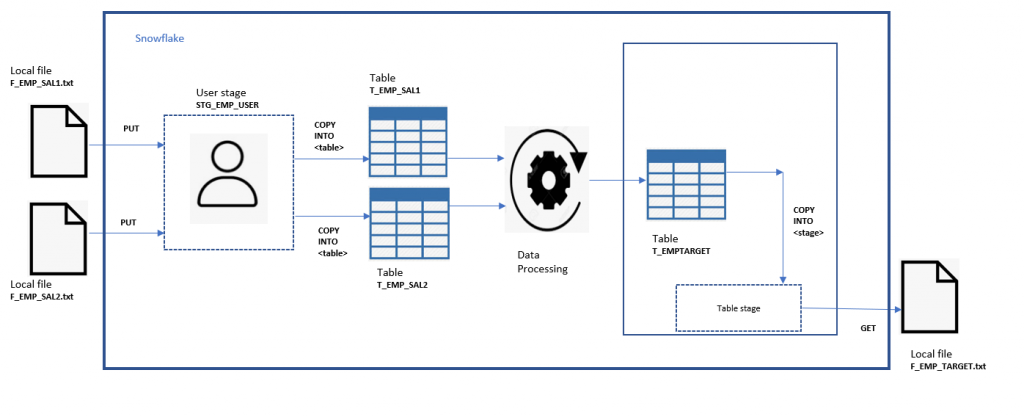
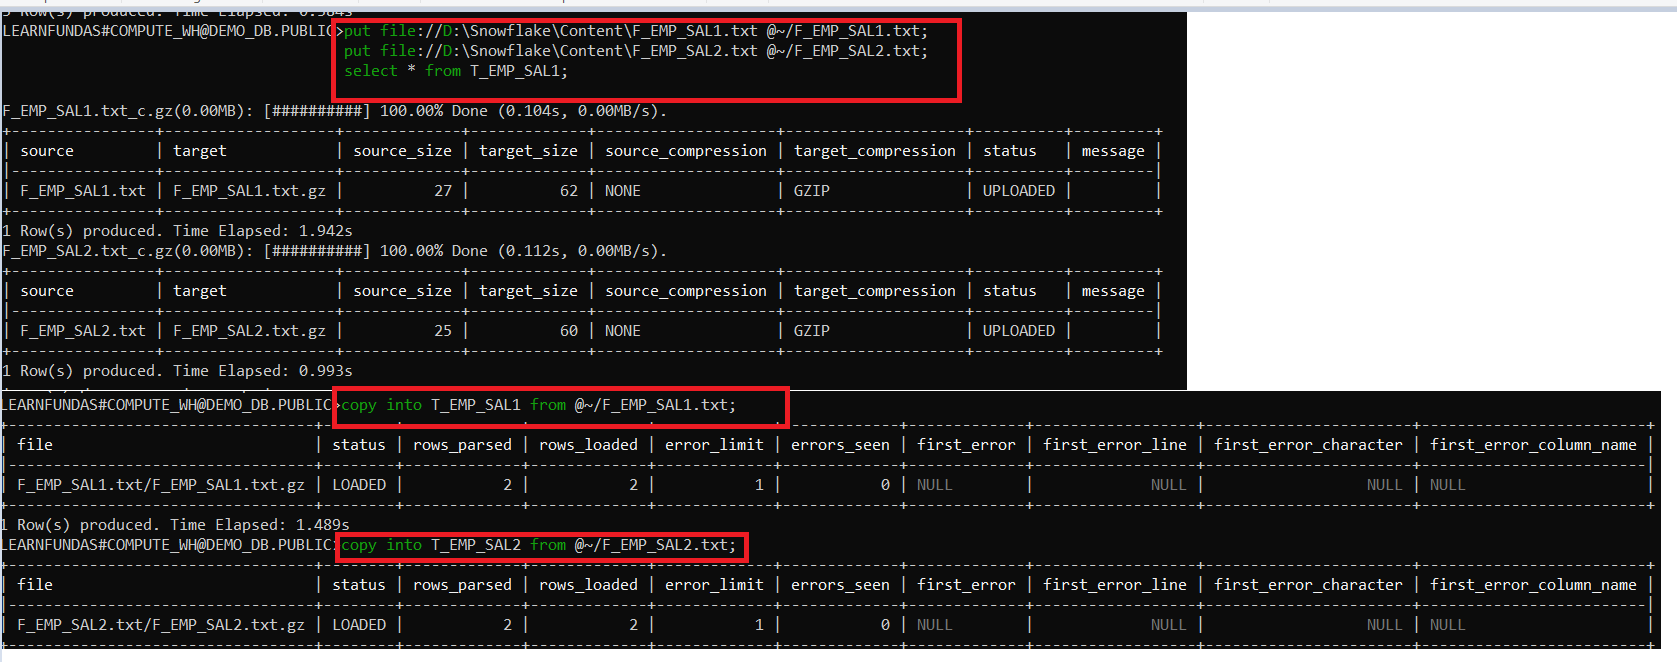
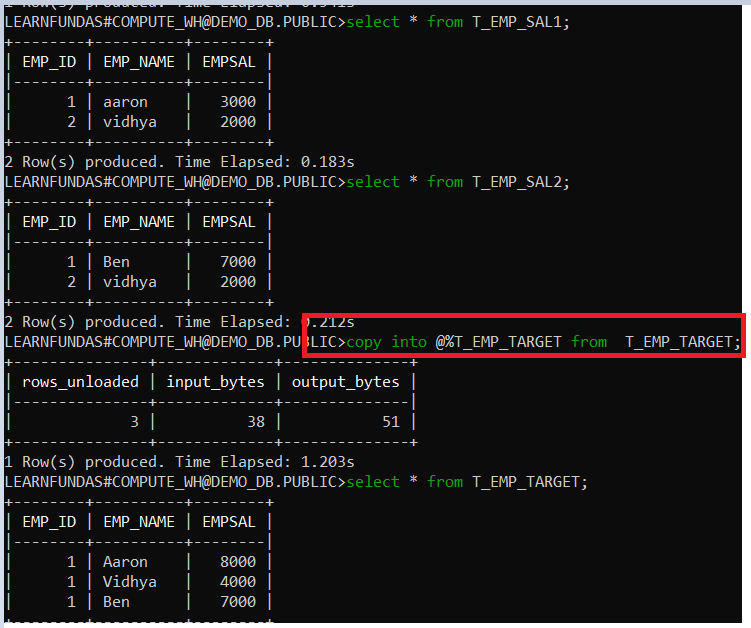
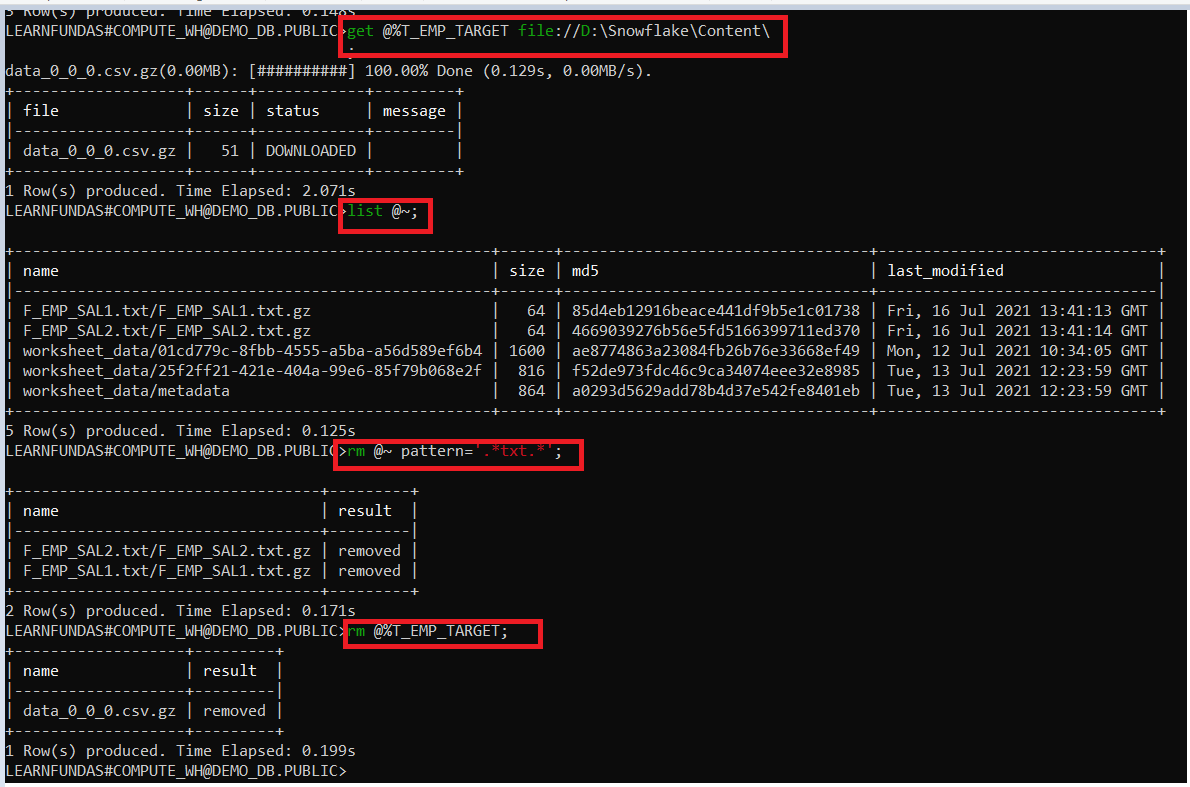

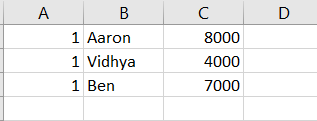

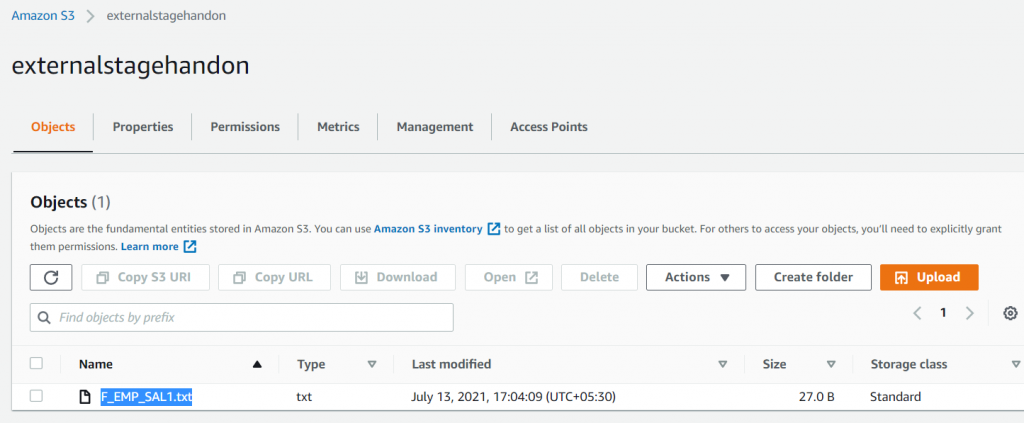
 Image source: Author
