This article was published as a part of the Data Science Blogathon.
Introduction
“Learning is an active process. We learn by doing. Only knowledge that is used sticks in your mind.- Dale Carnegie”
Apache Kafka is a Software Framework for storing, reading, and analyzing streaming data. The Internet of Things(IoT) devices can generate a large amount of streaming data. An Event Streaming platform like Kafka needs to handle this constant flux of data and process this data sequentially. I feel that building a simple data pipeline use case can help us understand the concepts. In this article, I want to walk through building a simple real-time data pipeline using Apache Kafka. I would like to focus on the implementation rather than the theoretical aspects. I would recommend to readers new to Kafka to look up my other Kafka articles on Analytics Vidhya to cement their understanding of the concepts before jumping into building the data pipeline.
Concepts Revisited

A messaging system is used for transferring data from one application to another application. The messaging system should handle the data sharing between producer and consumer applications and let the applications focus on data. Apache Kafka is a publish-subscribe-based durable messaging system. Kafka is used to building real-time streaming applications (a streaming application consumes streams of data ).

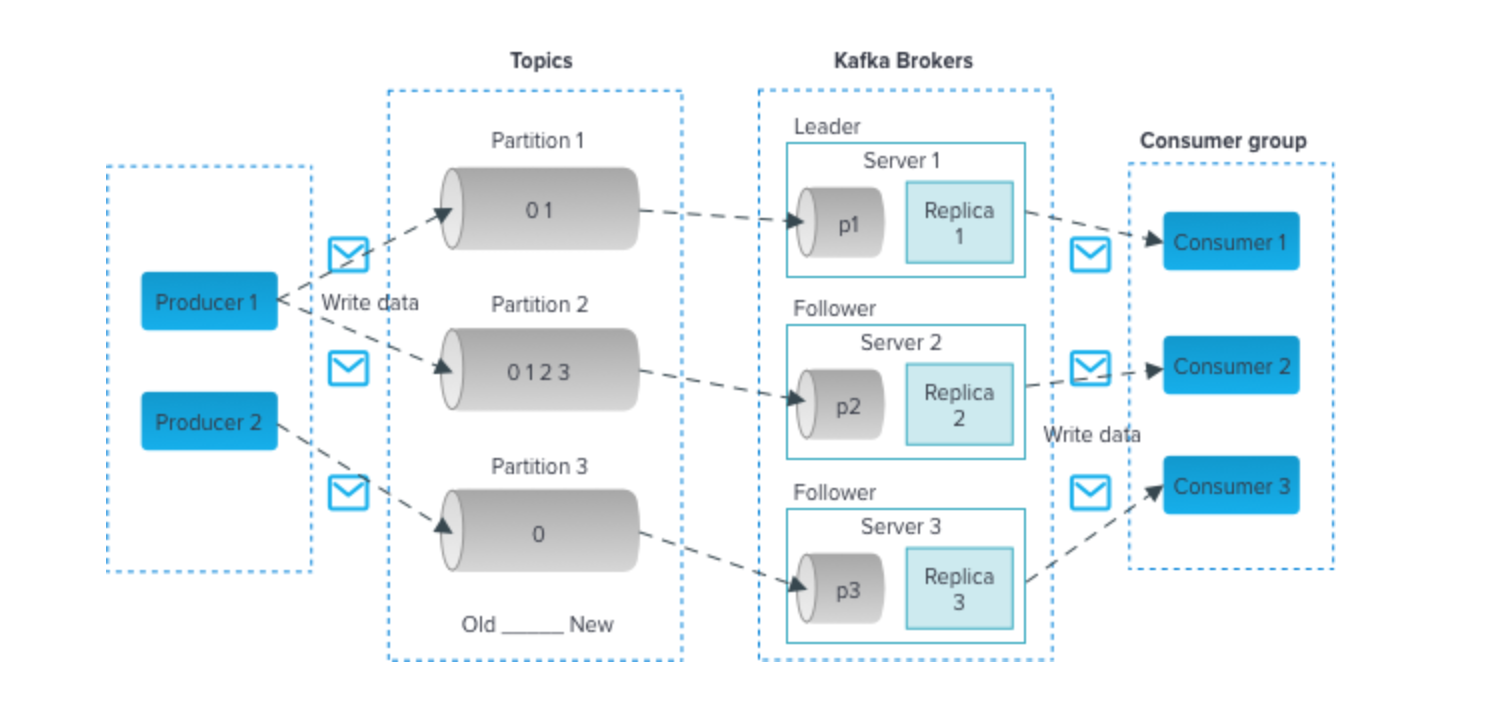
The above diagram gives a snapshot of the main terminologies involved in Kafka. Let’s go over one by one,
(a) Topic – In Kafka, the category name to which messages are published is a topic. We can think Topic similar to a particular section in a Newspaper like Current Affairs, Sports, etc. Producer applications produce messages about the topic, and Consumer applications can read from the topic.
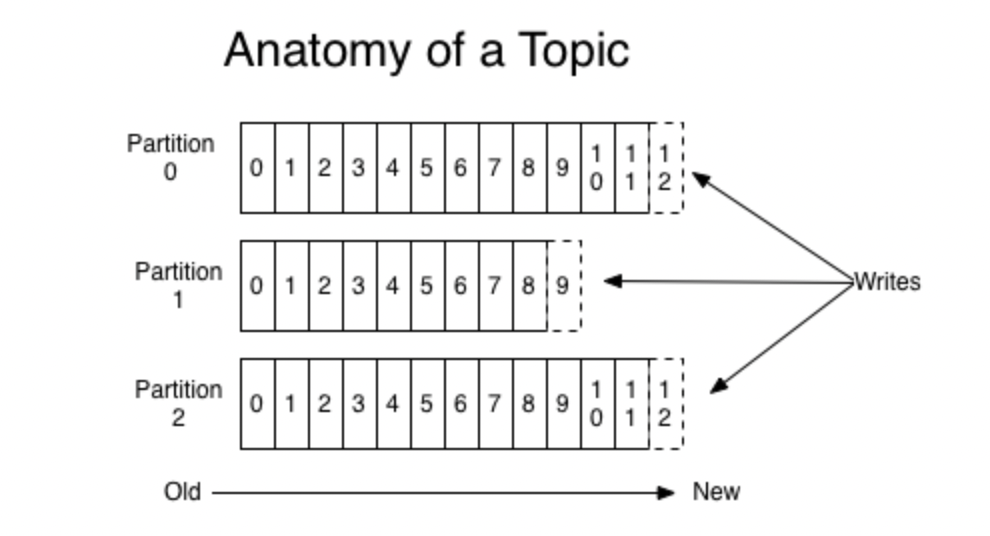
(b) Partitions – A Topic is stored in partitions for redundancy and faster processing of messages. Kafka ensures messages are in the order they reach a Partition. The Partition is numbered from ‘0’. The hash of the key is used to determine the Partition the message is to be directed to, and if there is no key in the message, a round-robin system is followed.

The messages in assigned an identification number called offset, which identifies a particular record in Partition.
The messages are retained for a period defined by the retention policy. Replicas of each message are organized by Kafka (a Replication Factor, viz, number of copies is defined) in partitions to provide redundancy.
(c) Broker – It is a Kafka Server in a Cluster. There can be one or more Brokers in a Kafka Cluster.
(d) Zookeeper – Keeps metadata of the cluster
(e) Consumer Groups – Consumers are part of a Consumer Group, where each message of a Topic is consumed only by one of the consumers in the group.
Building a Simple Data Pipeline
We have briefly reviewed Kafka’s terminologies and are ready to create our Kafka real-time data pipeline. The use-case is to create a simple producer application that will produce messages with real-time stock data of Tesla. We will create a single Broker Kafka Cluster for the Producer to write the records to a topic. Finally, we will write a Consumer application to read real-time data from the topic. We will use the Python API of Apache Kafka for writing Producer and Consumer applications.
Kafka with Docker- Data Pipeline
Docker is one of the popular Container applications used to create, package and deploy software applications. We can install Kafka on our local machine and create a local Kafka Cluster. I feel a better option would be to use Docker to create our Kafka environment. We need to have docker and docker-compose installed on our machine. I would advise you to go for the installation of Docker-Desktop.
A single node Kafka Broker would meet our need for local development of a data pipeline. We can create a docker-compose.yml file containing the services and the Configuration for creating a single node Kafka Cluster. To start an Apache Kafka server, we need to start a Zookeeper server. We can configure this dependency in our docker-compose.yml file to ensure that zookeeper is started before the Kafka server and stops after. The content of docker-compose.yml file is given below,
version: '3'services:zookeeper:image: wurstmeister/zookeepercontainer_name: zookeeperports:- "2181:2181"kafka:image: wurstmeister/kafkacontainer_name: kafkaports:- "9092:9092"environment:KAFKA_ADVERTISED_HOST_NAME: localhostKAFKA_ZOOKEEPER_CONNECT: zookeeper:2181
The yml file above contains two services, zookeeper and Kafka. We are using the image from wurstmeister, and the zookeeper will run on Port 2181 and the Kafka server on Port 9092.
Once you have installed docker and docker-compose on your system, create a project directory on your machine. Create a python Virtual Environment within this project directory. I have used conda to create my virtual environment. The virtual environment will give us a secluded environment to run our project, and we can keep the project environment clutter free by installing only the dependencies we need for our application. There are other options to create a python virtual environment, and please feel free to use one convenient to you and activate the virtual environment. I am using a Mac machine in this demo, and there could be minor changes in some of the commands if you are using a Windows machine. I would advise you to look up sites like StackOverflow to resolve any emergent error.
In the project folder, create the above docker-compose.yml file with the help of a text editor(my personal preference is VisualStudio Code), and name the file docker-compose.yml. Now head over to the Terminal and run the following commands to get the Kafka up and running,
docker --version
docker-compose --version
The above commands will confirm the installation of docker and docker-compose in our system,

We can create our single node Kafka cluster using the following command,
docker-compose up -d
The -d will flag will run the service in the background, and our Terminal is available to us for further exploration. We can confirm the services are running with the following command,
docker-compose ps
We can see both zookeeper and Kafka services running at designated ports,

Now our single node local Kafka cluster is up and running. We can create our Producer and Consumer application for our real-time stock data pipeline.
Creating a Producer Application
We need to install the libraries for running the Producer and Consumer applications, viz, Kafka-python and yfinance. yfinance is a Yahoo finance API to download market data.
pip install kafka-python yfinance
As I have already installed the above libraries, I can confirm the same with the command,
pip list | grep "kafka-python"


Using any of the preferred text editors, we can create the following kafka_producer.py in our project folder,
import time

from kafka import KafkaProducer

import yfinance as yf

from datetime import date

import json
current_date = date.today()

company = 'TSLA'

producer = KafkaProducer(bootstrap_servers=['localhost:9092'])

topic_name = 'stocks-demo'
while True:

data = yf.download("TSLA", period='1d',interval='2m')

#data = yf.download(tickers=company ,start=current_date,interval='2m')

data = data.reset_index(drop=False)

data['Datetime'] = data['Datetime'].dt.strftime('%Y-%m-%d %H:%M:%S')

my_dict = data.iloc[-1].to_dict()

msg = json.dumps(my_dict)

producer.send(topic_name, key=b'Tesla Stock Update', value=msg.encode())

print(f"Producing to {topic_name}")

producer.flush()

time.sleep(120)
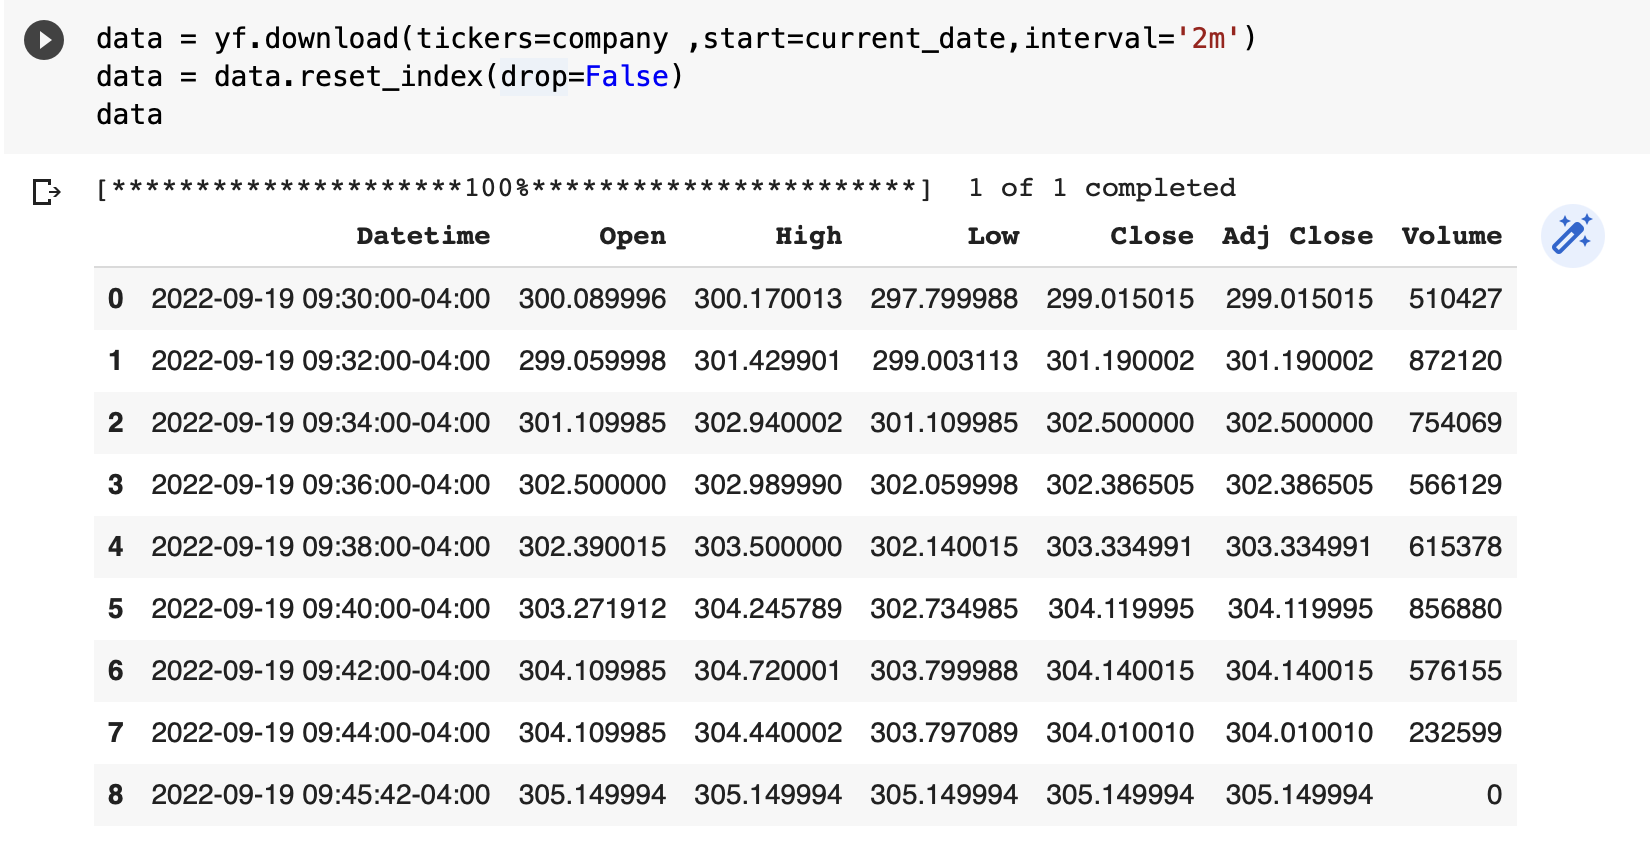
I have used a simple python script in our Producer application. Initially, we import the requisite libraries like Kafka, yfinance, json, etc. A Kafka Producer Instance has been defined, indicating the bootstrap_sever, and we assign a topic_name. The company name for which data is extracted has been defined as ‘TSLA”, an acronym used in Yahoo finance for Tesla. The script uses an infinite running while loop ( we can modify the code to run between opening and closing of the market, but the focus was to keep it simple and beginner friendly ), where stock data for TSLA is being downloaded for the current day at an interval of 2 minutes. If we look at the output of yf.download , it is a pandas Dataframe. The following screenshot is the output of yf.download() run from Google Colab during the stock market open hours. It is noted that yf.download() with parameter start = current_date will give an error if we run the code during non-market hours. Alternately, we can test the code during non-market hours with parameter period = ‘1d’, which will fetch the last one-day records.

As we are interested only in the latest stock data, the code in the producer application script extracts the last row from the panda’s data frame. We are also converting the last row to dictionary format and JSON format for easier encoding in Kafka producer. The code also converts the timestamp to a string, as JSON encoding converts the timestamp to UTC, which is challenging to interpret immediately. Essentially, the last row of the pandas’ data frame is the message content of the Kafka producer, and the key indicates that the stock details refer to Tesla. If the Producer application produces stock data for more than one company, then the key can be used to indicate the message category accordingly.
The producer.send() function produces the message to the Kafka topic every 2 minutes.
Creating a Consumer Application
Once the producer application is complete, we can create the consumer application. The python script for consumer application is simple and is given below:
from kafka import KafkaConsumer
consumer = KafkaConsumer(bootstrap_servers=['localhost:9092'],
                                                      auto_offset_reset='latest',
                                                       max_poll_records = 10)
topic_name='stocks-demo'
consumer.subscribe(topics=[topic_name])
consumer.subscription()
for message in consumer:
      print ("%s:%d:%dn: key=%sn value=%sn" % (message.topic, message.partition,
                                                                     message.offset, message.key,
                                                                     message.value))
We have to declare an instance of KafkaConsumer() with bootstrap_server. The consumer is subscribed to the topic and using a for loop we print details of the message like Partition (here we have only one Partition, hence not so much relevant), message offset, message key, and value, etc.
Running the Data Pipeline
We have our Kafka Cluster running on the local machine, and the Producer and Consumer applications are ready, so we are ready to run the data pipeline. For meaningful results, I would recommend the pipeline be run during market hours (usually, it is 0930 to 1600 hrs local time). In addition, please note the relevant company code for the stock (data you are pulling in the pipeline) in the local market from the Yahoo finance website. For example, the code for Tata Steel Limited in the Indian Stock market is TATASTEEL.NS (use the search box on the website https://finance.yahoo.com/ ).

To demonstrate the data pipeline, it would be beneficial to have two Terminal tiles running the Producer and Consumer application side by side. This will give a better visual appreciation of a real-time pipeline. I have used an application called ITERM on my mac for running the data pipeline on the Terminal. Reconfirm the Kafka services are running by running the docker-compose ps command. First, run the Consumer application followed by the Producer application,
python3 kafka_consumer.py
python3 kafka_producer.py
I started the pipeline at 1014 hrs local time, and it was seen that the Consumer was receiving the messages every two minutes.

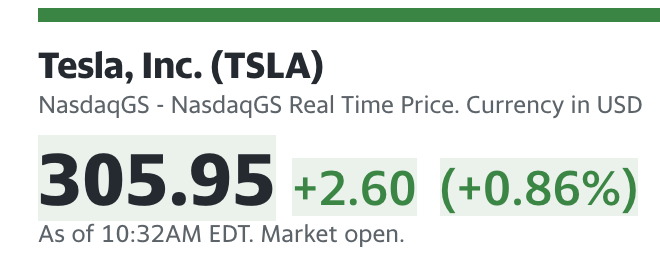
The left pane shows the Producer application, and the right pane shows the Consumer application. Our data pipeline design has been successfully constructed, and we can get TESLA stock data every two minutes. The screenshot of live TESLA stock data confirms that we have real-time data.

In a real-life application, the message received by the Consumer could be stored in a database for further analysis or say, preparation of a live dashboard. As said earlier, we could have multiple consumers from the same topic or the same Producer producing stock data of more than one company. The present case is a simple scenario to understand how Kafka data pipelines work.
The present Producer application runs on an infinite loop every two minutes, and you may use Ctrl+C to stop both Producer and Consumer applications. To stop the Kafka services, we can use the following command,
docker-compose down
Frequently Asked Questions
A. To create a data pipeline in Kafka, you can follow these general steps:
1. Set up a Kafka cluster: Install and configure Apache Kafka on your desired infrastructure, which includes setting up brokers, ZooKeeper, and topic configurations.
2. Define your data schema: Determine the structure and format of the data you will be working with. This helps ensure consistency and compatibility throughout the pipeline.
3. Create Kafka topics: Use the Kafka command-line tools or client libraries to create the necessary topics where data will be produced and consumed.
4. Develop data producers: Write code or configure applications that generate data and publish it to Kafka topics. This could be done using Kafka Producer APIs or Kafka Connectors for integration with other data sources.
5. Implement data consumers: Develop applications or services that consume data from Kafka topics. These consumers can perform various operations on the data, such as processing, transformation, or storage.
6. Configure data pipelines: Design the flow of data by connecting producers and consumers together. You can define specific rules, filters, or transformations to apply to the data as it moves through the pipeline.
7. Monitor and manage the pipeline: Set up monitoring tools to track the performance, throughput, and health of the data pipeline. This helps ensure the pipeline operates smoothly and can handle the data load.
It’s important to note that the exact implementation details and tools used may vary depending on your specific requirements, programming language, and ecosystem. Kafka provides various client libraries and connectors in different languages, making it adaptable to different programming environments.
A. Yes, Kafka can be used for Extract, Transform, Load (ETL) processes. Kafka’s distributed messaging system and fault-tolerant architecture make it suitable for handling large volumes of data in real-time.
Here’s how Kafka can be used in an ETL pipeline:
1. Extraction: Kafka can serve as a data source, where data is continuously produced and published to Kafka topics by various systems or applications. These sources can include databases, logs, sensors, or any other data-producing systems.
2. Transformation: Kafka provides the ability to process, transform, and enrich the data in real-time. You can use Kafka Streams or other stream processing frameworks integrated with Kafka to apply transformations, filtering, aggregation, or join operations on the data streams.
3. Loading: Once the data is transformed and processed, it can be consumed by downstream systems or databases for further analysis, storage, or reporting. Kafka Connect, a framework for connecting Kafka with external systems, allows seamless integration with popular data stores, including databases, Hadoop, Elasticsearch, and more.
By using Kafka in an ETL pipeline, you can achieve real-time data processing, handle large data volumes, ensure fault tolerance, and decouple data producers from consumers. Kafka’s distributed nature and scalability make it a robust choice for ETL workflows, enabling efficient data movement and processing across various stages of the pipeline.
Conclusion
In this article, we have looked at a basic Kafka data pipeline where we extract live TESLA stock data from Yahoo Finance website by using the python yfinance package. Following are the key learnings from our study,
- Apache Kafka is a fast, fault-tolerant messaging system.
- A single Kafka Node Cluster can be set up using docker-compose. This kind of set-up is useful for local testing.
- Apache Kafka has a python API for writing Producer and Consumer applications.
- Consumer applications can further process messages by storing them in a database or carry out data transformation/processing using tools like Apache Spark etc.
The media shown in this article is not owned by Analytics Vidhya and is used at the Author’s discretion.


