TensorFlow 2.0 – a Major Update for the Deep Learning Community
Just when I thought TensorFlow’s market share would be eaten by the emergence (and rapid adoption) of PyTorch, Google has come roaring back. TensorFlow 2.0, recently released and open-sourced to the community, is a flexible and adaptable deep learning framework that has won back a lot of detractors.
I love the ease with which even beginners can pick up TensorFlow 2.0 and start executing deep learning tasks. There are a plethora of offshoots that come with TensorFlow 2.0. You can read about them in this article that summarizes all the developments at the TensorFlow Dev Summit 2020.
In this article, I will focus on the marvel that is TensorFlow 2.0. We will understand how it differs from TensorFlow 1.x, how Keras fits into the picture and how to set up your machine to install and use TensorFlow 2.x. And then comes the icing on the cake – we will implement TensorFlow 2.0 for image classification and text classification tasks!
New to deep learning? You can’t go wrong with the below comprehensive courses to ignite your deep learning journey:
Table of Contents
- What is TensorFlow?
- TensorFlow 2.x vs. TensorFlow 1.0
- TensorFlow 2.x & its ecosystem
- Keras vs. tf.keras
- Installation & System Setup for TensorFlow 2.x
- Image Classification using TensorFlow 2.x
- Text Classification using TensorFlow 2.x
What is TensorFlow?
TensorFlow started as an open-source deep learning library and has today evolved into an end to end machine learning platform that includes tools, libraries and resources for the research community to push the state of the art in deep learning and developers in the industry to build ML & DL powered applications.
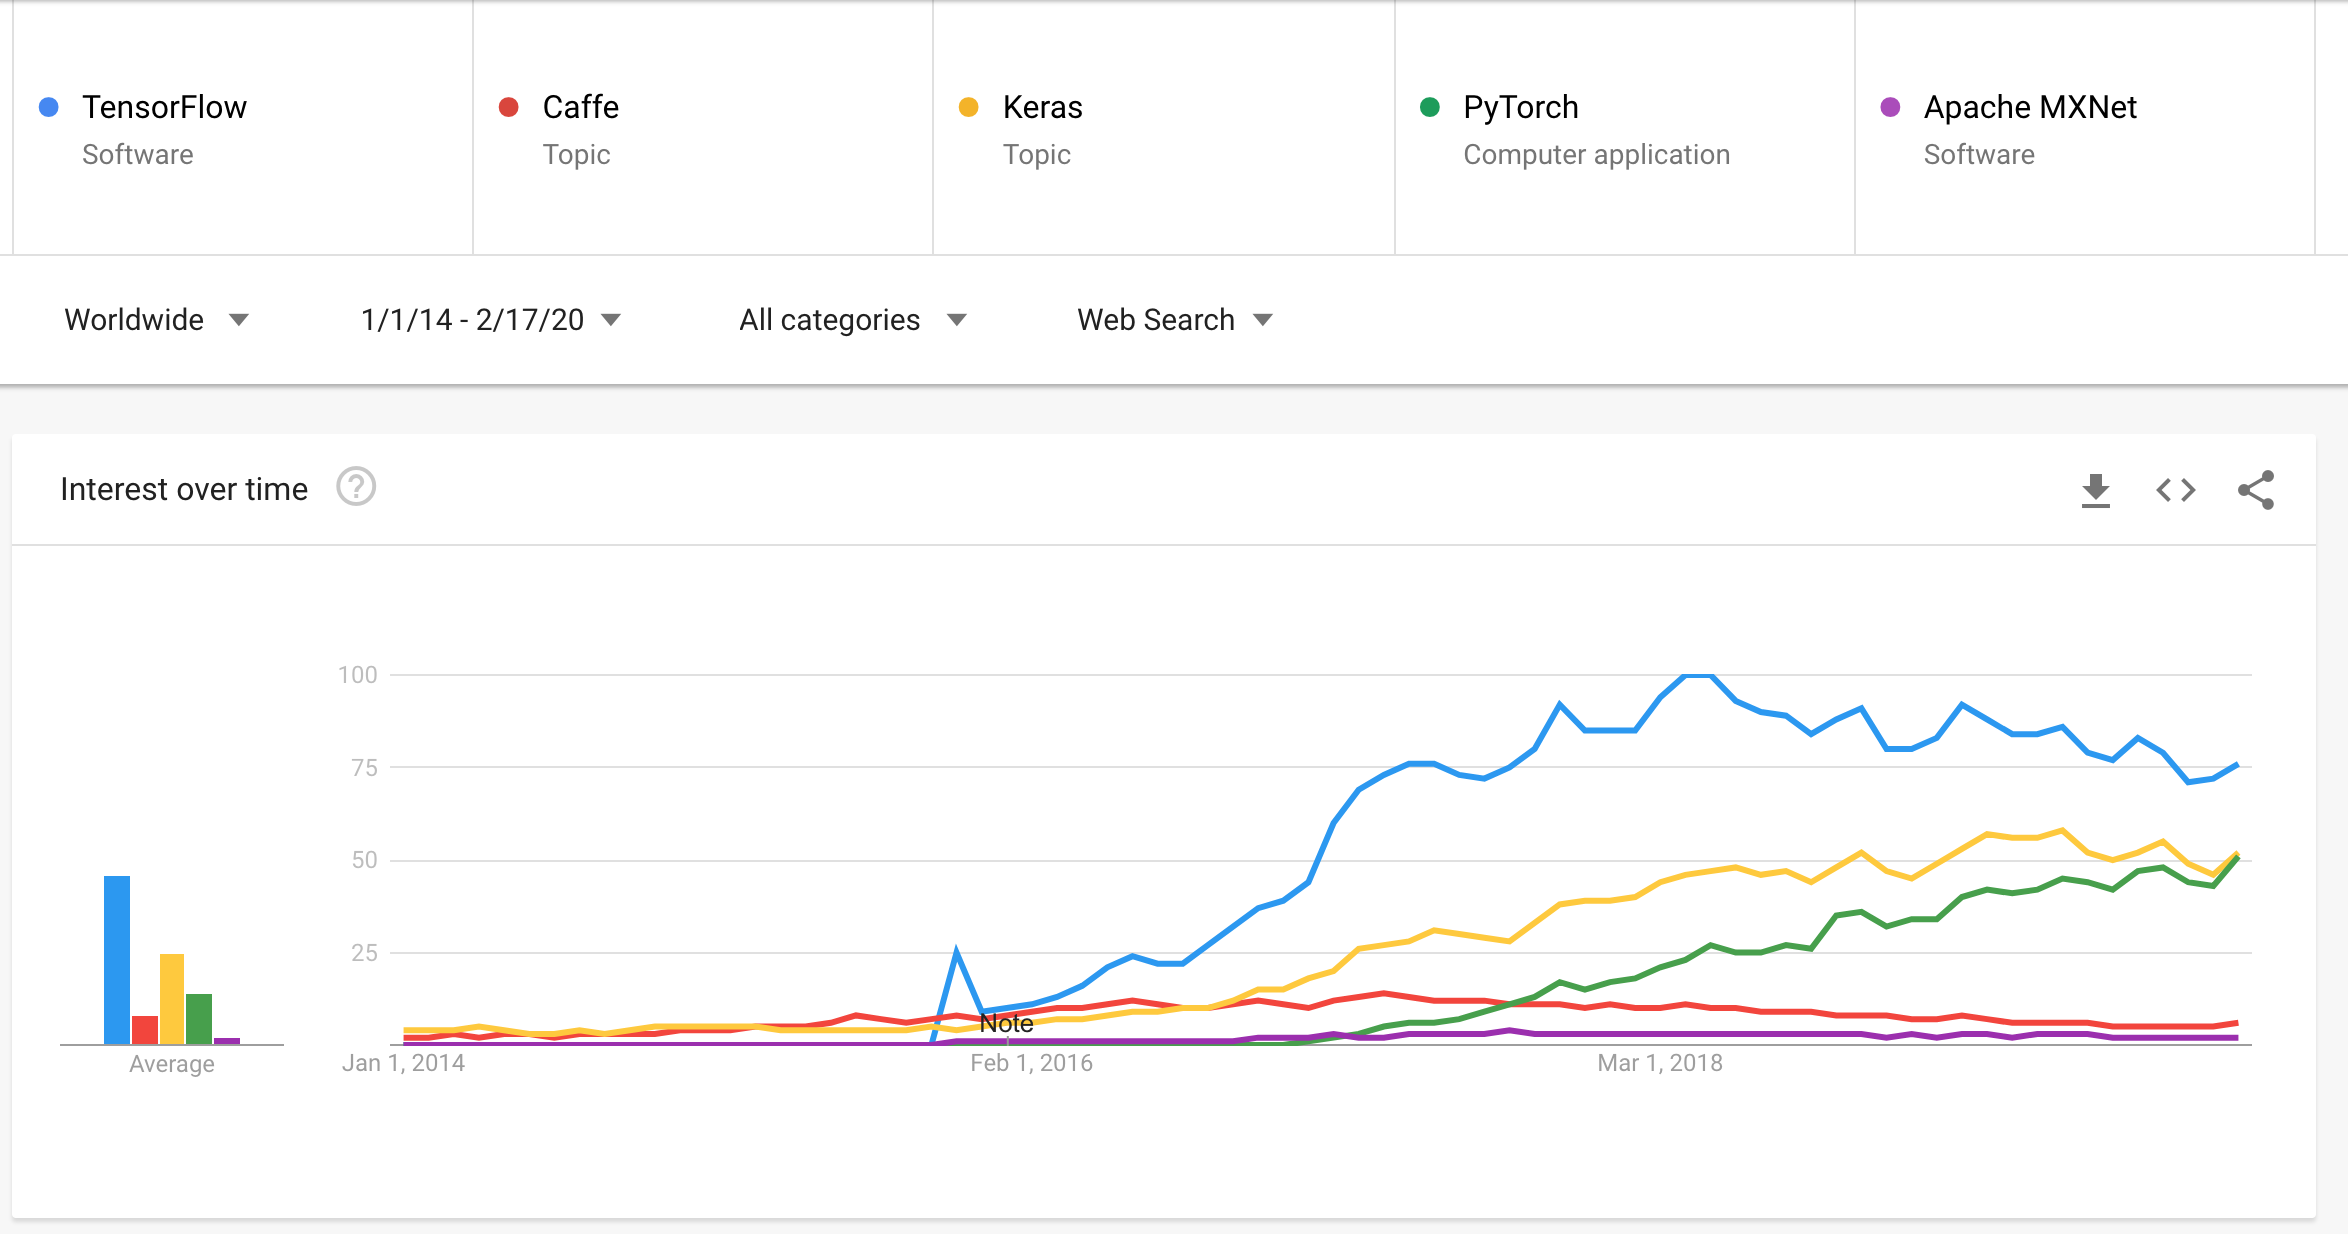
TensorFlow had its first public release back in 2015 by the Google Brain team. At the time, the evolving deep learning landscape for developers & researchers was occupied by Caffe and Theano. In a short time, TensorFlow emerged as the most popular library for deep learning and this is well illustrated by the Google trends chart below:
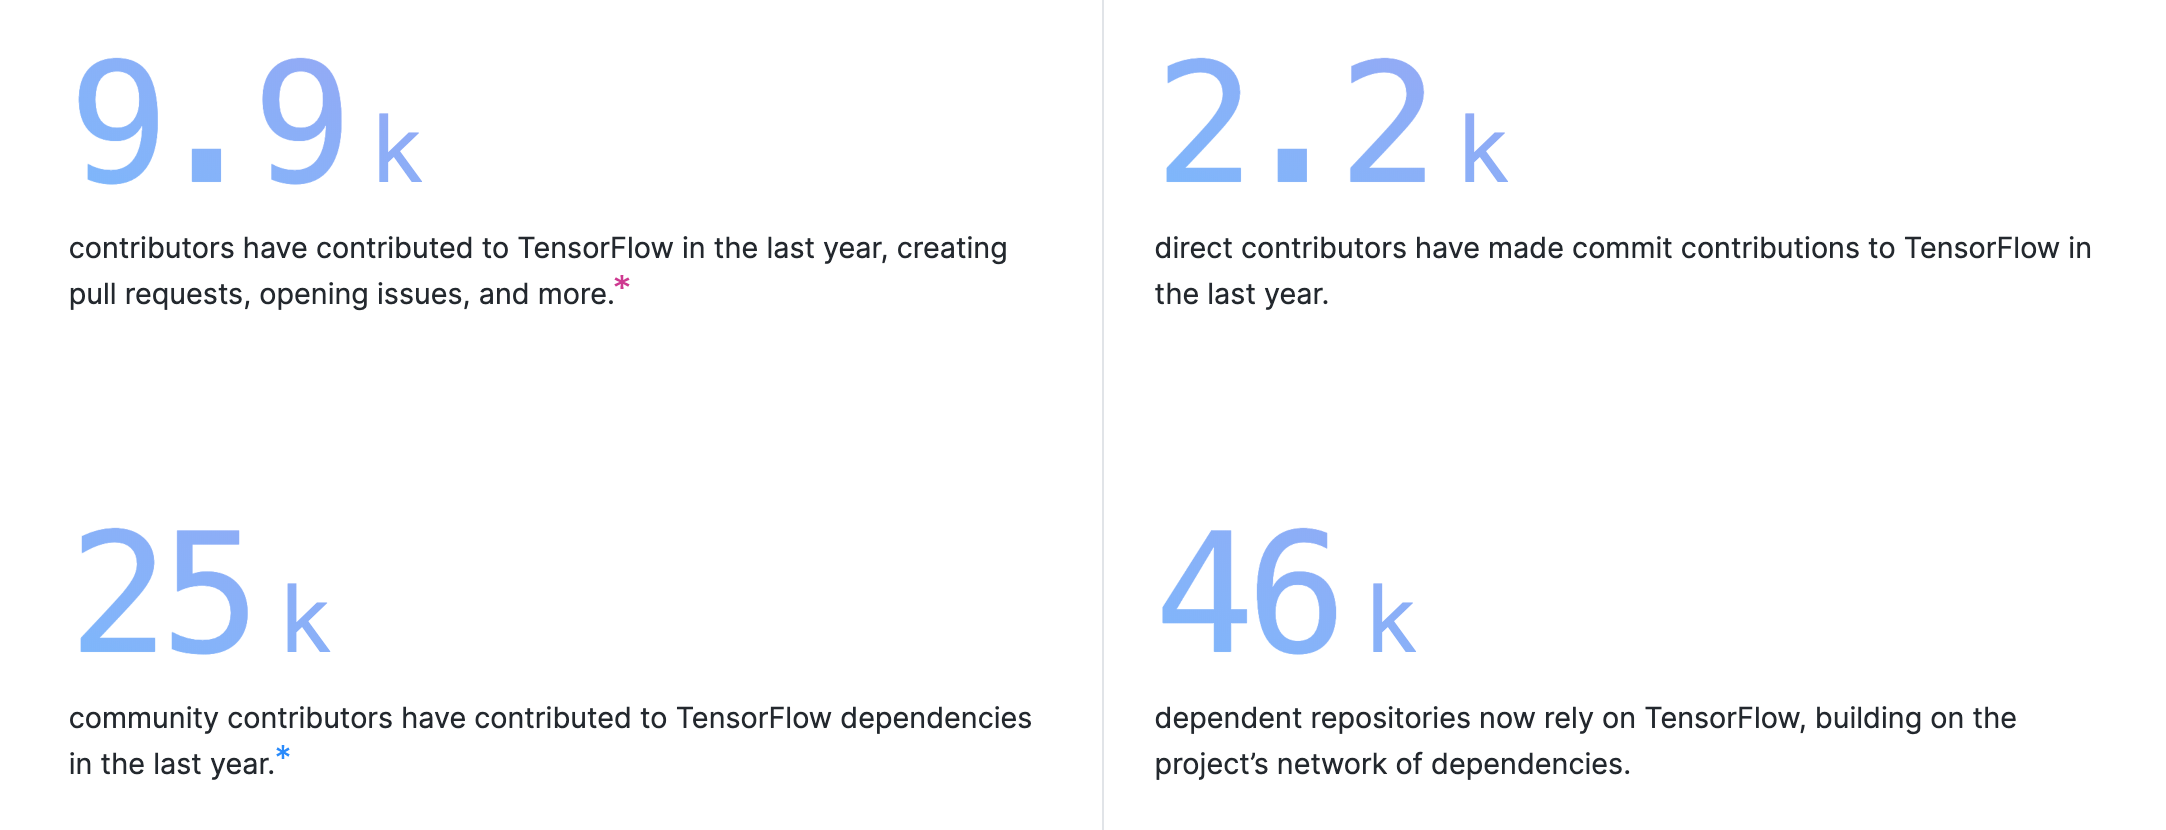
TensorFlow also knocks it out of the park when it comes to open source contribution and development activity so much so that it occupies a spotlight space at GitHub’s Octoverse page highlighting top open-source projects amongst other information:
These are huge numbers for any software project. With 141k stars on GitHub, TensorFlow is ranked 5th amongst all open-source GitHub projects. TensorFlow is fast with backend written in C++ and has interfaces in Python, Java, Swift, and Android!
TensorFlow 2.x vs TensorFlow 1.0
TensorFlow is currently running version 2.0 which officially released in September 2019. This is what a piece of code looked like back in TensorFlow 1.x (which wasn’t too long ago):
Now, I want you to guess what the output for this code could be. You would think it would be a list [2, 3, 4, 5, 6]. Well, not quite. Let’s try to understand why.
To run any operation in TensorFlow 1.x, it needs to run this in a session. A session represents the environment in which the objects, which in our example is the sum of 2 lists, are executed. Note that the value of a is never stored in the Python variable. The Python variable is just a reference to the TensorFlow graph. And the session holds the values of elements in the graph.
We need to ask the session for the value and provide the Python variable (`sess.run(variable)`) so that it knows which graph element’s value we want to read. We can do this by:
print(tf.Session.run(a))
This will return the actual result (list [2, 3, 4, 5, 6]) we were expecting in the first place. In this version, the developer needs to first create the complete graph operations, and only then are these operations compiled with a TensorFlow session object and fed data. For an intermediate Python programmer, this is difficult to understand and debug. So, a need was identified to make building neural network models with TensorFlow more Pythonic.
TensorFlow 2.0 alleviates some of the difficulty because it comes with Eager Execution by default.
But wait – what is eager execution?
That’s exactly what we covered in the above section! We saw that we had to execute the session in order to get the output in TensorFlow 1.x. With Eager Execution, TensorFlow will calculate the values of tensors as they occur in your code.
TensorFlow 2.x and its Ecosystem
Apart from the open-source library TensorFlow, there are various other tools that the TensorFlow 2.x Ecosystem has made available. Let’s look at each one by one.
TensorFlow.js – TensorFlow beyond Python
TensorFlow.js is a collection of APIs that allows you to build and train models using either the low-level JavaScript linear algebra library or the high-level layers API. Hence, deep learning models can be trained and run in a browser.
TensorFlow Lite – TensorFlow for Mobile & IoT devices
TensorFlow Lite is an open-source deep learning framework for on-device inference. This is a lightweight version of TensorFlow for mobile and embedded devices.
Here is a quick overview of the steps involved in TensorFlow Lite:
- Train a model on a high-end machine
- Convert your model into the
.tfliteformat using the utilities - Load the model into a device of choice
TensorFlow Lite is supported on Android and iOS with a C++ API and has a Java wrapper for Android.
TensorFlow Extended (TFX) – Deep Learning in Production
Keras vs tf.keras
You might be wondering where Keras is coming into here. It’s actually a fair comparison and let me explain why.
Quoting from the official Keras repository:
“Keras is a high-level neural networks API written in Python and capable of running on top of TensorFlow, CNTK, or Theano. Keras was originally created and developed by Google AI Developer/Researcher, Francois Chollet. And before installing Keras, please install one of its backend engines: TensorFlow, Theano, or CNTK. We recommend the TensorFlow backend.”
So, Keras is a high-level API. TensorFlow has decided to include Keras inside itself as tf.keras. When Google announced TensorFlow 2.0, they declared that Keras is now the official high-level API of TensorFlow for quick and easy model design and training.
It is suggested even by the creator of Keras that all deep learning practitioners should switch their code to TensorFlow 2.0 and the tf.keras package going forward.
Installation & System Setup of TensorFlow 2.x
There are multiple ways in which we can use TensorFlow (local as well as the cloud). In this section, we’ll go over two ways in which TensorFlow 2.0 can be used locally as well as in the cloud:
- Anaconda
- Google Colab
Anaconda
This is the simplest way of using TensorFlow on a local system. We can pip install the latest version of TensorFlow:
[In]: pip install -q tensorflow==2.1.0
Google Colab
The most convenient way to use TensorFlow, provided by Google’s TensorFlow team, is Google Colab. Short for Colaboratory, this represents the idea of collaboration and online laboratories. It is a free Jupyter-based web environment requiring no setup as it comes with all the dependencies prebuilt.
Google Colab provides an easy and convenient way to let users write TensorFlow code within their browser, without having to worry about any sort of installations and dependencies.
Let’s go over the steps to see how to use Google Colab for TensorFlow 2.0:
- Go to https://colab.research.google.com. You will see that the console has multiple options
- Select the relevant option from the console, which contains the following five tabs:
- Examples: Shows the default notebooks provided in Colab
- Recent: The last few notebooks that the user worked on
- Google Drive: The notebooks linked to the user’s Google Drive account
- GitHub: The option to link the notebooks present in the user’s GitHub account
- Upload: The option to upload a new ipynb or a GitHub file
- Click ‘New Python 3 Notebook’ and a new Colab notebook will appear
- Install and import TensorFlow 2.0: Colab comes preinstalled with TensorFlow and you will see in the next section how you can make sure the Colab is using TensorFlow 2.x
Another great advantage of using Colab is that it allows you to build your models on GPU in the back end, using Keras, TensorFlow, and PyTorch. It also provides 12 GB RAM, with usage up to 12 hours.
Now, let us jump into the code and see how we can use tf.Keras – the high-level API to solve an image classification task.
Image Classification using TensorFlow 2.x
Here, we will train a neural network model to classify images of clothing, like sneakers and shirts. You can view the complete problem statement and download the dataset from the practice problem hosted at this link.
We are using tf.keras, the high-level API to build and train models in TensorFlow. You can use the below code in the Google Colab environment that provides a Jupyter notebook-like interface in the cloud.
Ensure Tensorflow 2.x is utilized
In the Google Colab environment, the default TensorFlow version being used is still 1.x so in order to use TensorFlow 2.x, we need to include the following code to ensure that the Colab notebook uses only TensorFlow 2.x:
Import Necessary Libraries including TensorFlow and Keras
Before we attempt to import data into the Colab environment, it is necessary to import the required libraries:

Import the Apparels Data
Now, for importing the data downloaded from the practice problem page, we would need to upload the train and test zip files on Google Drive. There are other methods as well (link) of importing data to the Google Colab environment, however, we have chosen this for its ease of use. Now let’s see how this works.
Once you have uploaded the train and test zip files, the first step is to mount your drive folder into the Colab environment:
It will ask for an authorization code that you can copy from the link and paste in the Colab notebook. Once you press enter, your drive is mounted and you can access everything uploaded to your Google Drive just like the local environment on your machine.
The next step is to unzip the train file so that we can access the train images and the labels that are contained in train.csv. This can be done using the following code:
Preprocess The Data
Next, we will import the data and preprocess it. This includes reading all the images from the train folder one by one and then doing some necessary preprocessing steps such as dividing by 255 to bring all values between 0 and 1. We would also need to convert the target to categorical as right now they are numerical in form and the model needs to understand these as categories.
Build the Deep Learning Model
Now that we have preprocessed the images and labels, it is time to define the model. Here, we are using a convolutional neural network (CNN) model. For those of you who are new to CNNs, I encourage you to go through this excellent tutorial. Before we declare the model, we will split the train data into new train and validation sets in order to check performance at each epoch:
We have chosen the above architecture iteratively after trying various hyperparameters to get better accuracy. You can go through some tips and tricks to improve your model performance at this link.
Compile & Train the Deep Learning Model
Once we have defined the neural network architecture we will now compile it and train the model to check its performance on the validation set:
Wow, this model is already giving great accuracy (0.92) at the validation set and there are many experiments that I encourage you to do such as:
- Increasing epochs
- Use more layers
This will help you to get an even better score on the validation set.
Make Predictions & Evaluate Accuracy
Once this submission is created, you can download it from the left-hand side pane in the Colab Notebook and upload it at the solution checker to check the accuracy score for the test set. Right now with the above code, you will get a score of 0.922 on the public leaderboard.
Text Classification using TensorFlow and Keras
Now we will pick up a text classification problem where the task is to identify whether a tweet contains hate speech or not. You can access the dataset and problem statement for this here – DataHack Practice Problem: Twitter Sentiment Analysis.
Ensure Tensorflow 2.x is utilised
Again, we need to include the following code to ensure that the Colab notebook uses only TensorFlow 2.x:
Import Necessary Libraries including TensorFlow and Keras
Now, as a next step, we will import libraries to clean and work with text data along with Keras and TensorFlow:
Importing the train tweets
Next, as we did for the image classification task, we will upload the train and test file. Since these are not very heavy files, we can directly upload these to the Google Colab Upload Pane:
Separate the tweet texts and the labels using the following code snippet:
Text Cleaning & Preprocessing
Here, we will define a function to clean the text since these are tweets with a lot of acronyms and slangs, digits, random characters which, if cleaned, can reduce the noise for our sequence model:
Tokenizing the text to feed into the model
Now, we would need to tokenize the text for which we can directly use a function from the Keras Text Preprocessing Module ‘Tokenizer’:
Padding Text Sequences
Padding is required in order to make each input sentence of the same length. This is nothing but inserting zeroes for the smaller sentences such that all sentences are of the same size:
Create Validation Set
Now, we will create a validation set from the train data in order to check the performance of our trained model before we build the model:
Building & Compiling the Model
Here, we will build and compile an LSTM model. Again, the hyperparameters are arrived at using several iterations and experiments:
Training the Deep Learning Model
Now, it is time to train the model. This will take more than 100 seconds for each epoch so I have trained it for only 2 epochs:
Importing test data
Prediction on the test set and creating Submission File
Once you upload this file at the solution checker you will get a score of close to 0.75 (F1 Score). You can check it for yourself at this link.
Final Thoughts
TensorFlow 2.0 is a truly powerful update by the folks over at Google. I’m sure you’ve already gauged the different deep learning tasks you can perform using TensorFlow 2.0, such as image classification and text classification.
I encourage you to take what you have learned here and apply that in your deep learning projects. Start from Analytics Vidhya’s DataHack platform and pick it up from there.
And make sure you check out the below popular (and utterly comprehensive) courses on deep learning and computer vision:


