Overview
This is the overview of the below article.
1. Introduction
2. What is an artificial neural network?
3. What is customer churn?
4. Customer churn dataset
5. Import libraries
6. Load dataset
7. Preprocess the dataset
8. Checking null values
9. Handling categorical variables
10. Independent and targated variables
11. Splitting data
12. Building a neural network
13. Define model
14. Compile model
15. Performance matrices
16. EndNote
Introduction
Hello, this article will briefly discuss the customer churn prediction model that we will build using the simple artificial neural network.
Do you know what is customer churn? Do you know what is an artificial neural network? if not then we will firstly take a brief intro on the fundamentals of this article topic for better understanding.
So, in conclusion from the topic, we are predicting the customer churn by using the artificial neural network, Let take a brief understanding of the artificial neural network(ANN).
What is an artificial neural network and how does it work?
You may be familiar with deep learning, a kind of machine learning that employs a multilayer architecture known as neural networks, from which the phrase neural network derives. In the form of a computer network, we create a network of artificial neurons that is similar to brain neurons.
The artificial neural network is based on the collection nodes we will call the artificial neurons, which further model the neurons in a biological brain.

Image 1
In this neurons are interconnected with large numbers of neurons and they are managed in the form of layers. As we term layers there are consists of many layers that will form the complete neural network.
So, now that you’ve gained a basic grasp of the artificial neural network, let’s look at what accurate customer churn is, for example.
So, firstly look into the customer churn,
What is customer churn?
So, customer churn is simply the rate at which customers leave doing business with an entity. Simply put, churn prediction involves determining the possibility of customers stopping doing business with an entity. In other words, if a consumer has purchased a subscription to a particular service, we must determine the likelihood that the customer would leave or cancel the membership.
It is a critical prediction for many businesses because acquiring new clients often costs more than retaining existing ones. Customer churn measures how and why are customers leaving the business.
There are many ways to calculate the customer churn one of the ways is to divide the number of customers leaving a business in a given time interval by the number of customers that are present at the beginning of the period.

Image 2
We know that customer churn is important in business problems, the ability to predict that a particular customer is at a high risk of churning, while there is still time to do something about it.
Clarify for your batter understanding let’s take an example, suppose you have taken a premium subscription of the company product now you think that it’s time to leave the subscription, for this you will contact to the company, the company will try to offer some extra functionalities for not leaving the subscription. This is because it will be a loss for any industry that there is some percent of customers are not using their product.
For prediction of this kind of situation, there is a data science team is present, that will predict the customer churn based on several features.
It’s now time to build the artificial neural network that will forecast client attrition. First and leading, we will want a dataset on which to run our plan of action.
Customer churn dataset
So we will start with the dataset, we will use the telecom customer churn dataset which was taken from the kaggle. The dataset contains several features based on those features we have to predict the customer churn.
Link for dataset:- telco_customer_churn
Before going to process this dataset we need to understand the dataset such that it will be easy to manipulate and process that dataset.
The dataset consists of 7043 rows and 21 columns, where rows represent the number of customers in the dataset and the columns represent each customer’s attribute. The attributes are used to predict the churn of a particular customer.
Look to columns in the dataset:
There are 21 columns so we will divide them into independent and dependent columns:-
Independent variables:-
[ ‘customerID’, ‘gender’, ‘SeniorCitizen’, ‘Partner’, ‘Dependents’, ‘tenure’, ‘PhoneService’, ‘MultipleLines’, ‘InternetService’, ‘OnlineSecurity’, ‘OnlineBackup’, ‘DeviceProtection’, ‘TechSupport’, ‘StreamingTV’, ‘StreamingMovies’, ‘Contract’, ‘PaperlessBilling’, ‘PaymentMethod’, ‘MonthlyCharges’, ‘TotalCharges’ ]
Dependent variables:-
[ ‘Churn’ ]
Now it’s time to start building the artificial neural network, firstly we will import important libraries for the further process.
Import Libraries required to create the Customer Churn Model
We import basic libraries for processing the data.
#import pandas
import pandas as pd
#import numpy
import numpy as np
#import matplotlib
import matplotlib.pyplot as plt
#import seaborn
import seaborn as sb
So, we import pandas for data analysis, NumPy for calculating N-dimensional array, seaborn, and matplotlib to visualize the data, these all are the basic libraries required for the preprocessing of the data.
Now we will define our dataset and then we will see our churn dataset for overview.
Load Churn Prediction Dataset
For loading our churn dataset we need to use panda’s library
# use pandas to import csv file
df = pd.read_csv('churn.csv')
# too see max columns
pd.set_option('display.max_columns',None)
# print dataframe
df
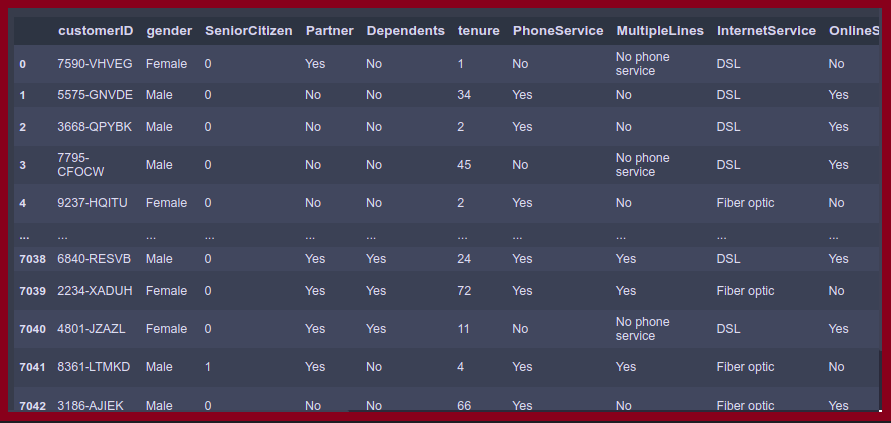
In this dataset there are 7043 rows and 21 columns are present. There are some categorical and some numerical columns present.
Preprocess Dataset
Now it’s time to preprocess the data, firstly we will observe the dataset, this means we have to see the data types of the columns, other functionalities, and parameters of each column.
First, we check the dataset information using the info() method
df.info()
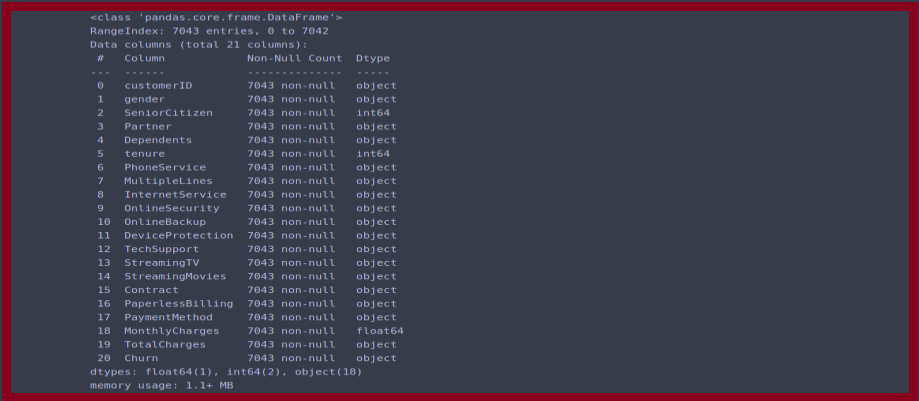
You can see that the datatypes of each column, number of rows present with non-null values, there are 2 int, 1 float, and remaining are string datatype columns.
Second, we check the description of the dataset, here we will only visible the num variables functionalities. we will use describe() method.
df.describe()
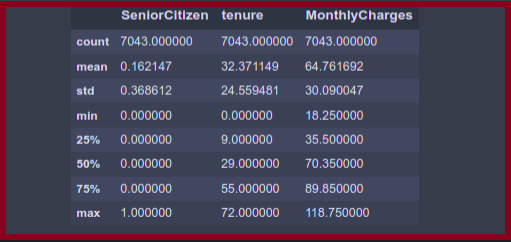
Here you can see that describe() method only describe the functionalities of a numerical variable. From this, we can easily conclude the parameters of each column.
Now we drop unwanted features from our dataset because these unwanted features are like the garbage they will affect our model accuracy so we drop it.
# we didn't require customerID so we drop it
df = df.drop('customerID',axis=1)
We drop customerID because it has no meaning in the dataset and we can easily differentiate each customer using indices of the rows. By dropping this column or dataset should be now ready to process.
When we note the TotalCharges column then we found that it’s a data type of an object but it even would be float. so we have to typecast this column.
#count of string value into the column.
count=0
for i in df.TotalCharges:
    if i==' ':
        count+=1
print('count of empty string:- ',count)
#we will replace this empty string to nan values
df['TotalCharges'] = df['TotalCharges'].replace(" ",np.nan)
# typecasting of the TotalCharges column
df['TotalCharges'] = df['TotalCharges'].astype(float)
After printing, we found that 11 rows contain” ” empty string which will affect the datatype of the column, so we convert this into nan values and typecast into float64.
So, now TotalCharges has 11 null values, we have to fill it. let’s do it.
Checking Null Values in Customer Churn Data
Null values badly affect our model performance because, these null values are irreverent in nature they are misplaced in the dataset so we have to remove them and replace them with other values if null values are less, but if it was present in large quantity then we just drop it.
Now we have to check for null values, for this, we use the pandas IsNull() method which will give True if the null value is present and False when there are no null values.
# checking null value
df.isnull().sum()
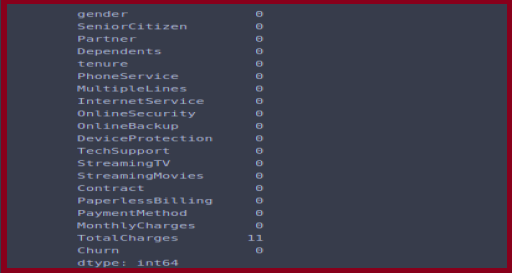
# fill null values with mean
df['TotalCharges'] = df['TotalCharges'].fillna(df['TotalCharges'].mean())
To handle null values we fill null values of the TotalCharges column with the mean of the TotalCharges column.
Now we will extract the numerical and categorical columns from the dataset for further processes.
#numerical variables

num = list(df.select_dtypes(include=['int64','float64']).keys())

#categorical variables

cat = list(df.select_dtypes(include='O').keys())

print(cat)

print(num)
['gender', 'Partner', 'Dependents', 'PhoneService', 'MultipleLines', 'InternetService', 'OnlineSecurity', 'OnlineBackup', 'DeviceProtection', 'TechSupport', 'StreamingTV', 'StreamingMovies', 'Contract', 'PaperlessBilling', 'PaymentMethod', 'Churn']
['SeniorCitizen', 'tenure', 'MonthlyCharges', 'TotalCharges']
Here we create the num variable for numerical columns and cat for the categorical columns
Now we see the value counts of each category in each categorical column.
# value_counts of the categorical columns
for i in cat:
    print(df[i].value_counts())
# as we see that there is extra categories which we have to convert it into No.
df.MultipleLines = df.MultipleLines.replace('No phone service','No')
df.OnlineSecurity = df.OnlineSecurity.replace('No internet service','No')
df.OnlineBackup = df.OnlineBackup.replace('No internet service','No')
df.DeviceProtection = df.DeviceProtection.replace('No internet service','No')
df.TechSupport = df.TechSupport.replace('No internet service','No')
df.StreamingTV = df.StreamingTV.replace('No internet service','No')
df.StreamingMovies = df.StreamingMovies.replace('No internet service','No')
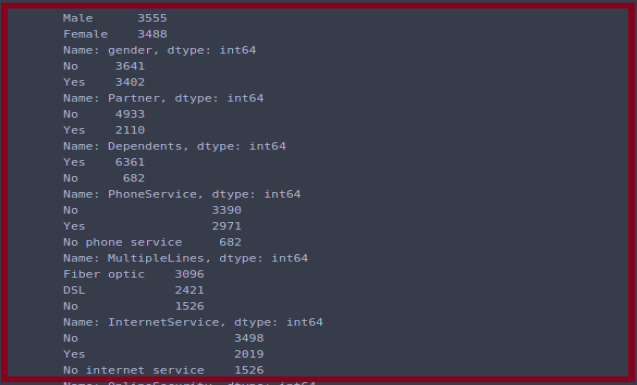
On observation we found that there are multiple columns were having some irrelevant categories, so we have to just convert it into a useful manner. For we change the “No Phone Service” category into the “No” category and we do it for all the columns where this “No Phone Service” is present.
Handling categorical Variables in Customer Churn Data
So, here we have to handle categorical columns, handle means we have to convert categorical values into numerical values because while the training model dataset contains all the numerical values categories won’t w accept.
# we have to handel this all categorical variables
# there are mainly Yes/No features in most of the columns
# we will convert Yes = 1 and No = 0
for i in cat:
    df[i] = df[i].replace('Yes',1)
    df[i] = df[i].replace('No',0)
On observing the count values of the dataset then we found that there are NO and YES are present, so we have to convert it into 1 and 0 which will be easy to process. For all categorical variables, we replace Yes with 1 and No with 0.
# we will convert male = 1 and female = 0
df.gender = df.gender.replace('Male',1)
df.gender = df.gender.replace('Female',0)
In the gender column, we replace Male with 1 and Female with 0.
Now we importing LabelEncoder from the sklearn which will decode categorical values into numeric ones.
from sklearn.preprocessing import LabelEncoder
label = LabelEncoder()
df['InternetService'] = label.fit_transform(df['InternetService'])
df['Contract'] = label.fit_transform(df['Contract'])
df['PaymentMethod'] = label.fit_transform(df['PaymentMethod'])
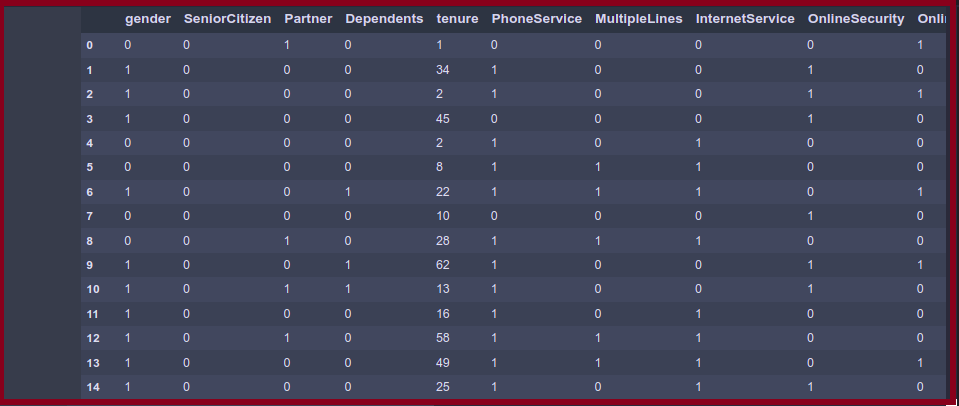
You can see that all the categorical columns are now typed cast into the numerical values.
The handling of categorical columns is over now we have to scale our data because there are some columns present where values are much larger which will affect the runtime of the program so we will convert bigger values into smaller ones.
scale_cols = ['tenure','MonthlyCharges','TotalCharges']
# now we scling all the data
from sklearn.preprocessing import MinMaxScaler
scale = MinMaxScaler()
df[scale_cols] = scale.fit_transform(df[scale_cols])
scale_cols contain that columns which are having large numerical values, and with MinMaxScaler we will scale it into values between -1 to 1.
Independent and Dependent Variables
This is an important step into the model-building part we have to separate all the columns which are important or by which target values are predicted with the target values which e have to predict.
Now we start our model training process, first, we have to divide our dataset into dependent and independent variables.
# independent and dependent variables
x = df.drop('Churn',axis=1)
y = df['Churn']
X contains an independent variable that is independent, Y contains a dependent variable which is to target variable. All the columns except Churn are present in the X variable and Churn is present in the Y variable.
Splitting data
This is the important part is we have to split our data into training and testing parts by which we do further processes.
Now we have to split our dataset into train and test sets, where the training set is used to train the model, and the testing set is used for testing the values of targeted columns.
from sklearn.model_selection import train_test_split
xtrain,xtest,ytrain,ytest = train_test_split(x,y,test_size=0.2,random_state=10)
print(xtrain.shape)
print(xtest.shape)
Output:- (5634, 19) (1409, 19)
We have just imported the train_test_split() method from the sklearn and we set some parameters where testing size was 30% and the remaining 70% considered as training data.
Building Neural Network for Customer Churn Data
Now all our preprocessing and splitting part is our, its time for building the neural network, we will use TensorFlow and Keras library for building the artificial neural net.
Firstly we have to import these important libraries for further processes.
# import tensorflow
import tensorflow as tf
#import keras
from tensorflow import keras
Tensorflow is used for multiple tasks but has a particular focus on the training and inference of deep neural networks and Keras acts as an interface for the TensorFlow library.
Define Model
Now we have to define our model, which means we have to set the parameters and layers of the deep neural network which will be used for training the data.
# define sequential model
model = keras.Sequential([
    # input layer
    keras.layers.Dense(19, input_shape=(19,), activation='relu'),
    keras.layers.Dense(15, activation='relu'),
    keras.layers.Dense(10,activation = 'relu'),
    # we use sigmoid for binary output
    # output layer
    keras.layers.Dense(1, activation='sigmoid')
]
)
Here we define sequential model, in the sequential model the input, hidden and output layers are connected into the sequential manner, here we define one input layer which contains all 19 columns as an input, second and third layer is hidden layers which contain 15, 10 hidden neurons and here we apply RelU activation function. Our last layer is the output layer, as our output is in the form of 1 and 0 so, we will use the sigmoid activation function.
Now we compile our sequential model and fit the training data into our model.
Compile the Customer Churn Model
The compilation of the model is the final step of creating an artificial neural model. The compile defines the loss function, the optimizer, and the metrics which we have to give into parameters.
Here we use compile method for compiling the model, we set some parameters into the compile method.
# time for compilation of neural net.
model.compile(optimizer = 'adam',
             loss = 'binary_crossentropy',
             metrics = ['accuracy'])
# now we fit our model to training data
model.fit(xtrain,ytrain,epochs=100)
We fit the training data and set the epochs into the model and in each epoch, our model tries to get better accuracy.
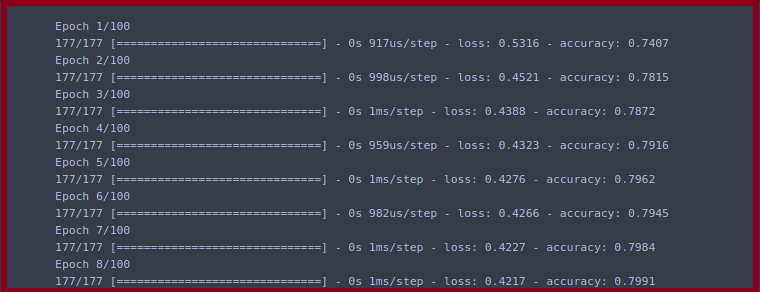
Now we evaluate our model by this we can observe the summary of the model.
# evalute the model
model.evaluate(xtest,ytest)

As above we are performing scaling on the data, that’s why our predicted values are scaled so we have to unscale it into normal form for this we write the following program.
# predict the churn values
ypred = model.predict(xtest)
print(ypred)
# unscaling the ypred values
ypred_lis = []
for i in ypred:
    if i>0.5:
        ypred_lis.append(1)
    else:
        ypred_lis.append(0)
print(ypred_lis)
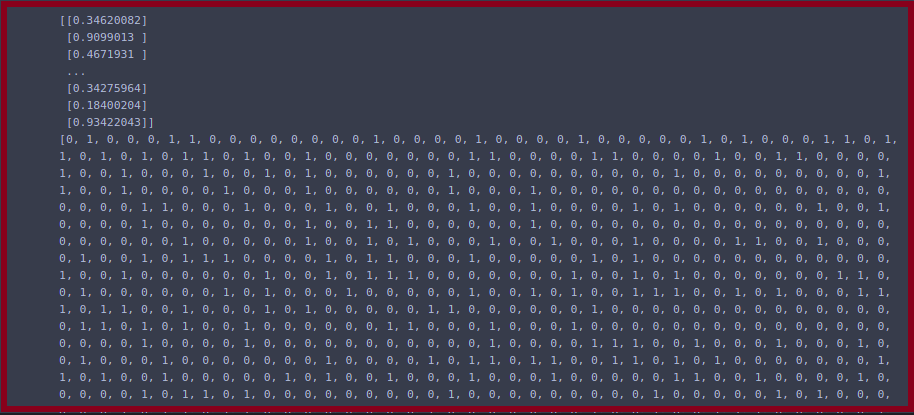
Here we just create a list of predicted variables, when the scaling values are greater than 0.5 then it will be considered as 1 otherwise it will be considered as 0. We store these values into the list.
At the conclusion we have to differentiate original and predicted values together, so we find that our model predicted true or false.
For that, we combine original values and predicted values together into a dataframe.
#make dataframe for comparing the orignal and predict values
data = {'orignal_churn':ytest, 'predicted_churn':ypred_lis}
df_check = pd.DataFrame(data)
df_check.head(10)
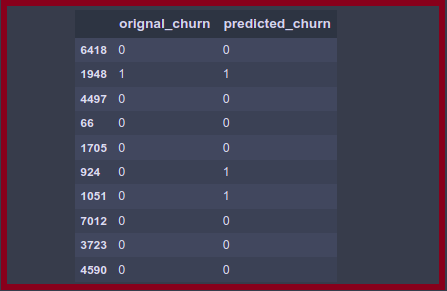
You can easily observe that the original and model predicted values of each customer.
Performance Matrices
This is used in the classification problems, and the customer churn is also a classification problem so we use performance metrics for checking the model behavior.
At the last, we have to predict the churn which is in the form of 0 and 1 means it was a classification problem, and the performance of the classification problem is observed with the performance metrics.
There are many types of performance metrics for checking the performance of the model but we use the confucion_metrix and classification_report.
# checking for performance metrices
#importing classification_report and confusion metrics
from sklearn.metrics import confusion_matrix, classification_report
#print classification_report
print(classification_report(ytest,ypred_lis))
# ploting the confusion metrix plot
conf_mat = tf.math.confusion_matrix(labels=ytest,predictions=ypred_lis)
plt.figure(figsize = (17,7))
sb.heatmap(conf_mat, annot=True,fmt='d')
plt.xlabel('Predicted_number')
plt.ylabel('True_number')
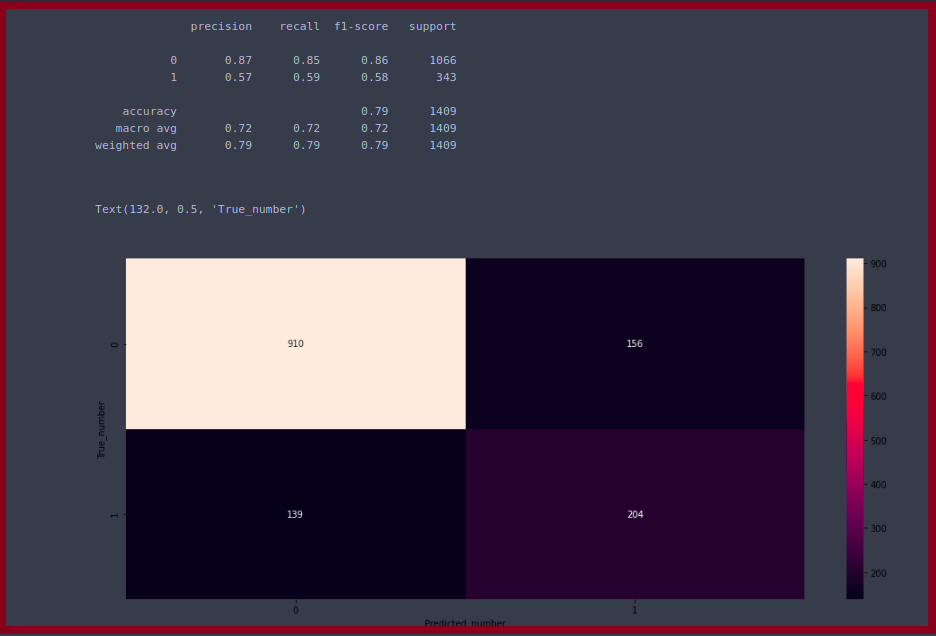
Here we plot the confusion matrix plot, in this plot, we observe that there are numbers of values that are predicted to be true and false.
End Notes
First of all, thank you for reading this article, I am Mayur Badole currently pursuing B.tech in CSE, this was my article on the neural network hopes you like this.
Connect with me on Linkedin: Mayur_Badole
Thank You.
Image Sources-
Image 1: https://bernardmarr.com/img/What%20is%20an%20Artificial%20Neural%20Networks.jpg
Image 2: https://atrium.ai/wp-content/uploads/2021/07/What-stops-customer-churn-Having-a-centralized-data-hub-does-and-heres-why.jpeg


