This article was published as a part of the Data Science Blogathon
Overview of Streamlit
If you are someone who has built ML models for real-time predictions and wondering how to deploy models in the form of web applications, to increase their accessibility. You are at the right place as in this article you will be seeing how to deploy models that are already built on Machine Learning or Deep Learning.
Article overview:
- Understand the concept of Model Deployment.
- Perform Model deployment using Streamlit for the dog-breed classifier.
Once you are done training the model you have several options of deploying a project on the web that are Flask, Django, Streamlit.
Flask and Django are somewhat heavy so it takes more than one article and time to understand them better (we would be focusing on this one also), but for now, we would be discussing Streamlit. So let’s start with a question.
Why Streamlit?
- Streamlit lets you create apps for your Machine Learning project using simple code.
- It also supports hot-reloading that lets your app update live as you edit and save your file.
- Using streamlit creating an app is very easy, adding a widget is as simple as declaring a variable.
- No need to write a backend, No need to define different routes or handle HTTP requests.
- More information can be found on their website — — –https://www.streamlit.io/.
We would be discussing how you can deploy a Deep Learning Classifier using Streamlit. For this article let’s take a Dog Bread Classifier, you can check how to create a Dog Bread classifier in the given article link.
Once you have gone through the above link it’s time to start the deployment part. we
will use the model which is trained on different dog breeds. Go through the above article link,
train your model and save feature_extractor.h5, dog_breed.h5, dog_breeds_category.pickle.
- feature_extractor.h5 is a saved model which will extract features from images,
- dog_breed.h5 is another saved model which will be used for prediction.
- dog_breeds_category.pickle the file will be used to covert class_num to class_label.
Model Deployment Using Streamlit
Once you have all the required files let’s start with Streamlit installation procedure and build a web application.
Installing Streamlit
Running the following command will install all the dependencies and will set Streamlit in your python environment.
pip install streamlit
Setting up the Project Structure for Model Deployment using Streamlit
Creating a Directory tree is not required but it is a good practice to organize your files and folders.

Start by creating a project_folder, inside the project folder create another folder static and put all the downloaded files inside static and also create folder images inside static. now create an empty main.py and helper.py file and place it in the project directory.
Create prediction Pipeline
Creating a predictor function that will take an uploaded picture’s path as input and give different dog breed classes as output.
- The predictor function will handle all the image processing, model loading require for the prediction.
- The predictor function will be coded in
helper.pyto keep our structure look ordered.
Let’s begin by loading all of the required libraries:
import cv2

import os

import numpy as np

import pickle

import tensorflow as tf

from tensorflow.keras import layers

from tensorflow.keras import models,utils

import pandas as pd

from tensorflow.keras.models import load_model

from tensorflow.keras.preprocessing.image import load_img,img_to_array

from tensorflow.python.keras import utils
Loading the saved model from the directory:
current_path = os.getcwd()

# getting the current path

dog_breeds_category_path = os.path.join(current_path, 'static\dog_breeds_category.pickle')

# loading class_to_num_category

predictor_model = load_model(r'static\dogbreed.h5')

with open(dog_breeds_category_path, 'rb') as handle:

    dog_breeds = pickle.load(handle)

# loading the feature extractor model

feature_extractor = load_model(r'static\feature_extractor.h5')
In the above code chunk, we are loading the different categories of Dog Breeds using the pickle file and then we are loading the weights file (.h5 file) that has training weights. Now you will be defining a predictor function that takes the image’s path as input and returns prediction.
def predictor(img_path): # here image is file name

    img = load_img(img_path, target_size=(331,331))

    img = img_to_array(img)

    img = np.expand_dims(img,axis = 0)

    features = feature_extractor.predict(img)

    prediction = predictor_model.predict(features)*100

    prediction = pd.DataFrame(np.round(prediction,1),columns = dog_breeds).transpose()

    prediction.columns = ['values']

    prediction  = prediction.nlargest(5, 'values')

    prediction = prediction.reset_index()

    prediction.columns = ['name', 'values']

    return(prediction)
In the above block of code, we have performed the following operations:-
- First passing image path to predictor function.
- The function reads the image in (331,331) and converts it into an array.
- Then it converts the image array into tensors (4-d) array for prediction.
- Then it passes tensors to feature_extractor function to get extracted features for prediction, now our extracted features will become input for predictor_model
- And finally, it passes extracted features to predictor_model and gets final prediction then converts into data frame to get our prediction in the desired format
The predictor_function returns the top 5 detected dog breeds with their prediction confidence in a data frame.
Now you have a function ready that takes image path and gives prediction which we will call from our web app.
Creating Frontend
Our goal is to create a web app where we can upload a picture and then save that picture in the static/images directory for the prediction part.
Pipeline
- Create an upload button and save uploaded pics in the directory.
- The function predictor will take an uploaded image’s path as input and would give the output.
- Show the uploaded image.
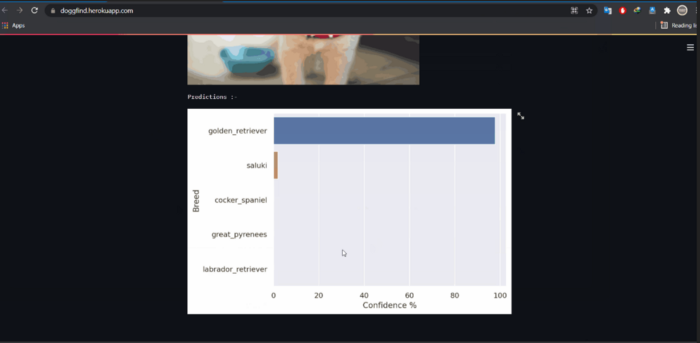
- Show the top-5 predictions with their confidence percentage in a barplot.
- After prediction, delete the uploaded picture from the directory
Frontend Streamlit code will be written in main.py and to make use of the predictor function created in helper.py we need to import the predictor function in main.py file. Let’s check the code part for the given pipeline.
from helper import *

#importing all the helper fxn from helper.py which we will create later

import streamlit as st

import os

import matplotlib.pyplot as plt

import seaborn as sns

sns.set_theme(style="darkgrid")

sns.set()

from PIL import Image

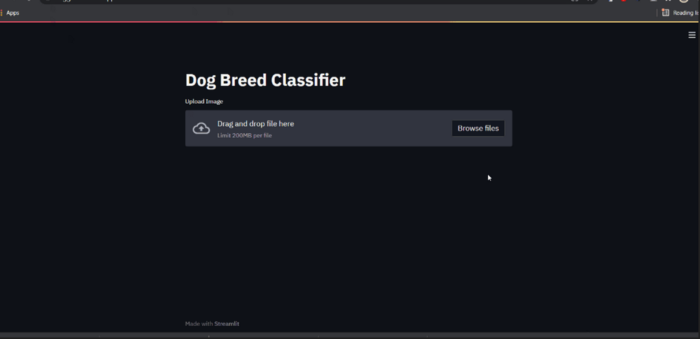
st.title('Dog Breed Classifier')
In the above code, we have first imported all the dependencies and then created an app with the title “Dog Breed Classifier”. It’s time to define a function to save uploaded images.
def save_uploaded_file(uploaded_file):

    try:

        with open(os.path.join('static/images',uploaded_file.name),'wb') as f:

            f.write(uploaded_file.getbuffer())

        return 1

    except:

        return 0
This function saves the uploaded pics to the static/images folder.
Creating Upload button, display uploaded image on the app, and call the predictor function which we had just created.
uploaded_file = st.file_uploader("Upload Image")

# text over upload button "Upload Image"

if uploaded_file is not None:

    if save_uploaded_file(uploaded_file):

        # display the image

        display_image = Image.open(uploaded_file)

        st.image(display_image)

        prediction = predictor(os.path.join('static/images',uploaded_file.name))

        os.remove('static/images/'+uploaded_file.name)

        # deleting uploaded saved picture after prediction

        # drawing graphs

        st.text('Predictions :-')

        fig, ax = plt.subplots()

        ax  = sns.barplot(y = 'name',x='values', data = prediction,order = prediction.sort_values('values',ascending=False).name)

        ax.set(xlabel='Confidence %', ylabel='Breed')

        st.pyplot(fig)
Let’s discuss the above code:
- You can write text anywhere in the program using the st.write() method.
- The Image.open() reads image and st.image()
- os.remove() removes the uploaded file after prediction.
- st.file_uploader(‘Upload Image’)
- Whatever file will be uploaded will be passed to save_uploaed function in order to save the uploaded file.
- For plotting the prediction bar-plot we are using seaborn in Streamlit.
- sns.barplot()
- Plotted bar-plot will be sorted according to their confidence percentage.

Run Web App
Run the web app on your browser by running the command:-
streamlit run main.py
Here main.py is the file containing all the frontend code.

So Far we build the web app using Streamlit and it runs as a website on your local computer.
Model Deployment using Streamlit Over Internet
Deploying over the internet increases the accessibility of your application. After deployment app can be accessed from mobile, computer from anywhere in the world.
Streamlit gives you a Streamlit Share feature to deploy your Streamlit web app for free on the internet.
- Once
your account is created, you simply need to push the deployment folder
(local repo) to ‘Github’ (remote repo) and from here Streamlit takes
care of the rest. as you can see down below the deployment page on streamlit.io. - I personlally would not suggest deploying the model on Streamlit share as it is not much flexible.
You have multiple choices when it comes to hosting your model on the cloud. AWS, GCD, AZURE CLOUD are some popular services nowadays.
Heroku is a free online model hosting service. you can host the model on the cloud for free. Deploying apps on Heroku is more flexible, Managing your app, package versions, storage is a lot easier with Heroku.
Conclusion
Creating a Machine Learning model is not enough until you make it available to general use or to a specific client. If you are working for a client you probably need to deploy the model in the client’s environment, but if you are working on a project that needs to be publicly available you should use technology to deploy it on the web. Streamlit is the best lightweight technology for web deployment.
So by this, we come to an end to the article. I hope you enjoyed it and now can start creating beautiful apps yourself.
The whole code and architecture can be downloaded from this link.
Thank you for reading this article! There is actually a lot more to learn about Streamlit, I hope you can give me some claps and ask a lot
of questions in the comment box!


