The Android 16 Beta is finally here. Google’s made good on its prior promises to deliver the first beta release of the newest Android version in early 2025, and you can download it on your Pixel starting today. There are a few ways to get it up and running on your phone — here’s how, and what to expect when you do.
No Thanks, Keep Reading
Related
Android 16’s first beta is here with major tablet improvements and iOS-like Live Updates
No flashing needed — just opt in and download
How to install the Android 16 Beta
Android’s beta builds are easier to install than developer previews, so getting Android 16 Beta 1 up and running on your device should be less of a hassle than installing the Android 16 Developer Preview was. It’s especially easy if you’ve been running those DP builds — you’ll get an OTA update to the beta automatically. Otherwise, you’ll need to start from scratch on one of the following devices:
- Pixel 6 or 6 Pro
- Pixel 6a
- Pixel 7 or 7 Pro
- Pixel 7a
- Pixel Fold
- Pixel Tablet
- Pixel 8 or 8 Pro
- Pixel 8a
- Pixel 9, 9 Pro, 9 Pro XL, or 9 Pro Fold
Using the Android Beta Program site
Unlike for Developer Preview builds meant for developers and dedicated enthusiasts who have multiple devices to fool around with, Android’s Beta programs are meant for anyone looking to get in on the newest version ahead of time. While the Android 16 Beta 1 build available today won’t be as stable as, well, the stable release, it’s more stable than the previous DP builds and should be more suitable for your daily driver. If you do install it, though, you should still expect some bugs.
The easiest way to get Android 16 Beta 1 on your device is to sign up on the Android Beta Program website. Head there, click on View your eligible devices, then click Opt in under the device you want to enroll. After installing Android 16 Beta 1, you’ll get subsequent beta updates over the air automatically, the way you normally would with stable updates. If you stay on the beta release track, you’ll eventually get stable Android 16 once it rolls out.
To opt out of the Beta program and return to stable Android 15, visit the same site and choose Opt out under your device.
If you’re having trouble with the Android Beta Program website or you just prefer doing things the old fashioned way, you can also install the Android 16 Beta manually in a couple of ways.
Other ways to install Android 16 Beta 1
If you want to (or have to) install Android 16 Beta 1 without using Google’s convenient opt-in OTA method, you’ll need the following:
- A computer running Windows, macOS, or Linux.
- A supported device for the Android 16 Developer Preview, as listed above.
- A good cable to connect your computer to your phone.
You’ll also have to enable USB debugging on your Pixel phone to install a Developer Preview build.
- Enable the developer options by navigating to System settings > About phone and tapping the build number seven times.
- Navigate to the top level of the system settings and head to System > Developer options.
- Look for the USB debugging toggle and turn it on.
Using the Android Flash Tool
The browser-based Android Flash Tool is the second-simplest way to get Android 16 Beta 1 onto your Pixel. The tool uses WebUSB to connect your computer to your phone, so you’ll need a browser that supports it, like Chrome or Edge. The Android Flash Tool provides step-by-step instructions to guide you through this process.
After installing an Android 16 Beta build, you can follow the same steps described below to reinstall the current stable version of Android on your Pixel. To do that, follow these same steps, but when choosing the Android build to install, choose the Back to Public option.
- Plug your Google Pixel into a USB port on your computer.
-
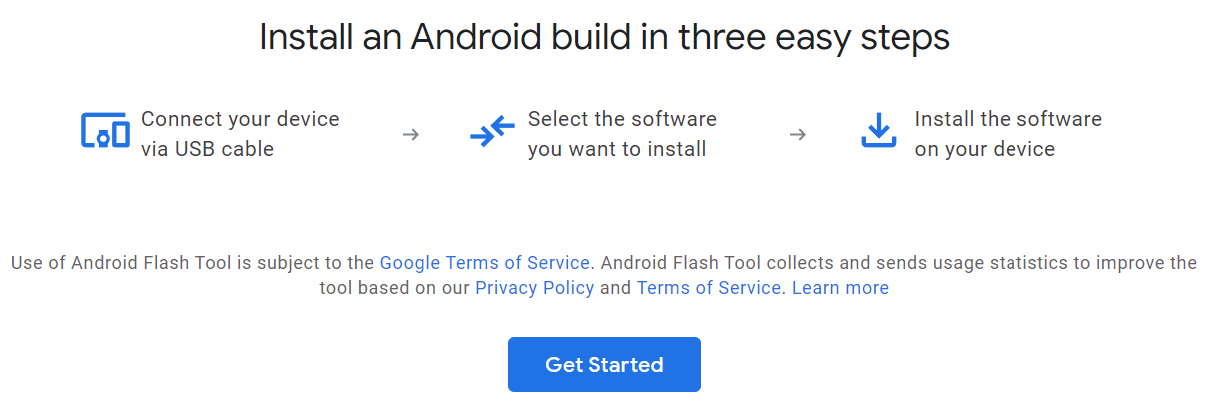
Visit the official Android Flash Tool website on your computer and click the Get Started button.
-
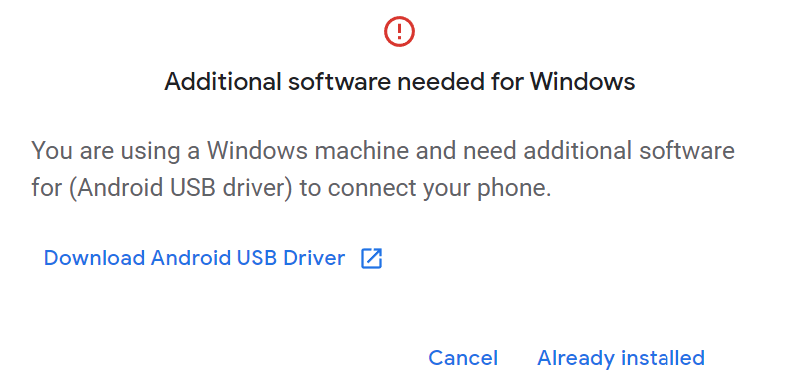
On Windows or Linux, click Download Android USB Driver and follow the instructions if needed; otherwise, press Already installed to continue. If you’re using a Mac, skip to step 4.
-
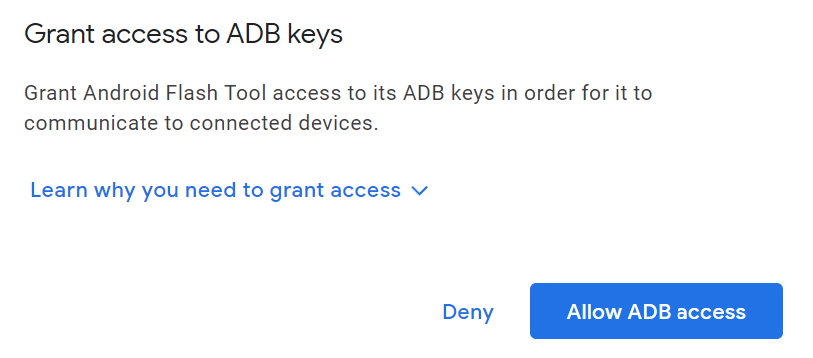
Click the Allow ADB access button. (Depending on your browser and settings, you may need to allow pop-ups to see this button.)
- On your Pixel phone, confirm the connection to your computer in the prompt by tapping Allow when required.
-
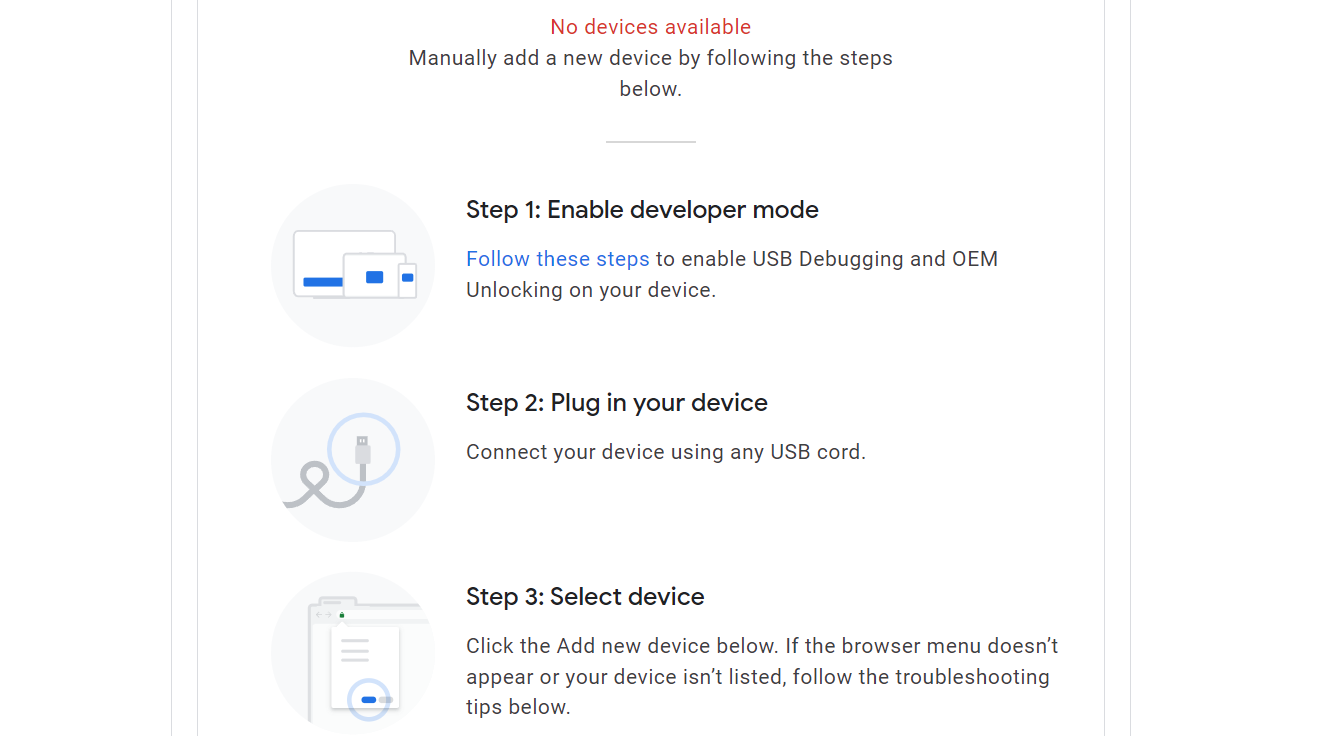
If you get the No devices available message on the Flash Tool, follow the on-screen steps to prepare your device for the installation. It also shows the No devices available message even if your device was prepared earlier. This is normal the first time around, as you don’t have any Pixel devices set up with the tool.
- Select the Add new device button once your device has been properly prepared.
-
Select your Pixel in the menu popup, then click the Connect button.
- Authorize the USB debugging connection via the prompt that appears on your phone, and tick the Always allow checkbox.
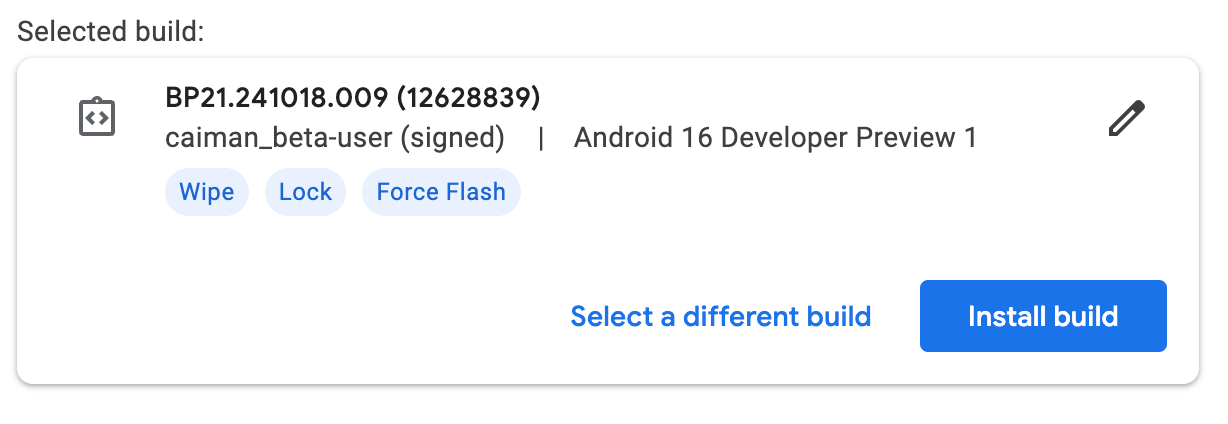
Now that your Pixel phone is connected to your computer, you can search for the specific build you want to install in the Android Flash Tool. You’ll find Android 16 Beta 1 under the Popular builds section.
Click the latest version to go to the overview screen for that build. If you want to install the latest public release for Android, select the Back to Public option, which installs the newest available stable version of Android. By default, installing a preview build factory resets your device, relocks the bootloader, and replaces your previous system files with the new ones.
Once you’ve made your selections and are ready to install Android 16, press the Install build button to begin the process. It takes some time to complete, so be patient and careful not to disconnect your device while it works its magic. Once the installation is finished, your phone automatically reboots and brings you to the Pixel welcome screen. Once you complete the initial setup, you’re ready to test the shiny new preview build for Android 16.
Related
How to use ADB or Flash Tool to manually install Google Pixel updates
You have plenty of choices if you don’t want to wait it out
Using factory images
The above methods are the simpler ways to get Android 16 Beta 1 up and running on your Pixel, but you can also can manually install the DP instead. Note that if you’re not a developer and these instructions seem unfamiliar or complex, you may want to avoid this method.
To use this method, you’ll also need to unlock your Pixel phone’s bootloader. Note that unlocking your bootloader will factory reset your device.
- Enable developer options by navigating to Settings > About phone, then tapping Build number until you see the message You are now a developer!
- Head to Settings > System > Developer options.
- Look for the OEM unlocking toggle and turn it on.
- Tap Enable, then enter your screen lock to confirm.
-
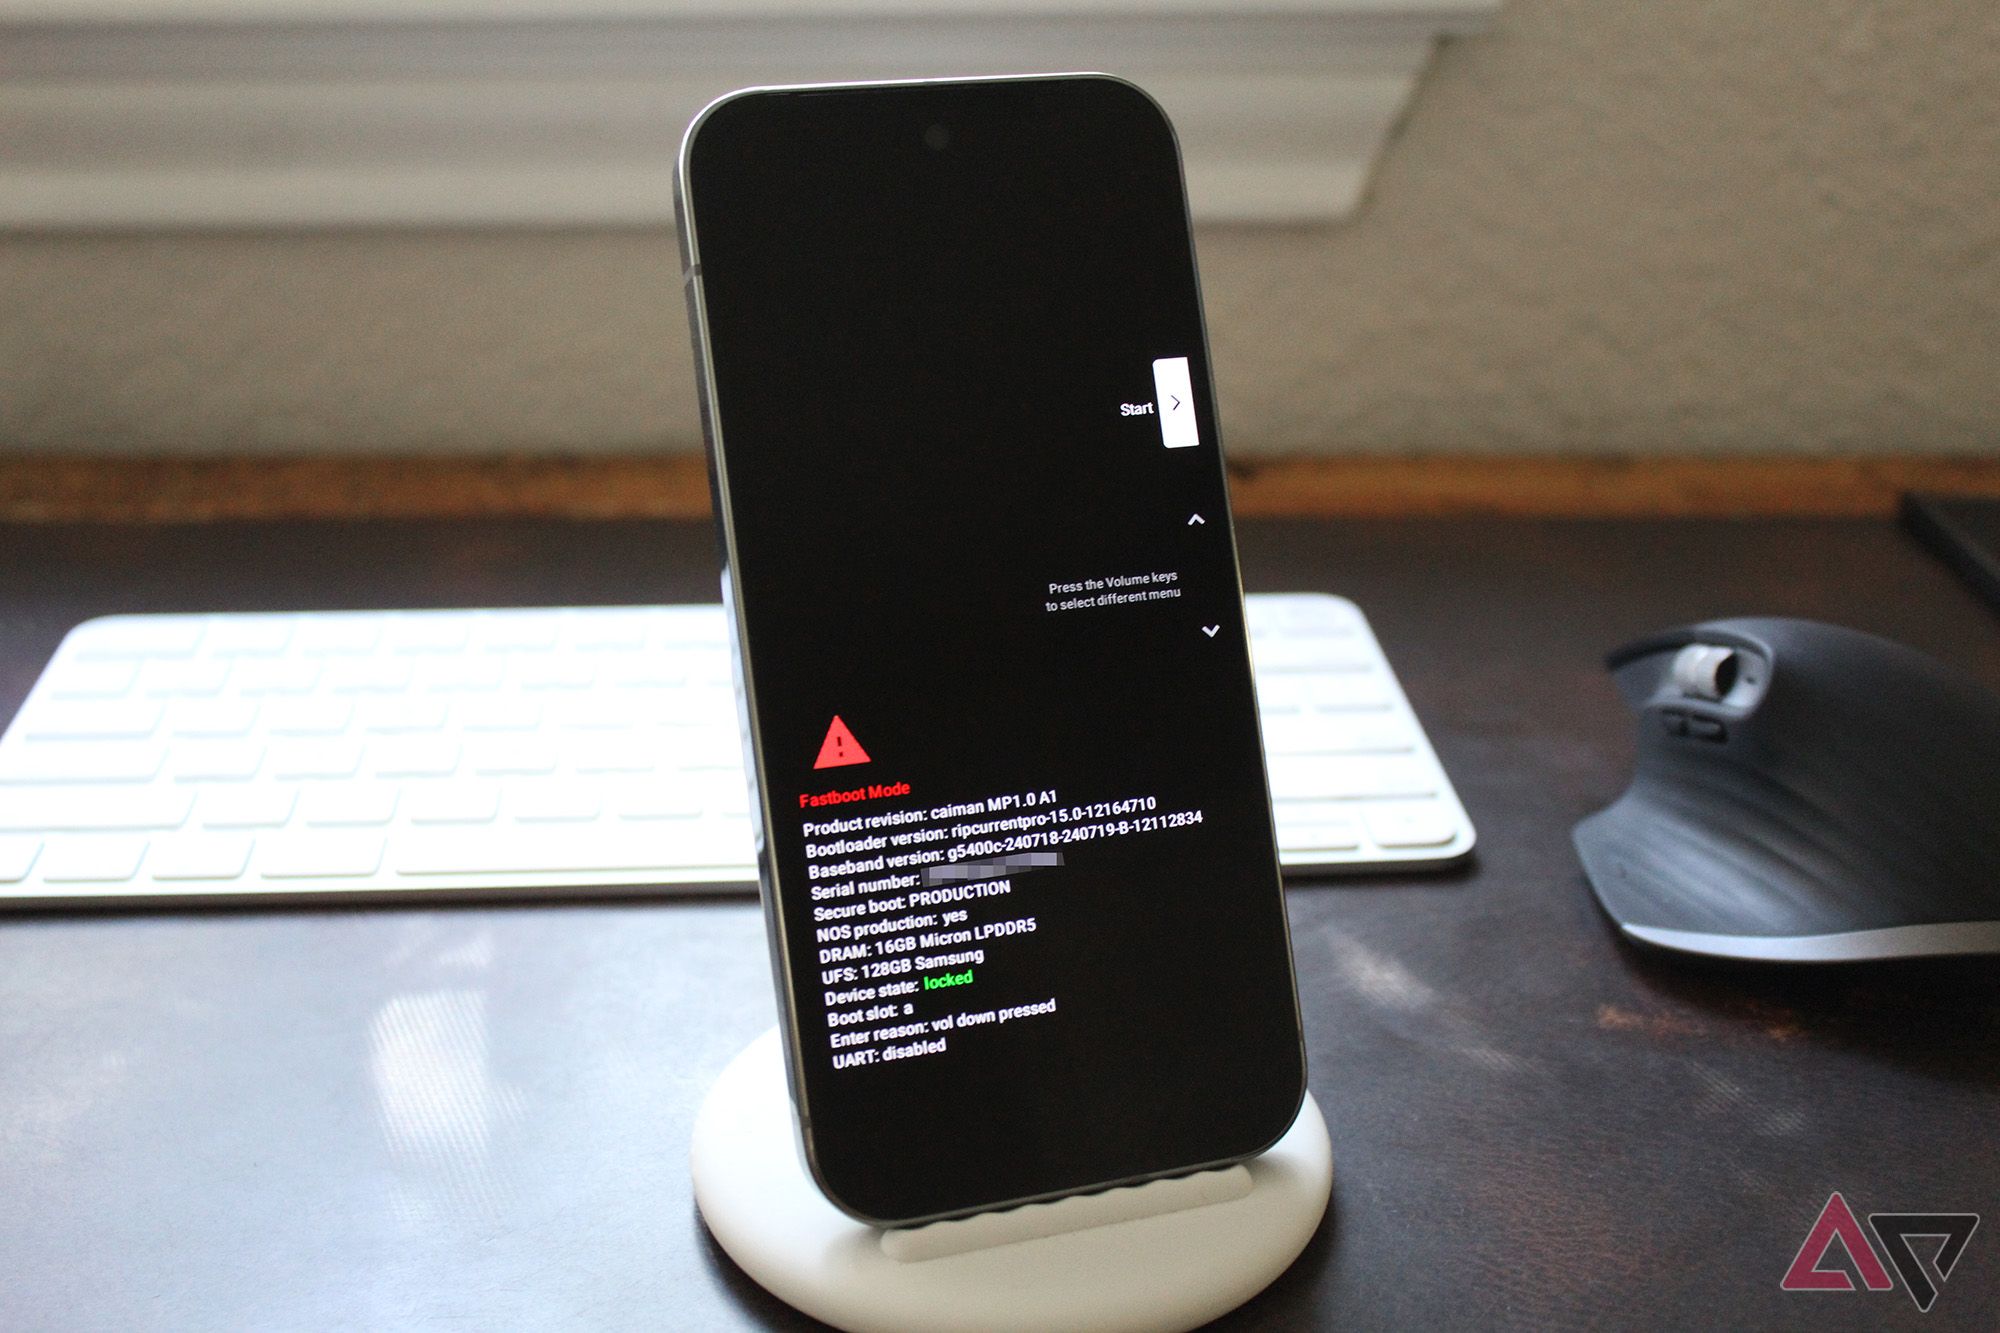
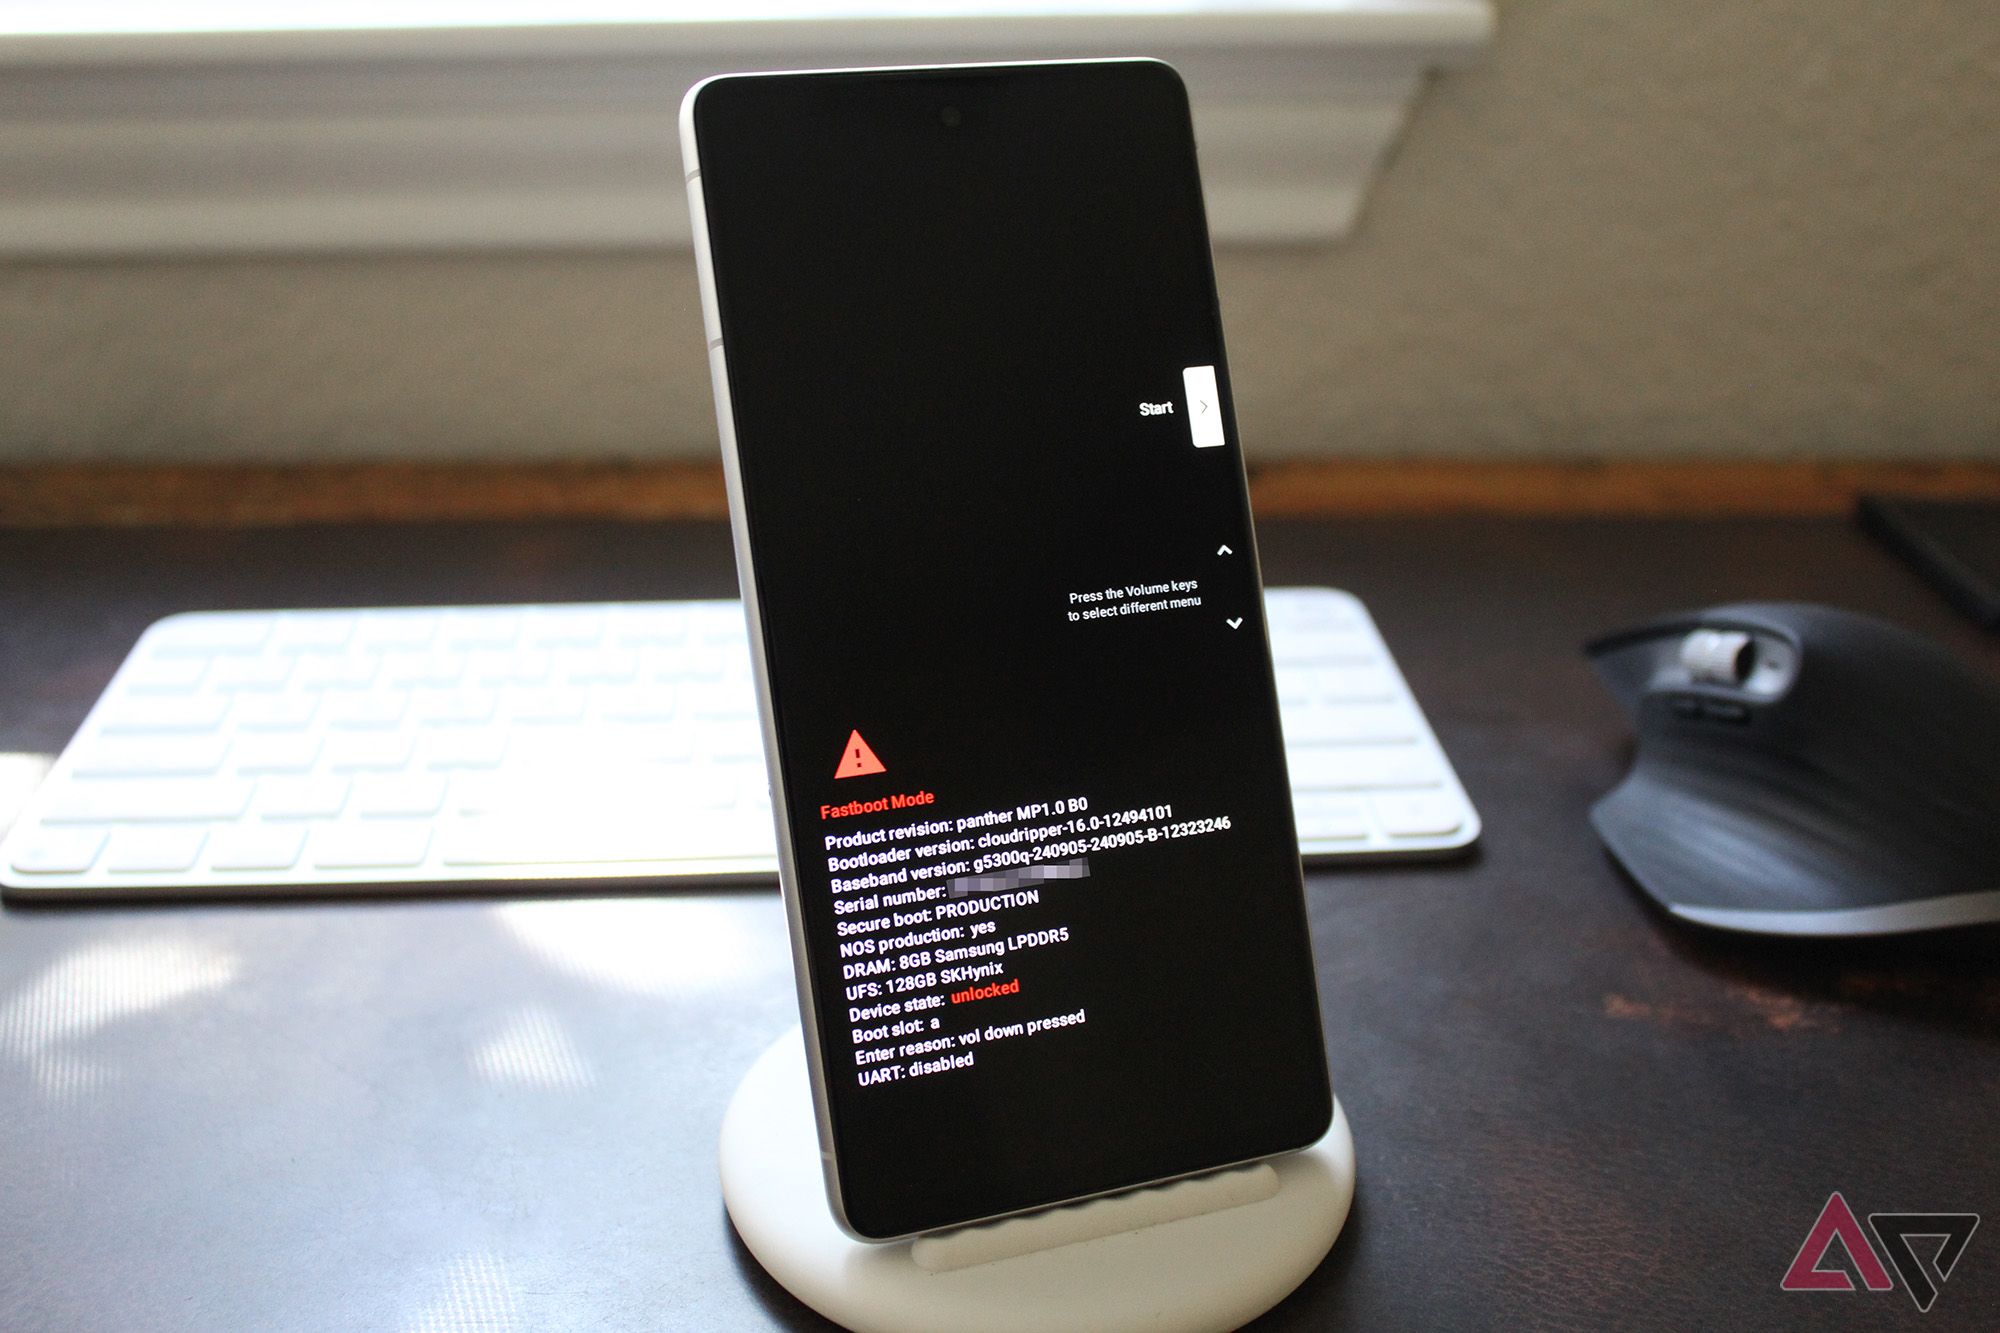
Boot your phone into Fastboot mode by selecting Restart from the power menu, then pressing and holding the physical volume down button until the Fastboot mode screen appears.
- Connect your Android phone with your computer using a USB cable, making sure to leave the phone on the Fastboot mode screen.
-
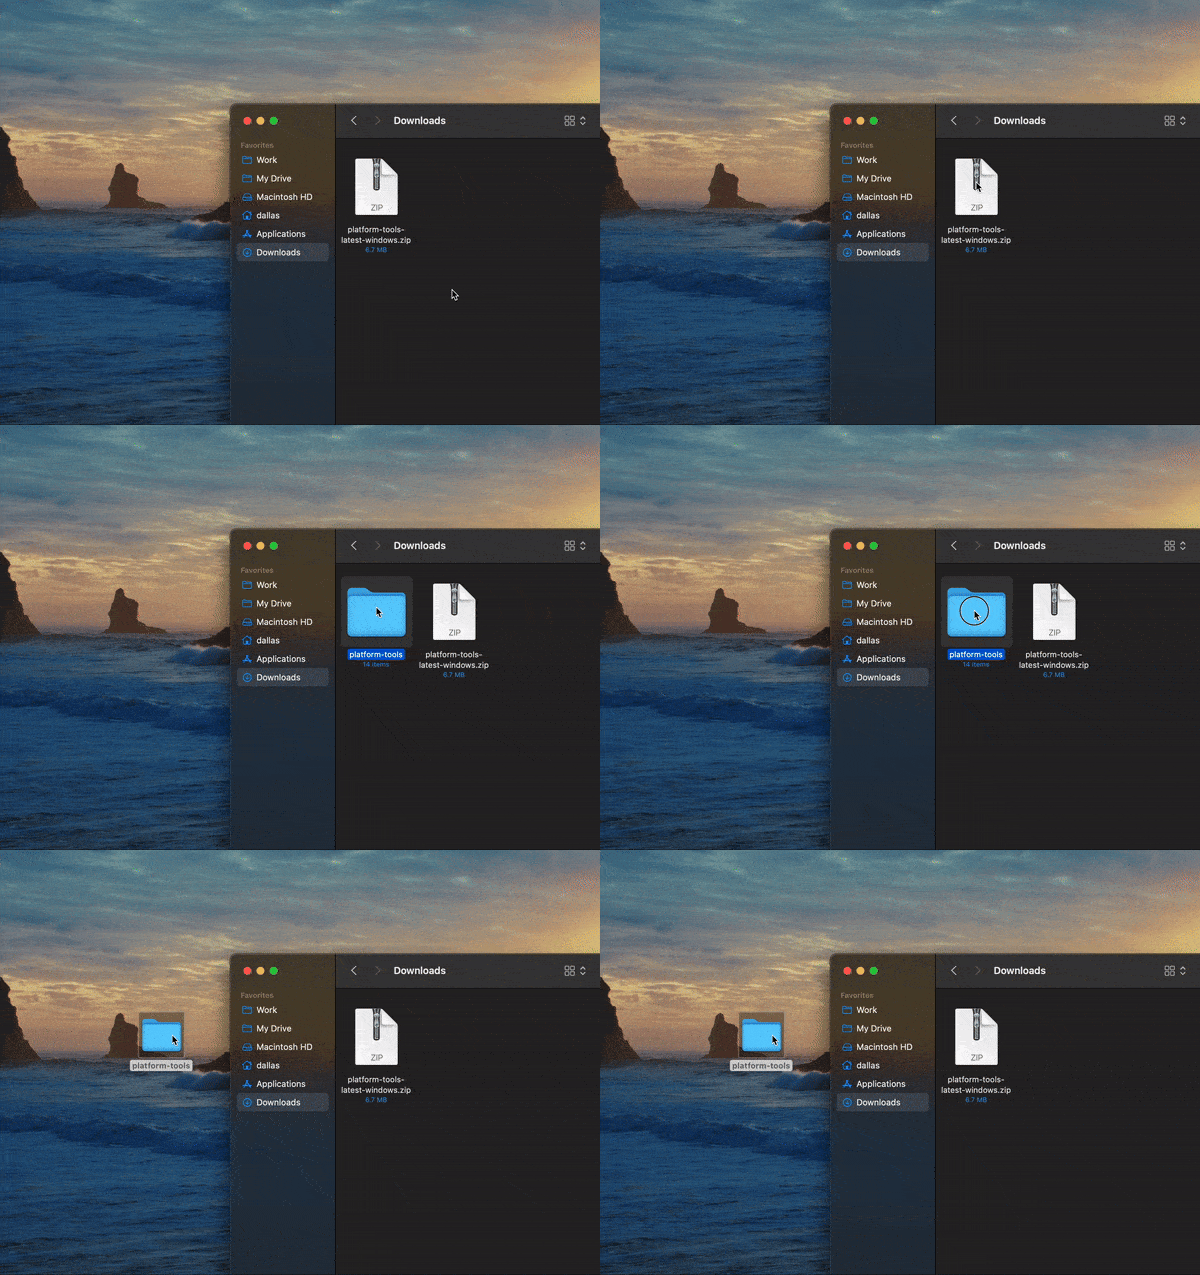
Download Google’s standalone platform-tools and extract the ZIP to a folder you can access easily (e.g., your desktop).
-
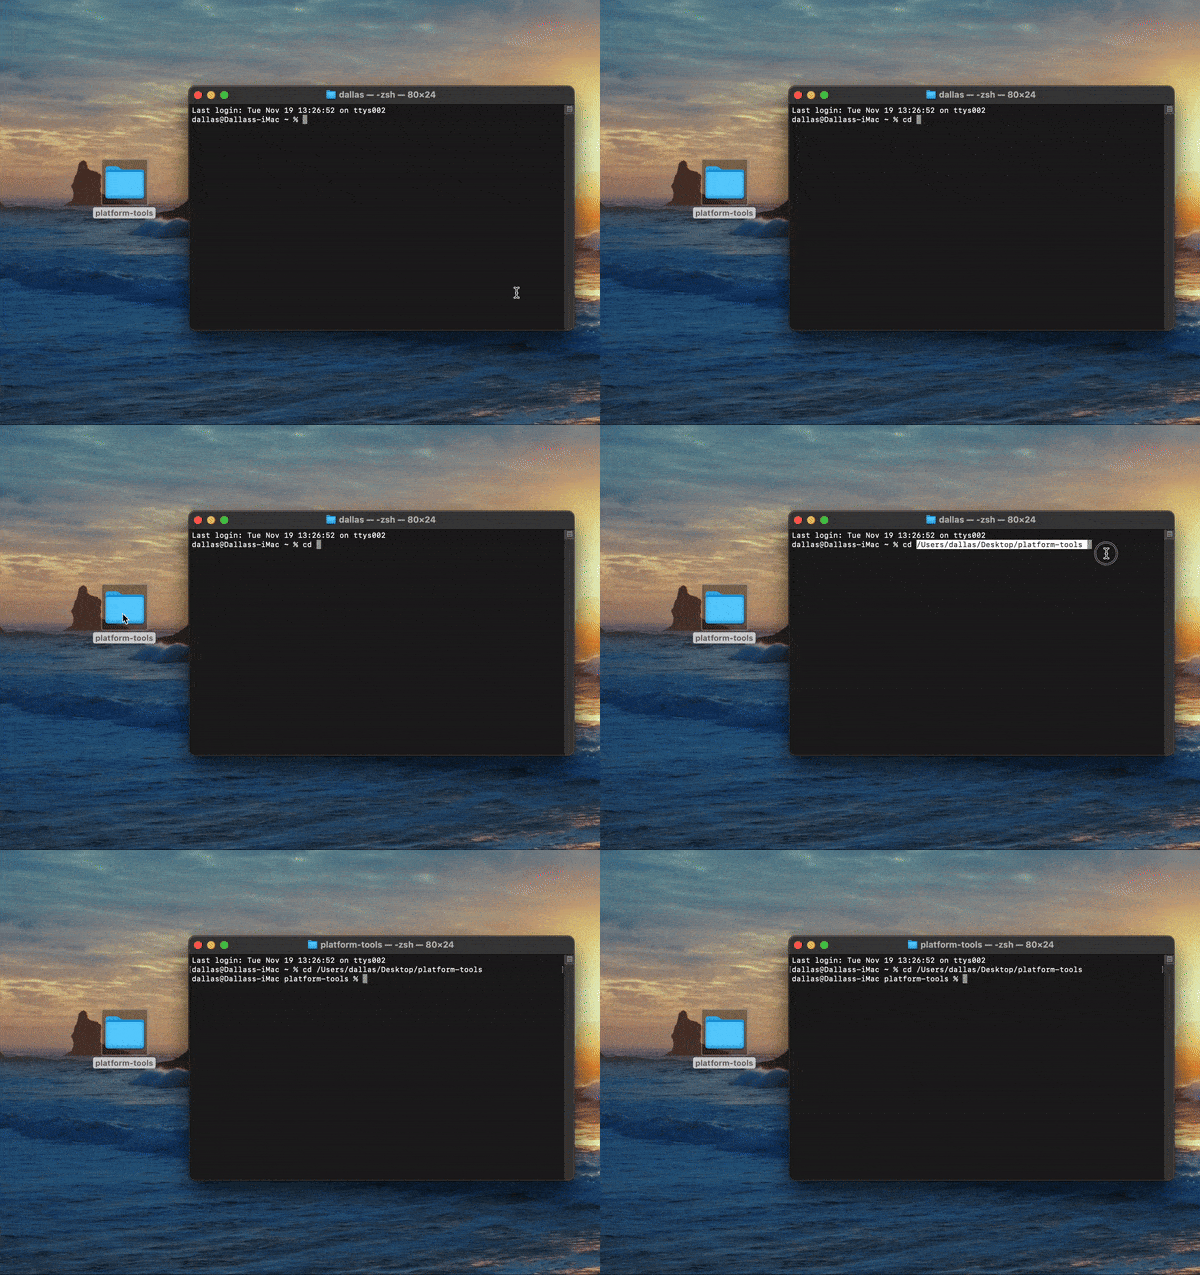
On your computer, open the terminal and type the letters cd followed by a space, but don’t hit enter yet. Instead, drag and drop the platform-tools folder from your desktop onto the command window to populate its full file path, then press enter.
-
Enter the following command into the terminal on your computer. If this shows an error in the terminal, add a period and a slash (./) to the beginning of the command (i.e., ./fastboot flashing unlock) and send it again:
fastboot flashing unlock
- On your Pixel, use the volume keys to navigate to Unlock the bootloader. Press the power button to confirm. Your phone will reset.
With Fastboot all set on your computer and your bootloader unlocked, you can get down to business and install the Android 16 Developer Preview build.
Note that if you’re on Windows, you’ll need to have the Google USB Driver installed. If you’re using a Mac, you can skip that step.
To flash Android 16 Beta 1:
-
Boot your phone into bootloader mode again by tapping Restart from the power menu, then pressing and holding the physical volume down key until the Fastboot mode screen appears.
- Connect your Android phone with your computer using a USB cable.
- Download the factory images of the beta build for your device from the Android Developers website.
-
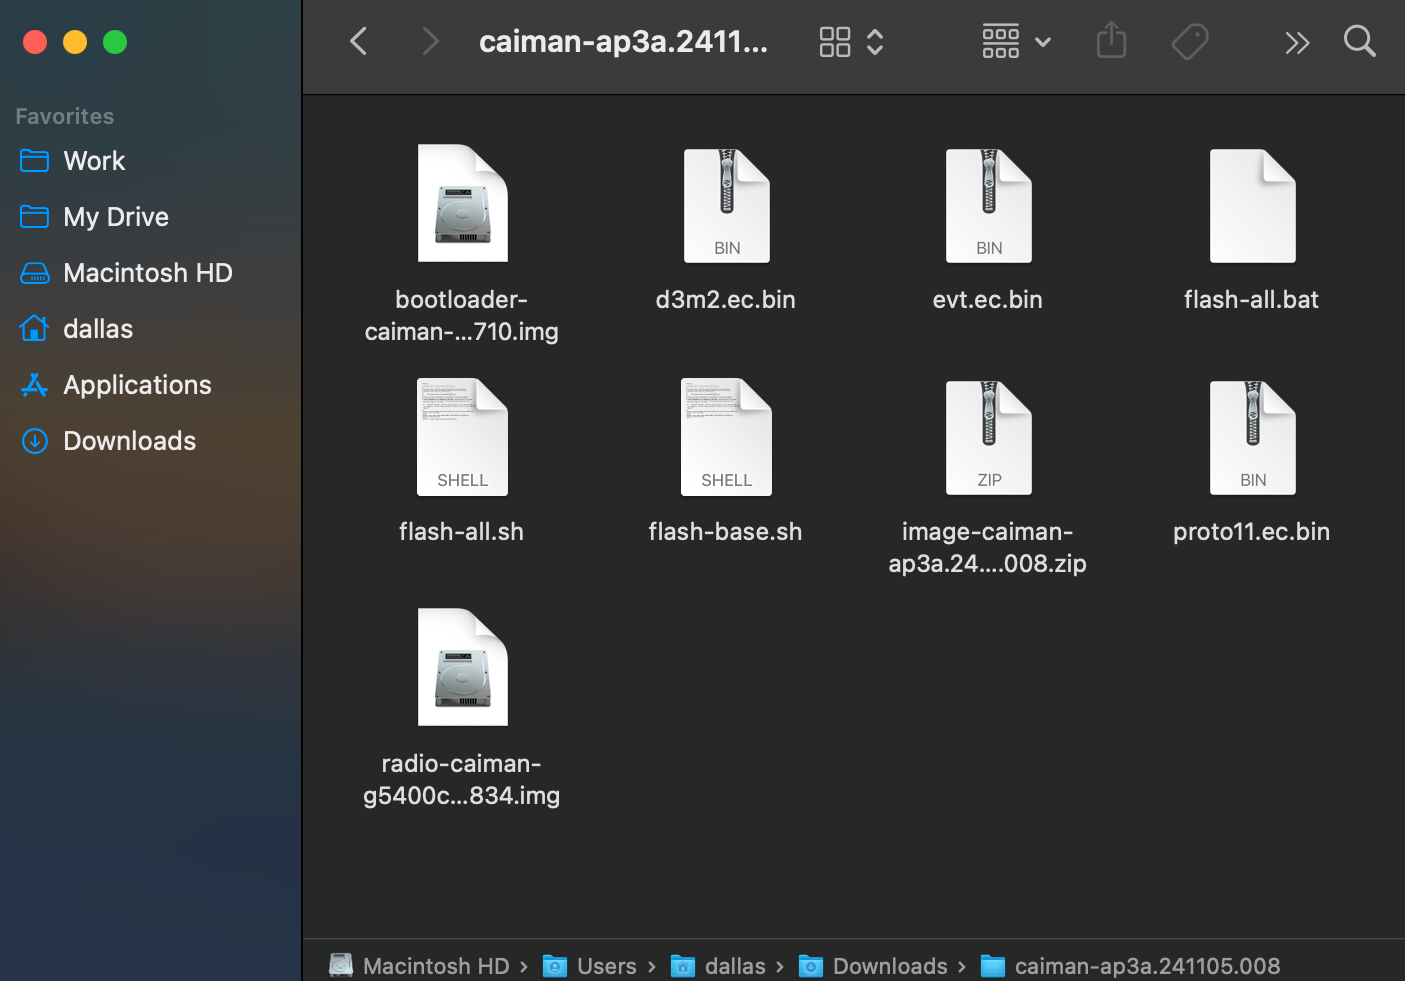
Extract the ZIP to a folder you can access easily. Inside this folder, there should be two IMG files and one ZIP, in addition to a few other files.
-
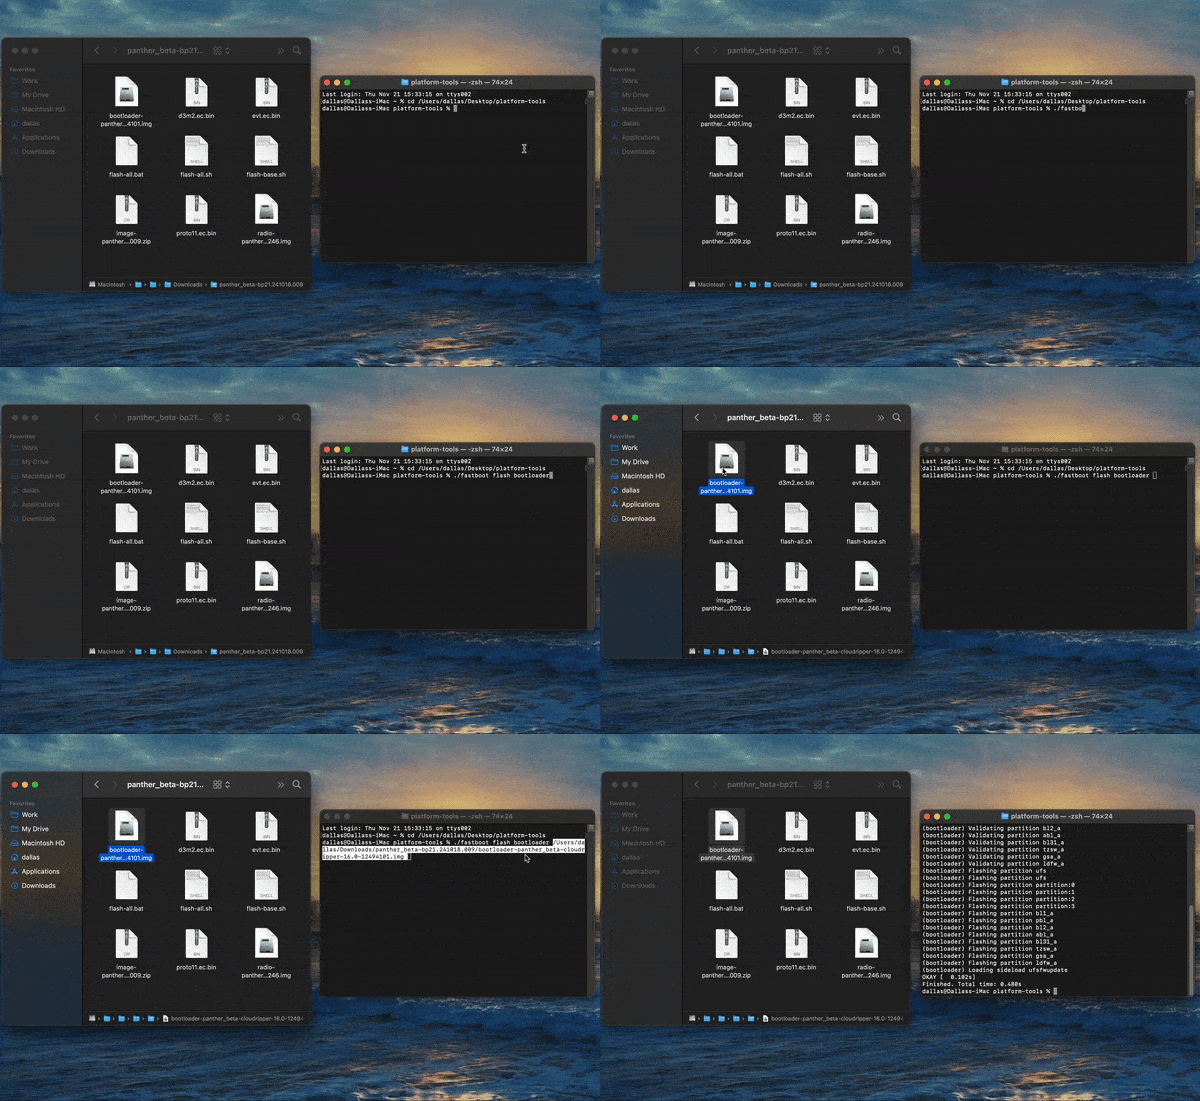
Open the terminal app on your computer and type the following command. Add a single space after it, but don’t hit enter yet:
fastboot flash bootloader
Note: If you had to add a period and a slash to the beginning of the commands above, you’ll need to add one to this command as well (i.e., ./fastboot flash radio). If in doubt, try without first; the worst that can happen is an error message in the terminal app.
-
Open the folder with the extracted factory images and locate the IMG file that begins with the word bootloader. Drag this file to the terminal window and drop it on top of the command prompt to populate its full path, then hit enter.
-
Reboot the phone into the newly flashed Android 16 bootloader with the following command, remembering to add ./ to the front if you’ve needed to in previous steps:
fastboot reboot-bootloader
-
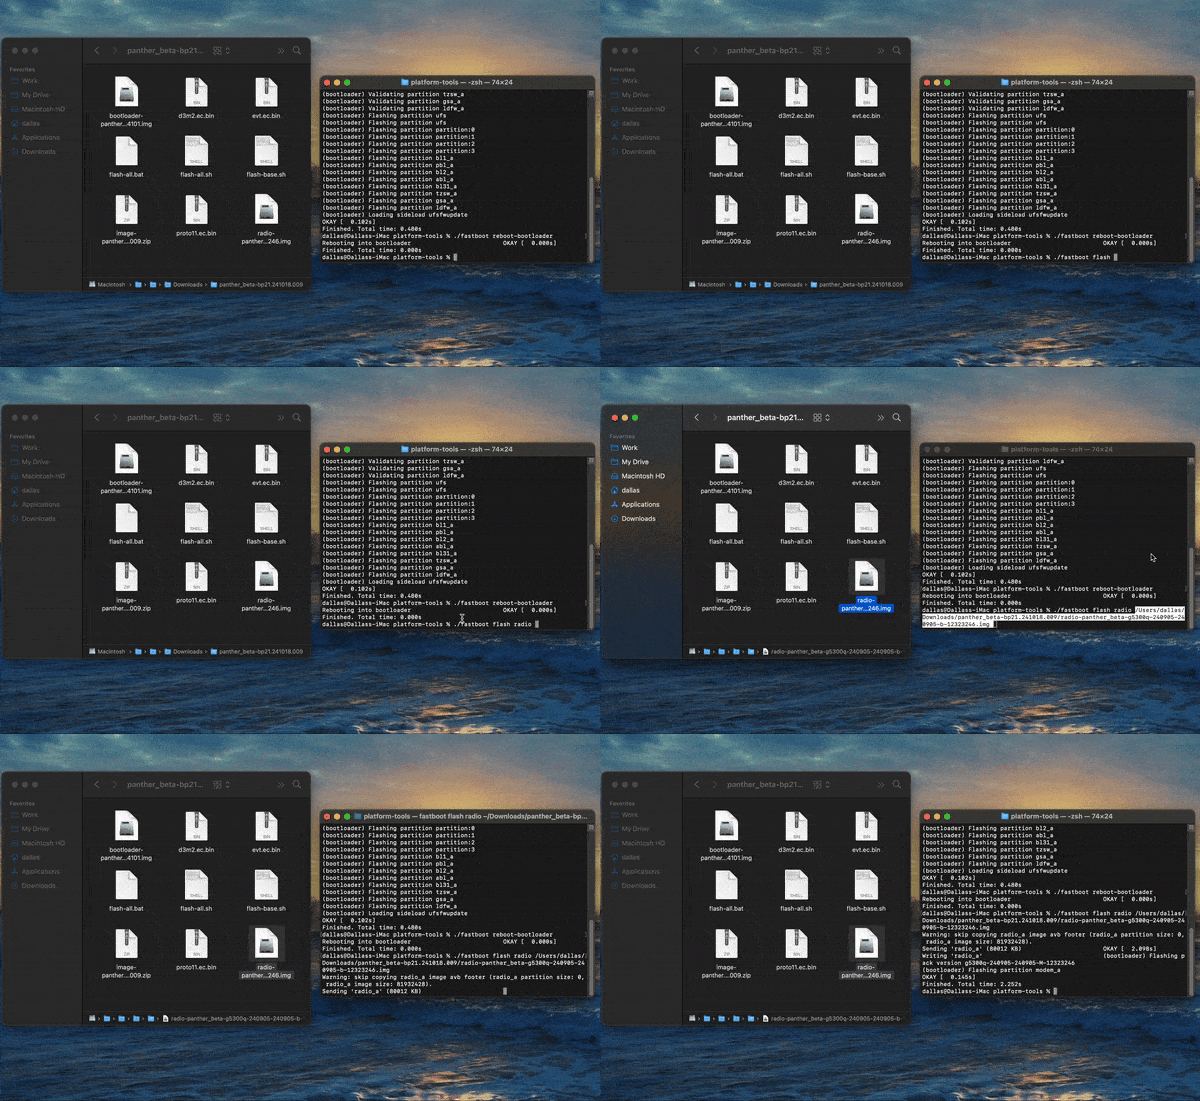
Type the following command to prepare for flashing the new radio. Again, add a single space to the end of the command, but don’t hit enter yet. As with all of these commands, add a ./ to the front if you needed to before:
fastboot flash radio
-
Now, drag and drop the image file that starts with the word radio onto the terminal window to populate its full file path. Press enter once populated to flash the Android 16 radio.
-
Again, reboot the bootloader to load the new radio, adding ./ to the front if you needed to before:
fastboot reboot-bootloader
-
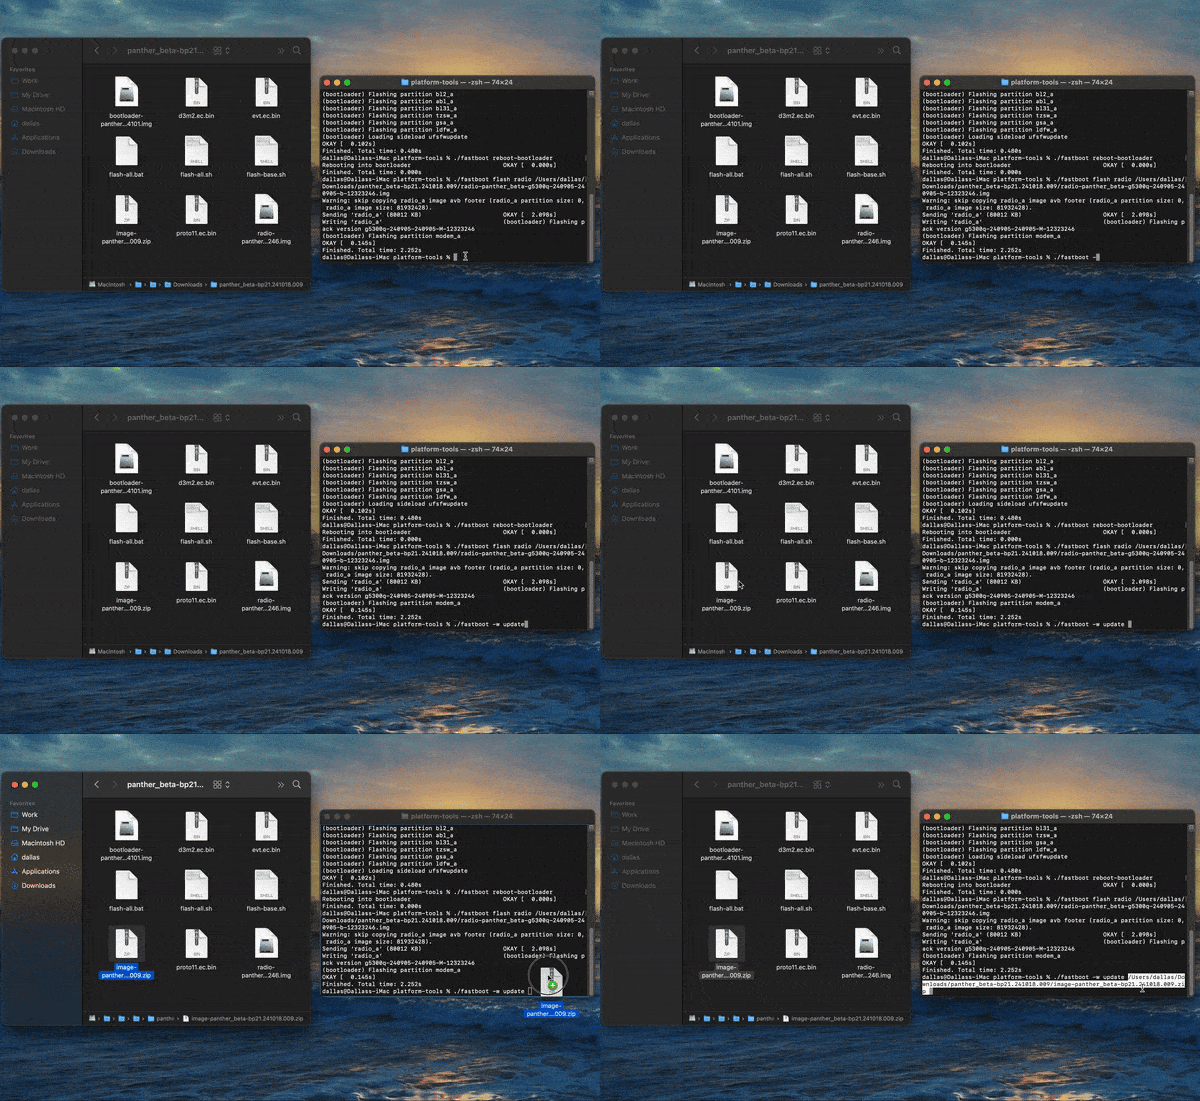
Now it’s time to flash the main update. Type the following command into the terminal, then add a single space, but don’t hit enter yet. And, of course, preface the command with ./ if you needed to in previous steps:
fastboot -w update
Note: The “-w” part of this command will wipe your device. To avoid this, you can delete that portion of the command, but note that wiping is recommended, and that it’s required if you’re coming from an Android 15 QPR beta build.
-
Drag and drop the ZIP file that starts with the word image onto the terminal window. Once its full file path is populated, press enter to install Android 16. This step will take a few minutes.
- When the flashing process is complete, your phone should reboot automatically into Android 16.
If everything went as expected, you should now have Android 16 Beta 1 on your device. If you stay on pre-release software, beta updates will be delivered automatically over the air, and you’ll eventually get back on the stable track with the full release of Android 16 in the second quarter of this year.
What new user-facing features are included in Android 16 Beta 1?
As is always the case with pre-release builds like this, much of what’s new in Android 16 Beta 1 is aimed at developers — new APIs and behaviors to account for in building new versions of apps for Android. For more on those behind-the-scenes changes, check out our deep-dive look at new features here.
But of course, it’s not all for developers. There are several new featuers included in Android 16 Beta 1 that users will notice, too. Here are some of the highlights.
Better app compatibility on large screens
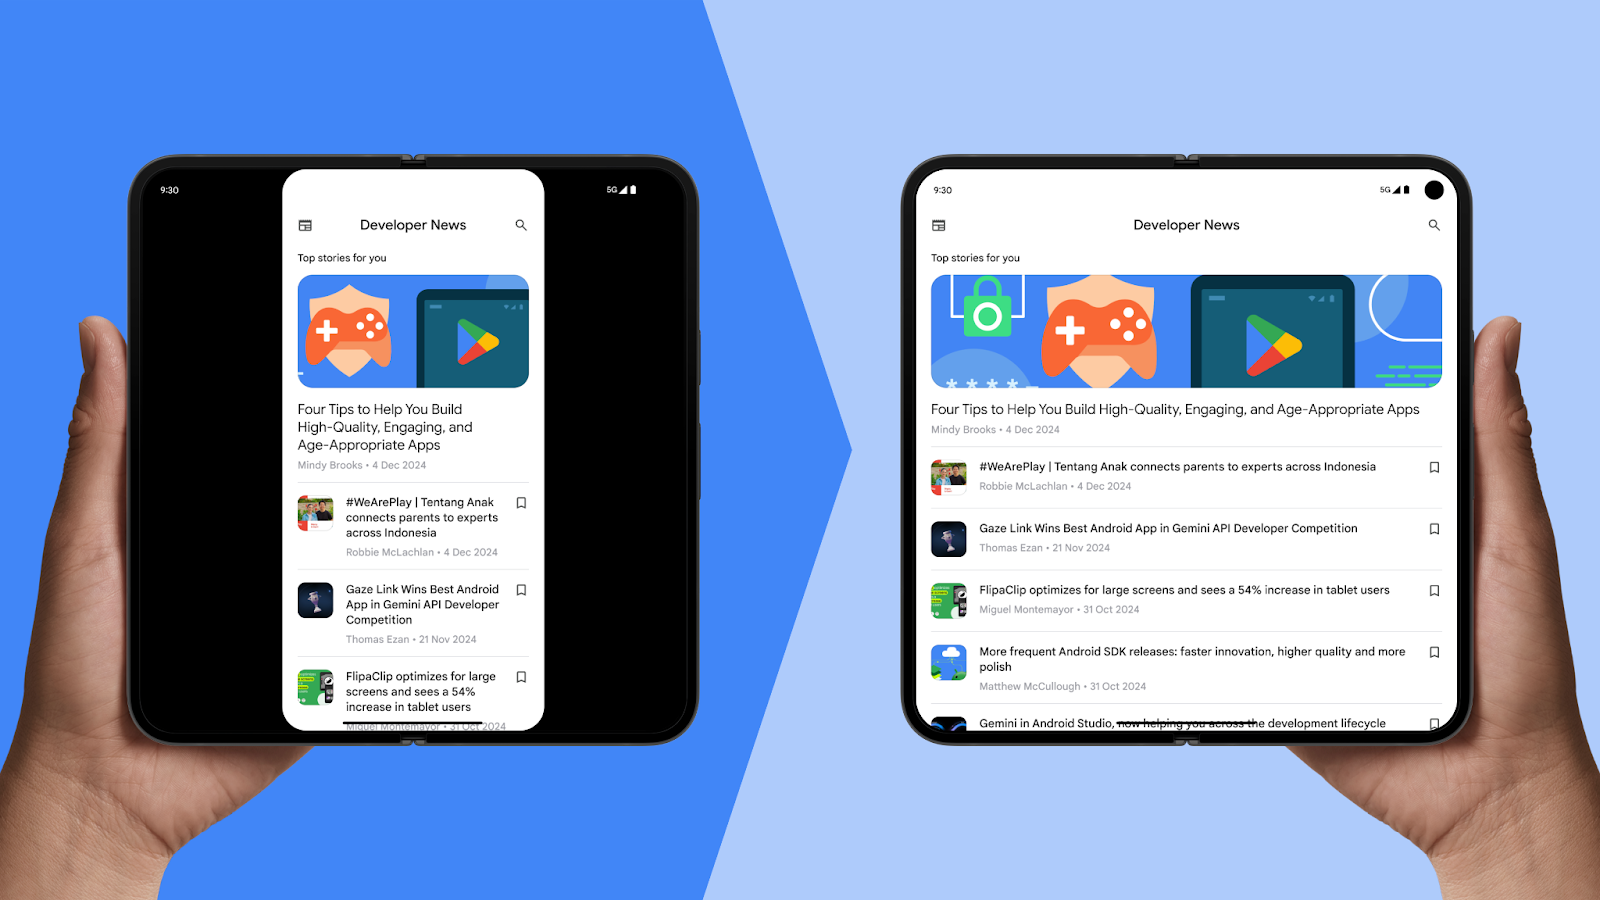
Android’s long had a problem with apps behaving strangely on screen sizes and shapes that developers didn’t specifically plan for — an issue exacerbated by the popularization of folding phones that can render apps on two vastly different displays. Apps targeting Android 16 will be resizable on large screens by default, meaning that developers won’t have to create a bespoke tablet layout in order to take advantage of all that real estate. Google says it’s on developers to ensure apps behave correctly when resized.
Live Updates notifications
Android 16 adds a new type of notification, called Live Updates, which work similarly to iOS’s Live Activities. These notifications are used for ongoing events — for example, to show the progress of your rideshare car or food delivery. These will populate at the top of your notifications list so you don’t miss them. Live Updates have to be implemented by individual app developers, but now that the utility is baked into Android, it shouldn’t be too long before popular apps implement the change.
Predictive back animations are here (again)
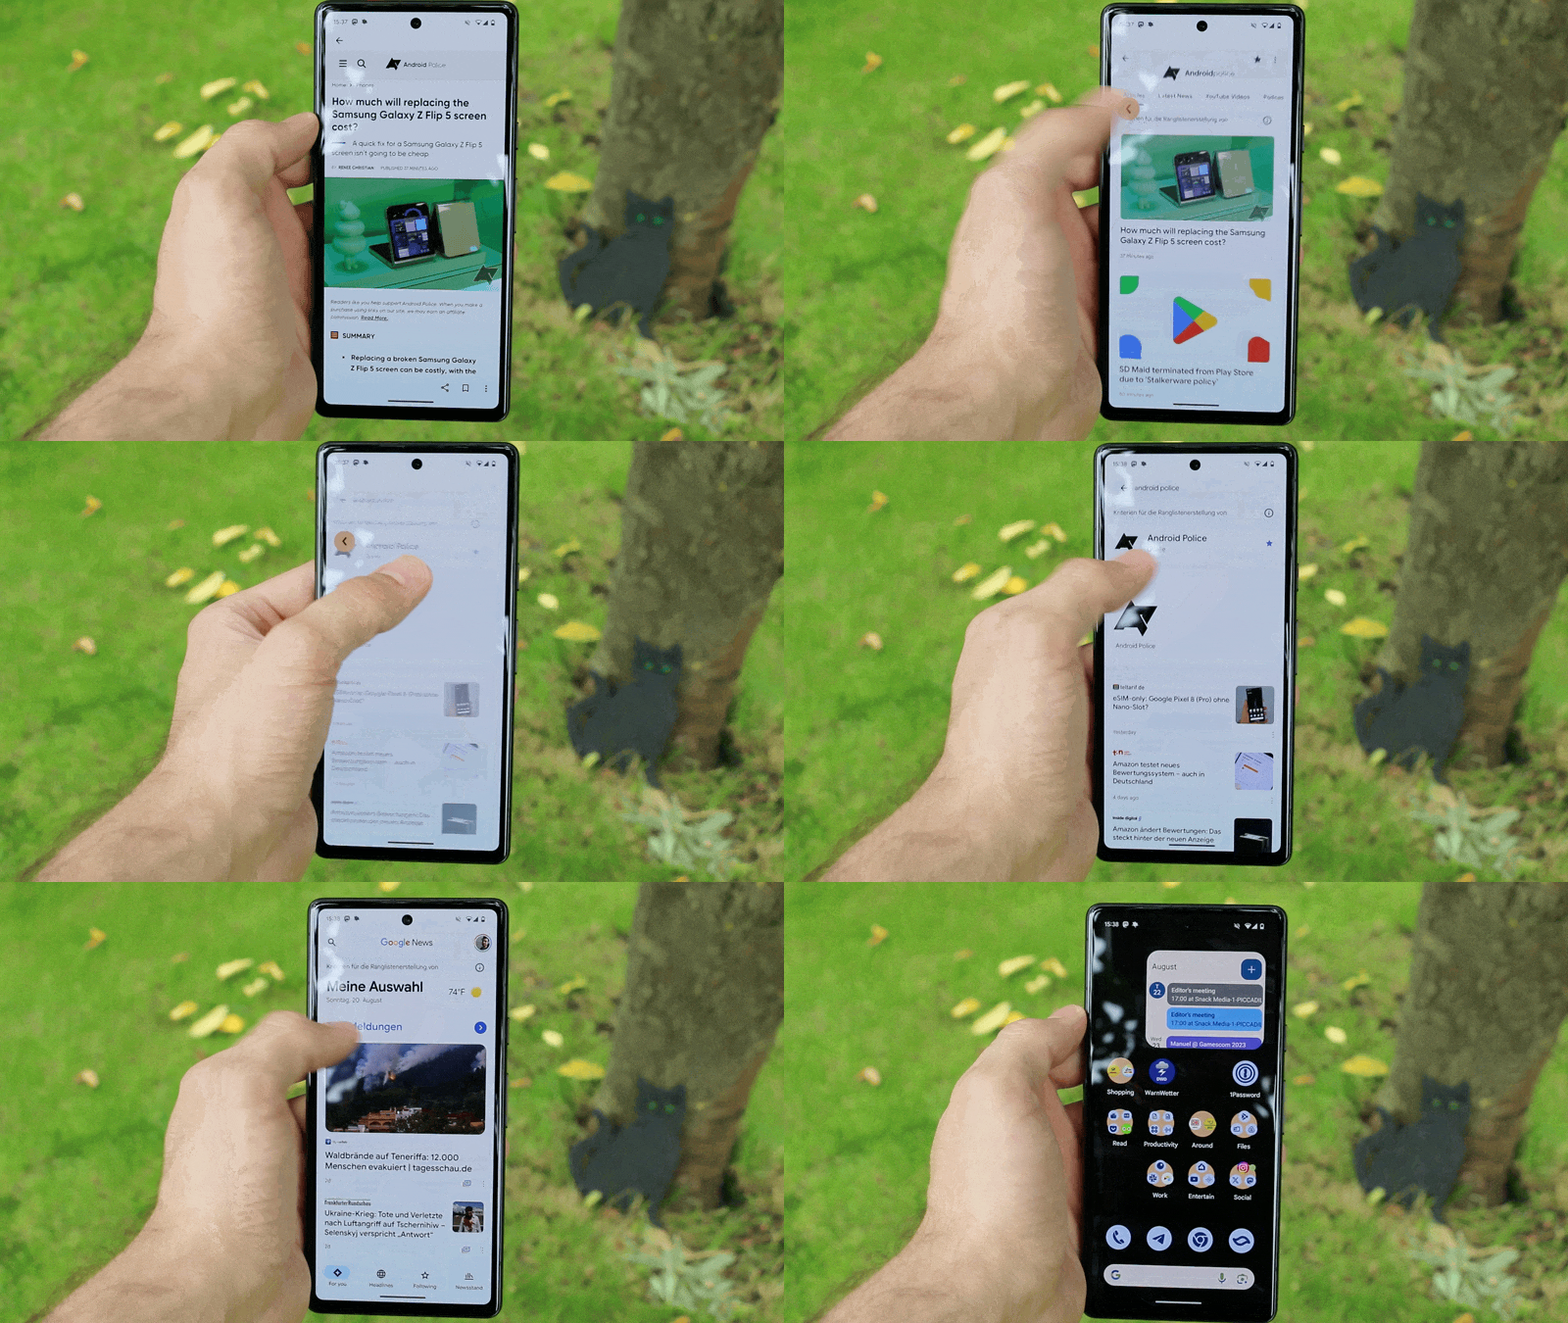
Android 15 introduced predictive back animations, which show a preview of the screen you’ll navigate to as you’re swiping in from the side of your display. Outside very specific cases, though, you probably never saw them — up to now, predictive back animations have been opt-in. Apps targeting Android 16, though, will have predictive back animations enabled by default. Developers can opt out, but Google recommends adapting the new feature early.
Interestingly, you’ll also see predictive back animations with traditional three-button navigation. Pressing and holding the back button in compatible apps will show the same preview you’d get using gestures.
Android 16 Beta 1 is available now
Android 16’s coming sooner than new Android builds usually do — the Developer Preview started in November, the Beta has begun, and the stable release is expected in late spring. If you’ve got an eligible Pixel phone and you’re curious to see what Google’s cooking up, now would be a good time to get in on it — though if you’re waiting for a more polished experience, Android 16 is expected to enter Platform Stability in March.


