Overview
- Indexing is MongoDB – a key aspect to managing and executing your database queries efficiently in data science
- Learn how indexing works in MongoDB using PyMongo, a classic Python library
Introduction
You can’t get away from learning about databases in data science. In fact, we need to become quite familiar with how to handle databases, how to quickly execute queries, etc. as data science professionals. There’s just no way around it!
There are two things you should know – learn all you can about database management and then figure out how to efficiently go about it. Trust me, you will go a long way in the data science domain.
MongoDB is a popular NOSQL database that is designed for ease of development and scaling. It is able to handle huge volumes of data with great efficiency (a must-have feature in today’s data-driven world). So how does MongoDB go about doing this?
One word – Indexing!
Just like any other database, MongoDB also provides support for indexing data. Indexing in MongoDB allows us to fetch the documents at a much faster rate thereby improving the performance of the database. This is significantly important when the database is handling huge amounts of data, probably in terabytes!
MongoDB has different index types with various properties that can handle complex queries. The indexes can be created and dropped as and when required and on any type of field in the document.
So in this article, we will look at indexing in MongoDB and when you should use it appropriately.
If you are a beginner in MongoDB, I suggest going through the below articles:
Table of Contents
- What is Indexing?
- Connecting to MongoDB Atlas
- Accessing Data with PyMongo
- Indexing in MongoDB
- MongoDB Collection Indexes
- Explain Query Result
- Create a Single Field Index
- Dropping Indexes
- Compound Indexes
- Multikey Indexes
- Text Indexes
- Geospatial Indexes
- Index Properties
- Unique Indexes
- Partial Indexes
What is Indexing?
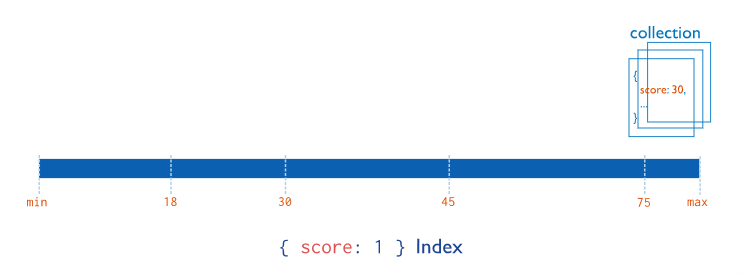
I’m sure you’ve done this – instantly jump to the relevant page in a book just by looking at its index. That is what indexing feels like in databases as well. Just by looking at the index, we instantly hop to the appropriate location in memory without having to look over all the other data in the database.
Indexing allows us to reduce the number of documents our database needs to scan through to look for the specific document thereby improving the performance of the database by leaps and bounds.
For example, if you have a database storing information about employees in a company and you frequently query the database based on their department field, then it is a wise thing to create an index on the department field. The database will arrange the department’s field values in order. Now, whenever you try to query based on the department, the database will simply go over the index first, jump to the location where the relevant records are, and retrieve the documents. This, in simple terms, is how indexing works.
However, in order to use indexes appropriately, you need to be aware of the queries you will be performing on the database. Otherwise creating random indexes will just be a waste of resources.
If in the example above we had created indexes on the name of the employee instead of the department, then it would have been of no use as the database would still have to go over all the documents. Therefore, it is important to know your queries for indexing.
A disadvantage to creating an index is that it puts a little bit of overhead on every insert, update, and remove. This is because the database not only needs to do the operation but also needs to make a note of it in any indexes on the collection. Thus, the absolute minimum number of indexes should be created.
Now, let’s look at how we can perform indexing in MongoDB. But first, we need to load our dataset.
Connecting to MongoDB Atlas
MongoDB Atlas is a global cloud database service. Using it, we can deploy fully managed MongoDB across AWS, Azure, or GCP and create truly flexible and scalable databases.
We will be using the sample dataset available with MongoDB Atlas clusters. So before we get our hands dirty with indexing in MongoDB, we need to first create a MongoDB Atlas account and then create a free cluster to access the sample dataset.
- Creating a MongoDB Atlas account is pretty straightforward. All you have to do is register your account here and log in to your account
- Then you need to deploy a Free Tier Cluster. These never expire but you can only create one per project
- Now you need to whitelist your IP address so that you can connect to the cluster and access the database
- Next, you need to create a user to access the cluster. Provide the username and password
- Now you need to connect to your cluster
- Note: My Python version is 3.7.4, however selecting the “3.6 or later” option from the “Version ” dropdown list gave me an error. Selecting the “3.4 or later” worked fined. You can try that if you get an error.
Once you have the connection string, fire up your Jupyter notebook because we will be needing the PyMongo library!
Accessing Data with PyMongo
To access data from your local machine, we will need the PyMongo library. You will need the connection string that you had generated to connect to your cluster. Remember to replace the <username> and <password> with the user name and password you have created for the database user.
You can now view all the sample database provided by Mongo using the following command:
We will be working with the “sample_restaurants” database here. Load the database using the following command:
You can have a look at all the collections within this database:
You can count the number of documents within each collection:
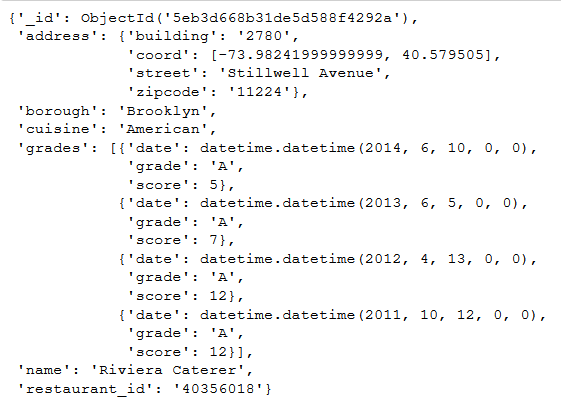
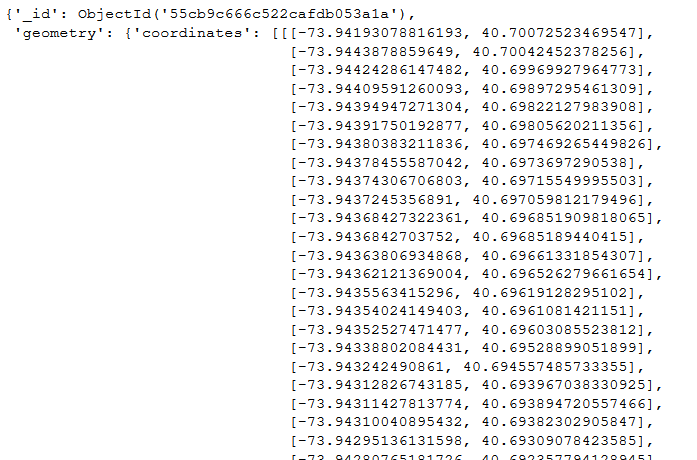
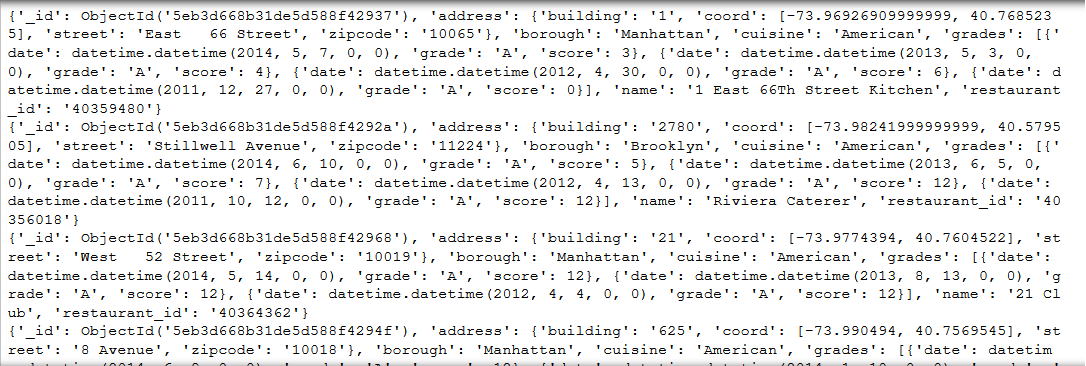
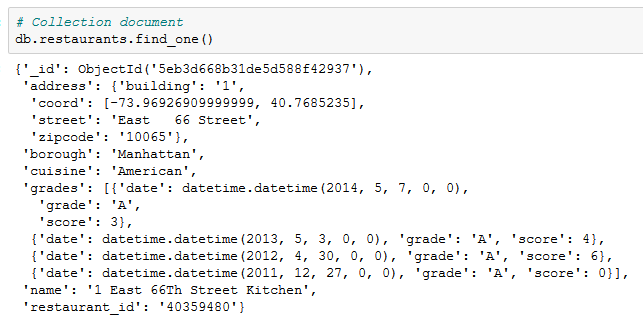
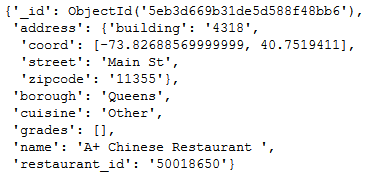
Here is a look at the documents from each collection:
Indexing in MongoDB
Without indexes, a MongoDB database has to scan every document in a collection to look for the relevant documents. This is called COLLSCAN, or a collection scan. However, using indexes greatly reduces the number of documents MongoDB needs to scan. Hence, using indexes makes the execution of queries quite efficient, especially if the database stores a large number of documents, for which MongoDB is very popular.
MongoDB offers a number of different index types that it supports and the various properties it provides for each of these indexes. So, let’s explore these indexes and when best we should use them!
MongoDB Collection Indexes
Every MongoDB collection has a default index: _id. This is created during the creation of the collection. It makes sure that no two documents in the collection contain duplicate values.
To know how many indexes there are in a collection and other related information about them, we use the index_information() function.
If we execute it right now, it will return only the _id index, since it is the only index present in the collection so far. In fact, even if you drop the custom indexes from the collection, you will still be left with this default index.
Here is the index from the restaurant collection:
{'_id_': {'v': 2, 'key': [('_id', 1)], 'ns': 'sample_restaurants.restaurants'}}
It returns the result as a dictionary. The key is the index name, _ id _ for the _id index. The values are dictionaries containing information about the index.
Similarly, if we retrieve the index for the neighborhoods collection, we will get the default index:
{'_id_': {'v': 2,
  'key': [('_id', 1)],
  'ns': 'sample_restaurants.neighborhoods'}}
Explain Results
When we run a query in MongoDB, we can actually determine a lot of information about the query using the explain() function.
It returns a document that contains information about the query plans and the execution statistics. We are interested in the execution statistics.
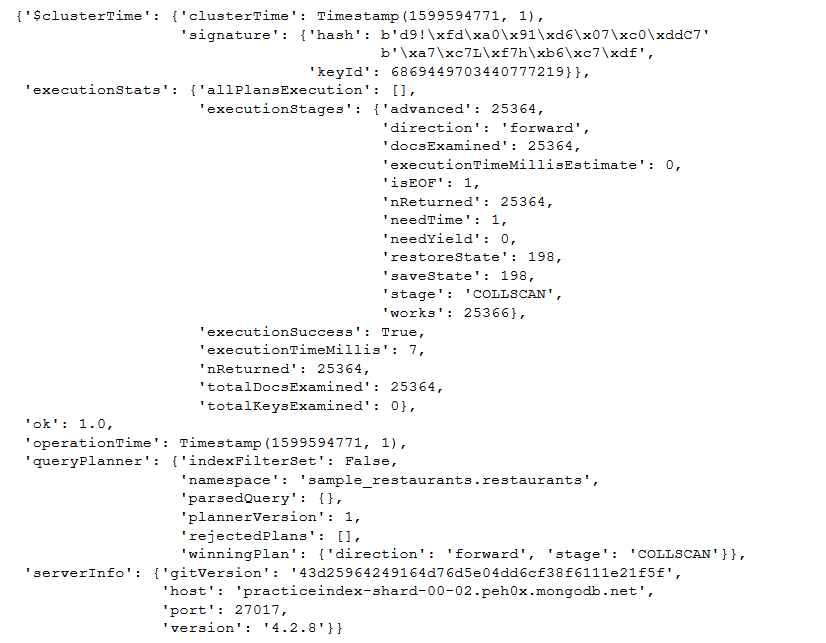
Execution statistics contain a lot of information about how MongoDB was able to retrieve the query results. But first, let’s have a look at the document returned by the explain() function:
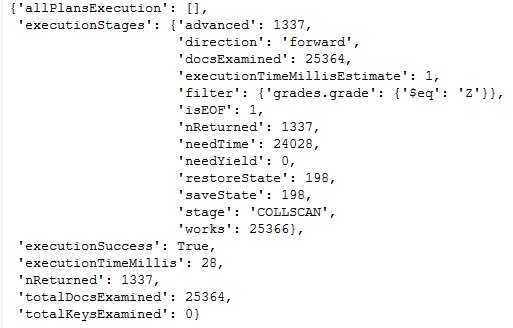
Here, focus on the executionStats key which contains the execution statistics. Below are the important keys to focus on:
- explain.executionStats.nReturned returns the number of documents that match the query
- explain.executionStats.executionTimeMillis returns the total time in milliseconds required for query plan selection and query execution
- explain.executionStats.totalKeysExamined returns the number of index entries scanned
- explain.executionStats.totalDocsExamined returns the number of documents examined during query execution. These are not documents that are returned
explain.executionStats stages are descriptive of the operation. COLLSCAN represents a collection scan while IXSCAN, which we will see later, represents an index key scan.
In this query, you will notice that “executionStats.executionStages.stage” is using COLLSCAN. This means that the default _id index was used to scan all the collections. Also, notice that explain.executionStats.nReturned and explain.executionStats.totalDocsExamined is the same as the number of documents in the collection. This is because we are using the default index. However, these values will change when we use indexes.
So, without further ado, let’s create our first index in MongoDB!
Create a Single Field Index
Suppose we want to find all the records of the restaurants that offer American cuisine. Let’s try finding that using the MongoDB find() function:
Now, we can use the explain() function to elicit the statistics about this query. Specifically, we will look at the executionStats key:
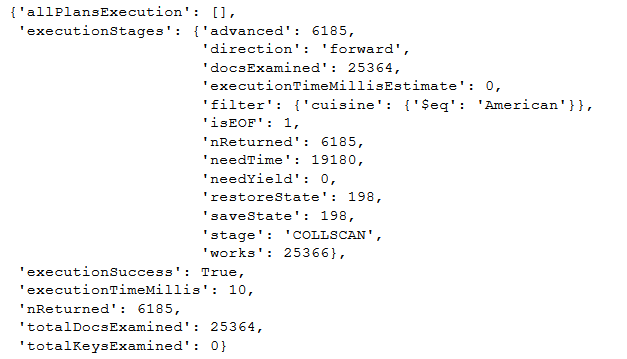
As you can see, it took 10 milliseconds and MongoDB had to scan all the 25,359 documents while it returned only 6,185 documents because it was using a collection scan. Can we make this querying faster?
Yes, we can do that using indexes.
Since we are querying on the cuisine key, we can create a new index on it. This we can do by using the create_index() function:
As you can see here, we have two indexes now – the default index _id and the custom index cuisine_1. Since we have created the index of a single field, it is called a Single Field Index.
Now, let’s use this index for the previous query and have a look at the statistics:
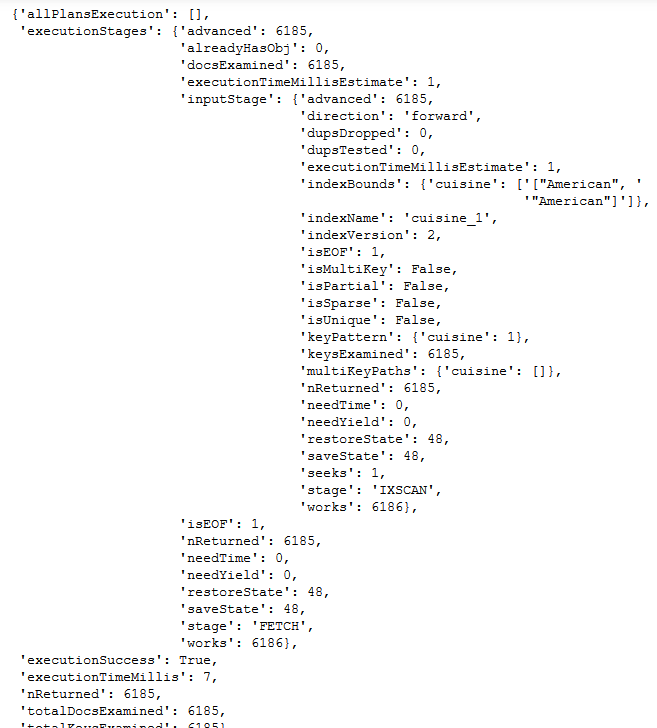
Notice the “executionStats.totalDocsExamined” values for both the queries. In the former query where we were using the default index, all the 25,359 records had to be scanned to look for the relevant records. But when we created the index, only 6,183 records were scanned. This considerably reduces the amount of time to query from the database as indicated by the “executionStats.executionTimeMillis” values.
Also, notice that the “executionStats.executionStages.stage” is IXSCAN here instead of COLLSCAN because MongoDB has scanned the index key we generated.
You can even name your index while creation. The create_index() has the name argument where you can provide your custom name.
Let’s create a new index because creating the same index again with a different name will give you an error. So, I will create a new index using the borough key and name it borough_index (so much for originality!):
Here, notice that the new index is referenced as “borough_index”, just like we wanted it to. Now, let’s see how to drop indexes before we move on to compound indexes in MongoDB.
Dropping Indexes
The disadvantage of creating an index is that it puts a bit of overhead on every insert, update, and remove. This is because the database needs to perform the operations and then also make note of it in the indexes of the collection. Therefore, it is important to drop indexes in MongoDB which are of no use. This will allow the collection to have more free space and can perform faster writes.
We can drop indexes with the same ease with which we created them. You will have to provide the name of the index you want to drop in the drop_index() function:
Here, we have dropped the custom index “cuisine_1”. You can also drop all the custom indexes for a collection with a single command using the drop_indexes() function:
You can only drop all the custom indexes that we had created.
The default _id index can never be dropped. If you try to do that, you will get an error:
Now, let’s check out how to create compound indexes in MongoDB!
Compound Indexes
Let’s say you query the collection on more than one field, then instead of creating a single index, you can create a compound index that contains all the fields in the query.
Here is the syntax for creating compound index: db.collection.createIndex( { <field1>: <type>, <field2>: <type2>, … } ).
MongoDB imposes a limit of 32 fields for any compound index.
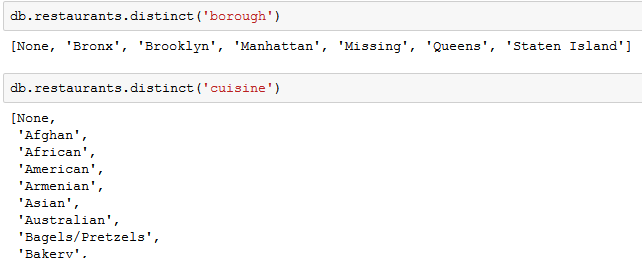
Now, if we wanted to query the collection to retrieve documents based on the cuisine in a specific borough, we can create a compound key that contains these two fields. First, let’s have a look at all the unique cuisines and boroughs in the collection.
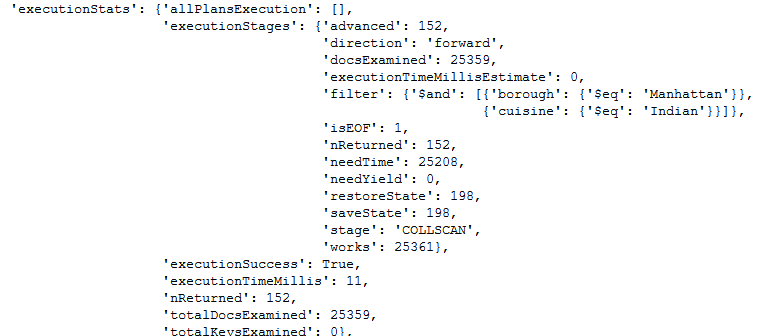
We can run the query before creating the index to compare the performance of the database:
As expected, we are using COLLSCAN and had to scan all the 25,359 documents while we returned only 152 relevant documents that matched the query.
Now we can create a compound index using the borough and cuisine fields:
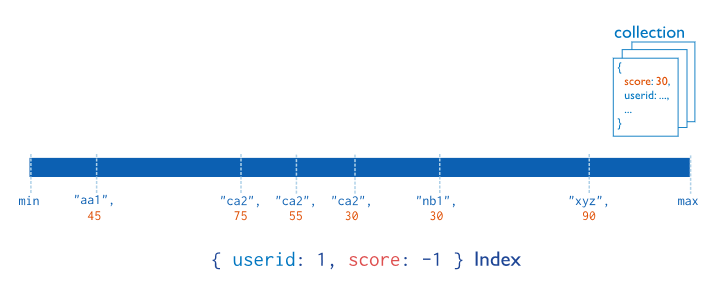
The index will contain references to documents sorted first by the values of the borough field and, within each value of the borough field, sorted by values of the cuisine field. That is, “Bronx”, “Afghan”; “Bronx”, “African”; etc.
You must have noticed that we are now providing the fields as tuples where the first value is the name of the field while the second value is oblivious to us. Well, the second value determines the index direction. This means we can order the items based on their index value. Since here we are using ASCENDING order for both the fields, the borough will be ordered in A-Z alphabetical order and within each borough value, the cuisine will also be ordered in A-Z alphabetical order. For example:
“Bronx”, “Afghan”;…;”Bronx”, “Vegetarian”
.
.
.
“Staten Island”, “Afghan”;…;”Staten Island”, “Vegetarian”
If however, we had ASCENDING for the borough and DESCENDING for the cuisine, the index would have been ordered as A-Z for borough , within it cuisine in Z-A alphabetical order as shown below:
“Bronx”, “Vegetarian”;…;”Bronx”, “Afghan”
.
.
.
“Staten Island”, “Vegetarian”;…;”Staten Island”, “Afghan”
The code for such an index is:
# # Create Compound index
# db.restaurants.create_index([('borough',pymongo.ASCENDING),
# ('cuisine',pymongo.DESCENDING)],
# name='cuisine_borough')
# # Get indexes
# pprint(db.restaurants.index_information())
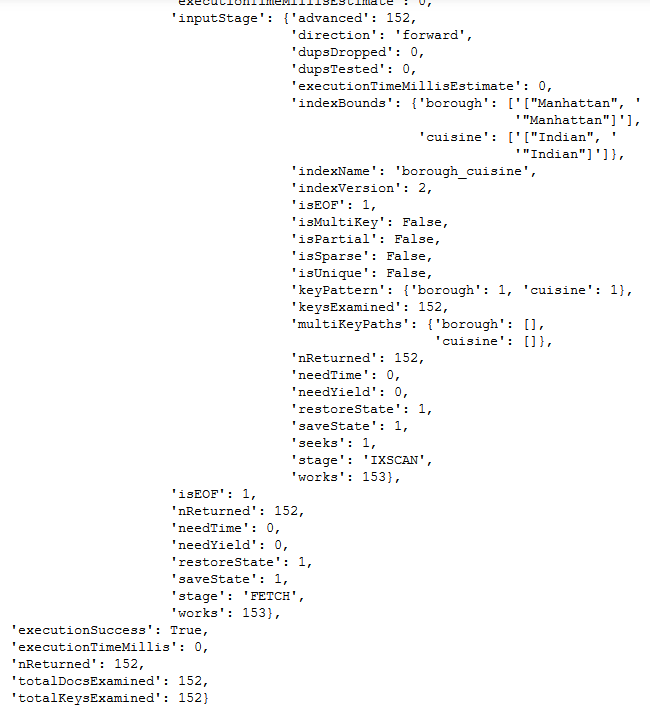
Now, let us try to run the same query as before and notice the difference:
Here, MongoDB used the “borough_cuisine” index that we created to retrieve the result in 1 millisecond and it only had to scan 152 documents, which is equal to the number of documents returned as well. Therefore, we were able to optimize the query by creating the compound index.
But, in addition to supporting queries that match on all the index fields, compound indexes can also support queries that match the prefix subsets of the compound index fields. That is, we can query on just borough in addition to querying on borough combined with cuisine as we have done so far.
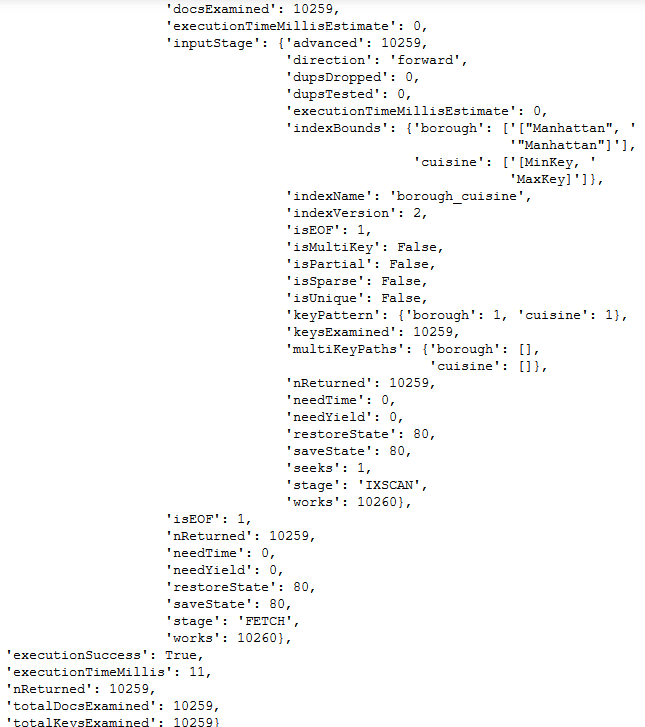
Let’s query to find the restaurants in “Manhattan” using the index:
As you can see, MongoDB is using the “borough_cuisine” index to scan for the relevant documents.
Next, let’s see how to create multikey indexes in MongoDB.
Multikey Indexes
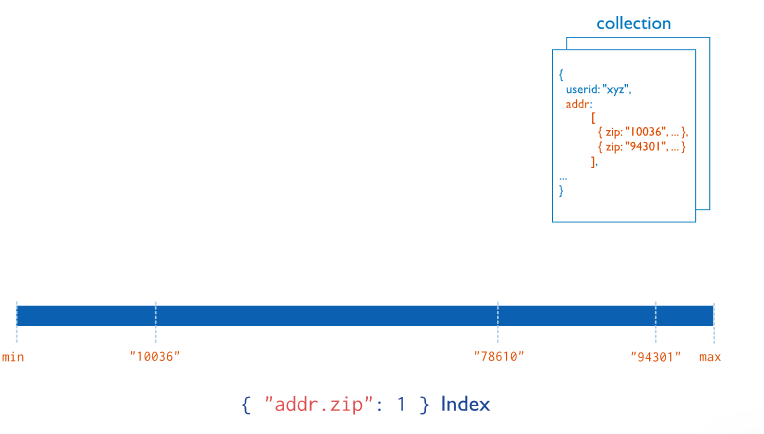
We can even create indexes on fields that contain array values. These are called Multikey indexes. MongoDB creates an index key for each element in the array. This is created automatically by MongoDB, so you do not have to explicitly specify it.
These Multikey indexes can be constructed over arrays that hold both scalar values (neither an embedded document nor an array value like strings, numbers) and nested documents.
But before creating a multikey index, let’s first drop the indexes we have created so far.
Now, as mentioned before, either you can create a multikey index for basic indexes like:
{ _id: 1, a: [ 1, 2 ], b: [ 1, 2 ]}
Or create multikey indexes on array fields that contain nested objects like:
{_id:1, a:[{‘score’:4, ‘grade’:’A’},{‘score’:2, ‘grade’:’B’}], b: “ABC”}
Now, since our collection here has nested objects in array format, we will be using that to create the multikey index. We will create a multikey index for the “grades.grade” field in the restaurant collection.
First, we will look at the execution statistics for the query we want to run. I want to find out the restaurants that have had a grade Z in their review.
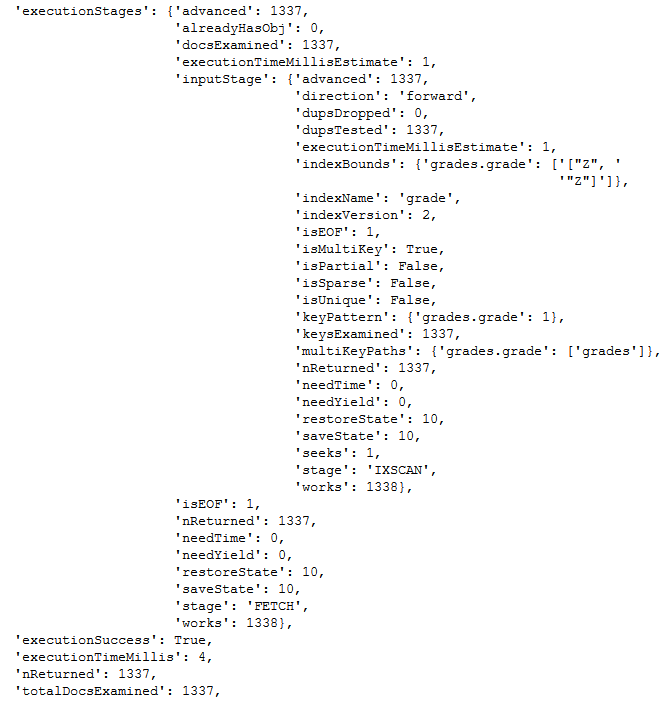
As you can notice, MongoDB is scanning all the collection documents and returned the results in 28 milliseconds. Now, let’s try to create a multikey index on this field and notice the change in query optimization.

Text Indexes
Now, regular expressions are useful for matching exact value within a text field. But if you are looking to match a specific word within a text field, then you ought to use the Text index.
Let’s have a look at one document from the restaurant collection.
If you wanted to retrieve all the restaurants that have the word “Kitchen” in their name, you can easily do that using the text index.
Now if we wanted to retrieve all the restaurants with the keyword “Kitchen” in their name, we can simply write the following query.
You can even search for multiple keywords in the name. The following query will return those documents that have either “Chinese” or “Kitchen” in their name.
You can even negate certain documents that contain a specific keyword. For example, the following query retrieves all the documents that have the keyword “Chinese” in them but not the keyword “Restaurant”.
There is a lot more you can do with text indexes in MongoDB and I implore you to check it out.
Geospatial Indexes
Location-based data is commonly used these days because of the proliferation of mobile devices. This means that finding the closest places to a location is a very common query that you will need to perform in today’s time. To handle such queries efficiently, MongoDB provides the geospatial indexes for querying the coordinates.
Let’s look at the documents present in our collections.
The restaurant’s collection contains the coordinates of the restaurant.
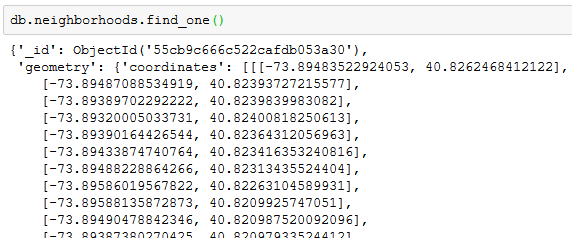
While neighborhoods collection contains the dimension of the neighborhood of the restaurant. We can create geospatial indexes for both fields. First, let’s create for the restaurant coordinates.
The 2d index is used to create index for a two-dimensional plane.
$near returns documents from nearest to farthest on a geospatial index.
25357
The following query returns documents that are at least 10 meters from and at most 1000 meters from the specified coordinates, sorted from nearest to farthest.
11
Here we returned only 11 documents based on the proximity to the given location. Now let’s create geospatial coordinates for the neighborhoods collection.
The coordinates in the neighborhood collection are earth-like objects. You must have noticed the shape of the neighborhood was also provided with the coordinates. Therefore we need to create a 2dsphere index that supports queries that calculate geometries on an earth-like sphere.

0
Since there are no documents that exist within our specified geospatial shape, therefore 0 documents were returned.
Now let’s talk about some properties of these index types we have looked at so far.
Index properties
Just like there are many different indexes in MongoDB, there are many properties for these indexes as well. Here we look at some of those properties.
Unique Indexes
So far, the indexes we created were not unique. Meaning, there could be more than a single document for a given index value. But the Unique index guarantees that, for a given field, every document in the collection will have a unique value. For example, if you want to make sure no two documents can have the same value in the “username” field, you can create a unique index.
A unique index that you are probably already familiar with is the index on “_id”, which is created whenever you create a collection.
Find the neighborhoods record we can create a unique index for the neighborhood name.


We get the same duplicate key error because there are already duplicate values present for our index field.
Alright, now let’s look at partial indexes.
Partial Indexes
Sometimes we might not want to index all the documents in the collection, but just a subset of documents. That is where Partial indexes come into the picture.
Partial indexes only index those documents in the collection that meet a specified filter expression. This lowers the storage requirement and reduces the overhead cost involved in the creation and maintenance of the index.
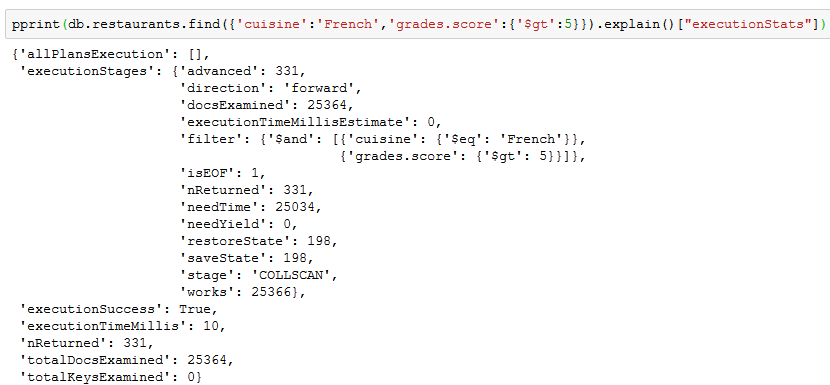
Suppose we only want to query documents based on the cuisine served in those restaurants that have a review with ‘grade.score’ greater than 5. In that case, instead of creating the index on the entire ‘grades.score’ field, we can create a partial index.
Let’s first have a look at the execution statistics for the query before creating the index.
To use the partial index property, we need to use the partialFilterExpression argument of the create_index() and provide the filter condition that will specify the document subset.
We will create an index for the cuisine field and since we will be querying restaurants with a score of greater than 5, we can provide that as our filter condition.
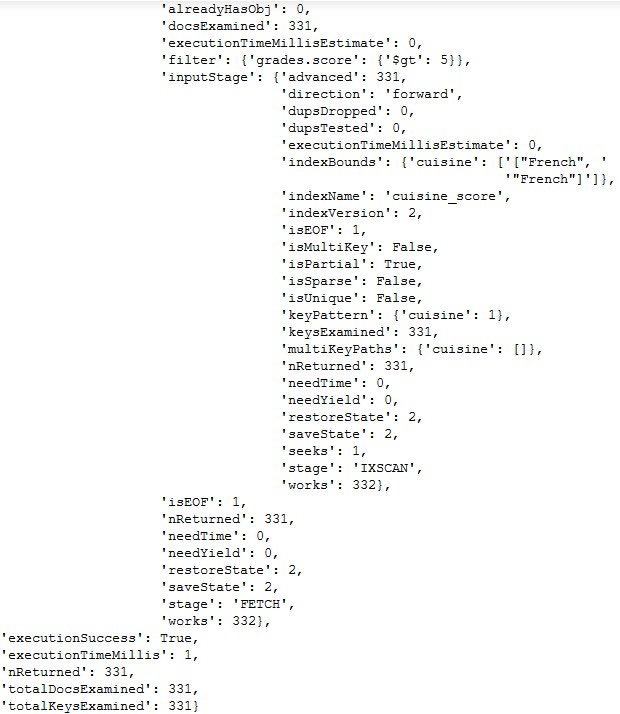
The following query uses the index since the query predicate includes the condition grades.score: { $gt: 7 } that matches a subset of documents matched by the index filter expression grades.score: { $gt: 5 }:
It took only 1 millisecond to retrieve the documents.
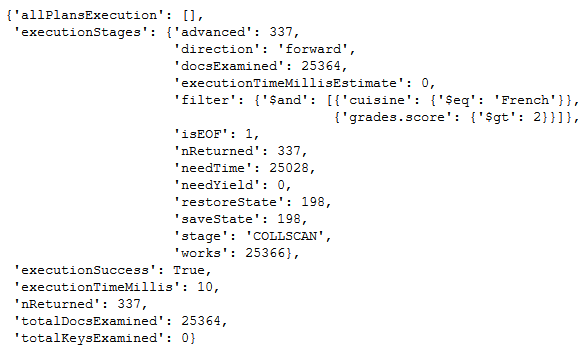
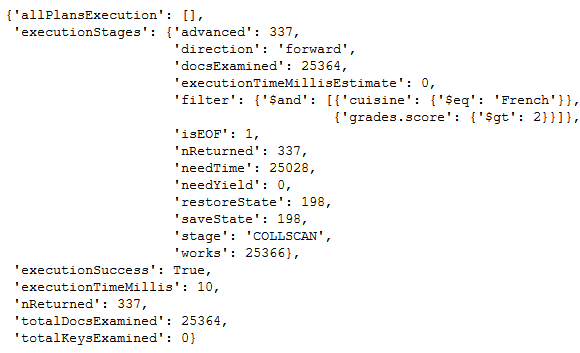
The following query does not use the index because grades.score: { $gt: 2 } while the index has the filter grades.score: { $gt: 5 }. That is, this query will match more documents than are indexed therefore it will not use the index we created.
As you can see, the query uses the COLLSCAN instead of an index to retrieve the documents.
The following query also cannot use the partial index because the query predicate does not include the filter expression and using the index would return an incomplete result set.
As you can notice, COLLSCAN was used and all the documented were checked for the query.
End Notes
I hope this article gave you a good idea about how important indexing is in databases and how MongoDB just makes it really easy to create indexes for every query pattern possible.
An important point to remember while creating indexes is that you should create your index according to your query. Also, when creating indexes make sure that indexes themselves are not too large that they can’t fit in the RAM. This will make sure that the database does not have to read indexes from the disk which will definitely improve the performance. And finally, create your indexes wisely so that the indexes you create enable the database to scan minimum documents.
In case you want to learn more about querying data, I recommend the following course – Structured Query Language (SQL) for Data Science.


