


This article was published as a part of the Data Science Blogathon
“You can have data without information but you cannot have information without data” – Daniel Keys Moran
Introduction
If you are here then you might be already interested in Machine Learning or Deep Learning so I need not explain what it is? So starting with a little introduction to the topic, Object Detection is the method of detecting desired objects in images or videos, and in past few years, there were a lot of models that were introduced for the same. YoloV5 is one of those models which is considered one of the fastest and accurate. In this article, I am going to explain how you can train the YoloV5 model on your own data for both GPU and CPU-based systems. I will explain how you will have to set up both GPU or CPU as it can be trained on any of them although GPU is preferred as it would take almost three times more on CPU to train the same, if you don’t have GPU based system and don’t want to train your model on Google Colab then you can still train the model on CPU.
The steps that we are going to discuss in this tutorial are as follows:
Optional: Creating a virtual environment for training.
- Cloning repository and Installing dependencies for YoloV5
- Create annotations for a custom dataset Using the VIA tool
- Convert Annotations to Coco format
- Creating YAML file for training
- YoloV5 training
- YoloV5 Inference
Python 3.6 is recommended for the training.
Let’s start with creating a virtual environment, this step is optional, if you want to install packages in the root environment you can skip this otherwise if you want to keep this setup separate you can follow it along to create a virtual environment. Start with installing virtualenv package which helps in creating the virtual environment.
$ pip install virtualenv
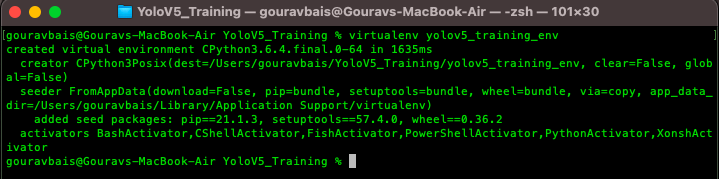
once the package is installed you can go ahead and create the virtual environment for YoloV5 training:
$ virtualenv yolov5_training_env
the output of the command would look like this:
after creating an environment you will have to activate the same to install the required packages.
Unix:
$ source yolov5_training_env/bin/activate
Windows:
$ yolov5_training_envScriptsactivate

Cloning Repository & Installing Dependencies
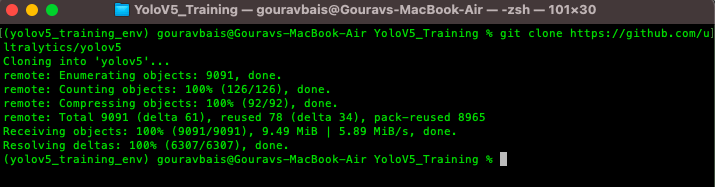
To begin with, we need to clone the official YoloV5 repository, if you have git already installed then the following command can be used to clone the repository.
$ git clone https://github.com/ultralytics/yolov5
otherwise, you can directly download the code from the following website:
YoloV5 Code: https://github.com/ultralytics/yolov5
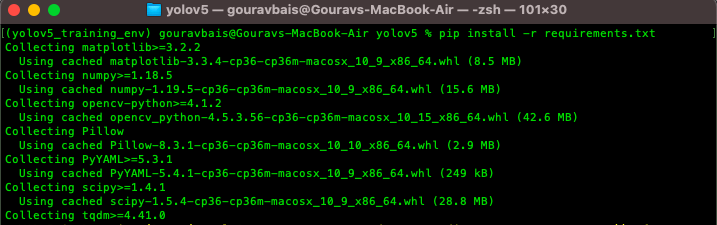
This yolov5 repository comes up with a “requirements.txt” file which contains all the required libraries for training the model. One thing to remember here is the torch library which would be different for both GPU and CPU environments, so we will have to remove torch and torchvision from the requirements files and install the other libraries. To install other libraries from the “requirements.txt” file following command is used.
$ pip install -r requirements.txt
after installing other libraries we will install torch and torchvision which are the backbone for training.
Torch CPU version installation:
Python package management system (pip) can be used to install torch and torchvision for CPU.
Windows & Linux:
$ pip install torch==1.7.0+cpu torchvision==0.8.0+cpu torchaudio==0.7.0 -f https://download.pytorch.org/whl/torch_stable.html
Mac:
$ pip install torch==1.7.0 torchvision==0.8.0 torchaudio==0.7.0Torch GPU version installation:
Conda is preferable for installing GPU-based torch and torchvision libraries as it already compiles it with CUDA. Also if facing any issue with conda installation you can use pip installation. Before installations make sure you are installing the CUDA compatible torch version which you can find here https://pytorch.org/get-started/previous-versions/.
Windows & Linux:
$ conda install pytorch==1.7.0 torchvision==0.8.0 torchaudio==0.7.0 cudatoolkit=10.1 -c pytorchor
$ pip install torch==1.7.0+cu101 torchvision==0.8.0+cu101 torchaudio==0.7.0 -f https://download.pytorch.org/whl/torch_stable.htmlMac:
$ conda install pytorch==1.7.0 torchvision==0.8.0 torchaudio==0.7.0 -c pytorchor
$ pip install torch==1.7.0 torchvision==0.8.0 torchaudio==0.7.0make sure this installation is done right otherwise there would be a lot of compatibility issues.
We need to download the pre-trained weights also in order to use the model for custom data. Weights can be downloaded from the following link https://github.com/ultralytics/yolov5/releases. Once downloaded the weights we need to create a folder “Yolov5/weights” and paste the weights file there. You can download any of the models based on your usecase (recommended: yolov5x.pt or yolov5x6.pt).
Create annotations Using the VIA tool
The heart of training any object detection model is data annotation (preparing data for training). Data Annotation is a technique where we create different geometrical shapes on the objects which we want our object detection model to detect. There are several data annotation tools available but the one which I find easy to use is VIA (VGG Image Annotator) tool. I have made some changes to the tool so that you can use it on your own objects. You can download the tool from here https://drive.google.com/file/d/1rJx0fNgnnhODM7H3GP9RQQ5QEsWdkYEd/view?usp=sharing. This tool is just a simple HTML page that provides you with multiple annotations types like COCO data format, CSV format, etc. Tool page looks like this:
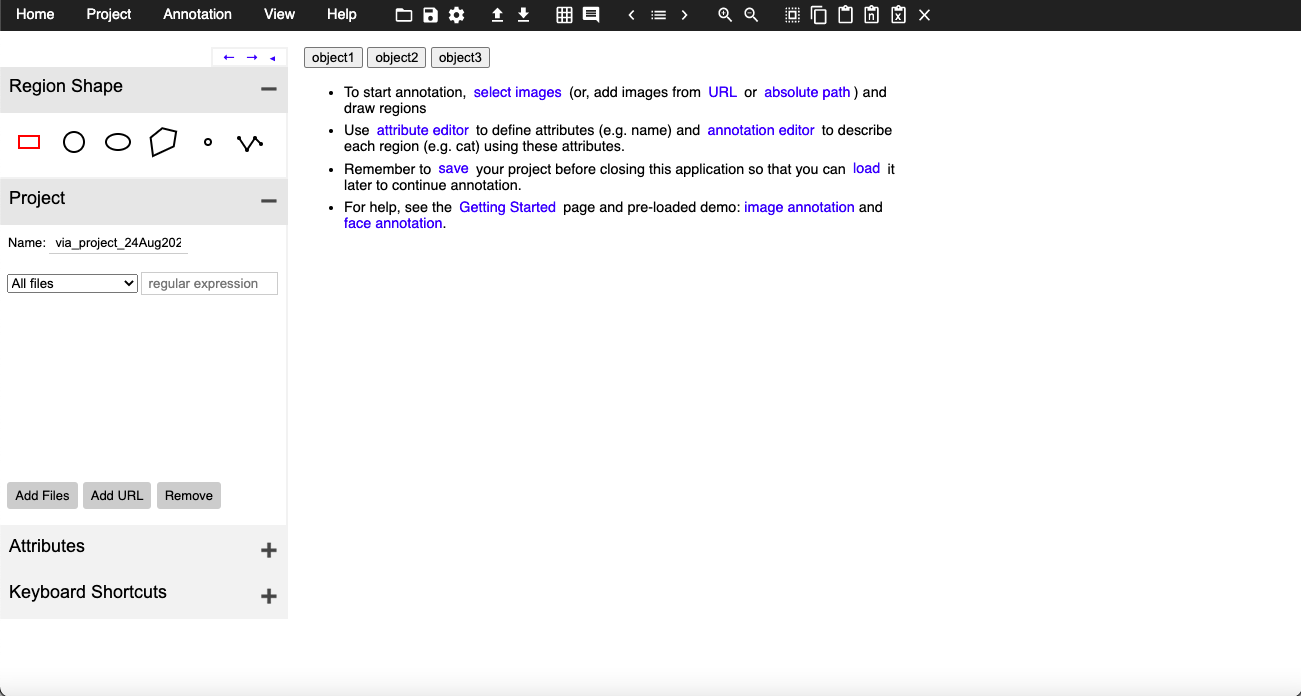
Here if you see, there are 3 buttons which are for objects one, two, and three are actually customizable i.e. you can change those buttons as per your object names, to do so you will have to open the HTML file in editable mode and find the following lines:

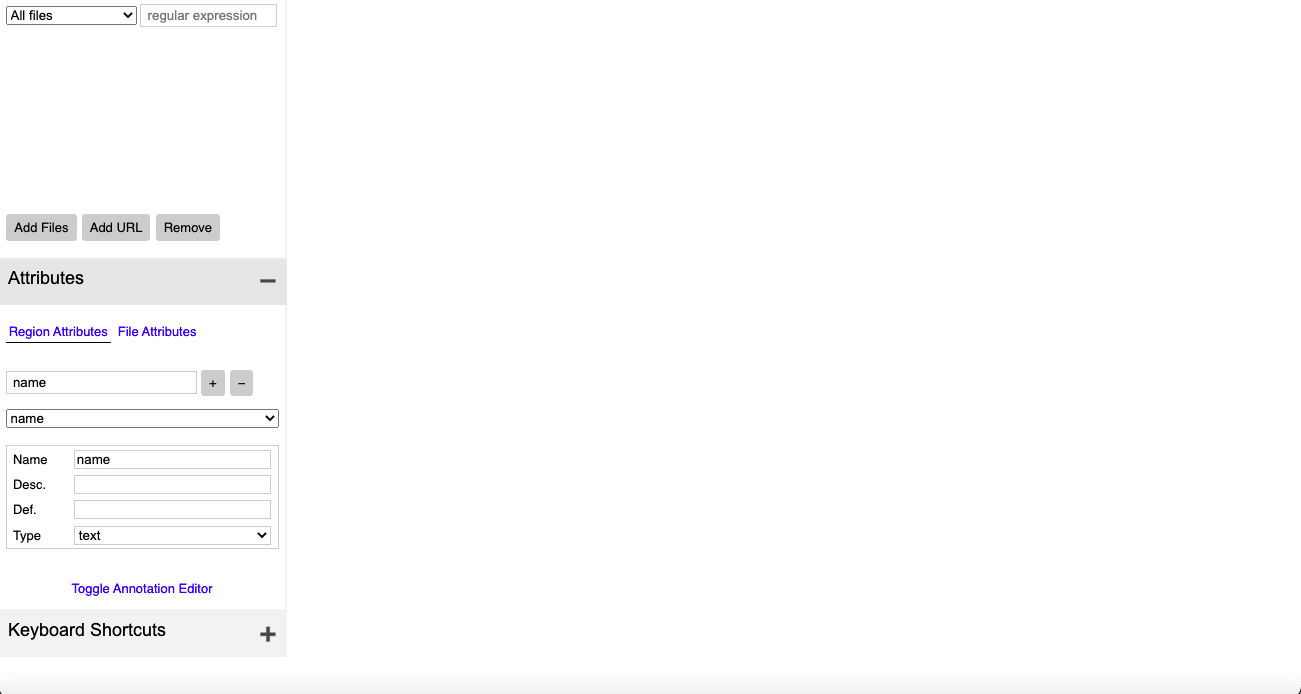
these object names you can have as your custom objects like car, person, etc. Once you have your tool ready you need to click on the attribute button you see on the left side panel and create a name attribute that would look something like this:
once you have done setting up, you can load the images using the “Add Files” button and can start annotations by selecting the object and clicking on the button with the object name accordingly.
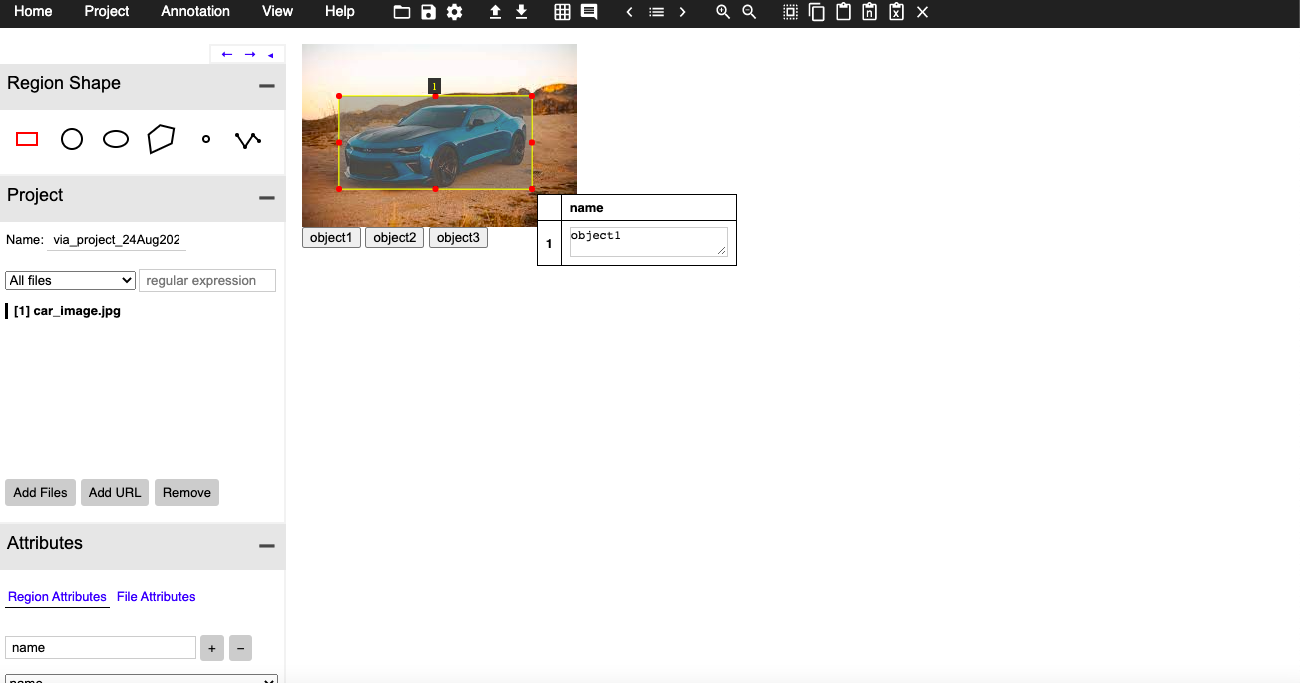
Once all the annotations are done you can export them in CSV format at your desired location.
Convert CSV annotations to COCO format
YoloV5 model requires data to be in coco format:
To convert CSV annotations to COCO format you can use the following code chunk:
Start with importing dependencies to create COCO dataset.
import os
import numpy as np
import pandas as pd
import shutil as sh
from PIL import Image
from tqdm.auto import tqdm
Once all the dependencies are imported we need to create some required columns for the COCO dataset.
data_path = '/Users/gouravbais//Final_Cleaned_Dataset/'
df = pd.read_csv(data_path+'train/via_region_export.csv')
## create x, y, w, h columns
x, y, w, h = [], [], [], []
for row in df['region_shape_attributes']:
    row = row.replace('{}', '').replace('}', '')
    row = row.split(',')
    x.append(int(row[1].split(':')[-1]))
    y.append(int(row[2].split(':')[-1]))
    w.append(int(row[3].split(':')[-1]))
    h.append(int(row[4].split(':')[-1]))
## calculating x, y, width and height coordinates
df['x'], df['y'], df['w'], df['h'] = x, y, w, h
## creating a column name image_id having images names as id
df['image_id'] = [name.split('.')[0] for name in df['filename']]
## creating two columns for storing x and y center values
df['x_center'] = df['x'] + df['w']/2
df['y_center'] = df['y'] + df['h']/2
## define number of classes
labels = df['region_attributes'].unique()
labels_to_dict = dict(zip(lables, range(0, len(labels))))
print('Lables Directory:', labels_to_dict)
df['classes'] = df['region_attributes']
df.replace({'classes':labels_to_dict}, inplace=True)
df = df[['image_id','x', 'y', 'w', 'h','x_center','y_center','classes']]
## set index of images
index = list(set(df.image_id))
and finally creating the dataset by copying images and creating text files.
source = 'train'
if True:
    for fold in [0]:
        val_index = index[len(index)*fold//5:len(index)*(fold+1)//5]
        for name,mini in tqdm(df.groupby('image_id')):
            if name in val_index:
                path2save = 'val2017/'
            else:
                path2save = 'train2017/'
            if not os.path.exists('convertor/fold{}/labels/'.format(fold)+path2save):
                os.makedirs('convertor/fold{}/labels/'.format(fold)+path2save)
            with open('convertor/fold{}/labels/'.format(fold)+path2save+name+".txt", 'w+') as f:
                row = mini[['classes','x_center','y_center','w','h']].astype(float).values
                imagename = data_path+"/{}/{}.jpg".format(source,name)
                check_image_width_height = Image.open(imagename)
                img_width, img_height = check_image_width_height.size
                for r in (row):
                    r[1] = r[1]/img_width
                    r[2] = r[2]/img_height
                    r[3] = r[3]/img_width
                    r[4] = r[4]/img_height
                row = row.astype(str)
                for j in range(len(row)):
                    print(row[j], 'n')
                    row[j][0] = str(int(float(row[j][0])))
                    text = ' '.join(row[j])
                    f.write(text)
                    f.write("n")
            if not os.path.exists('convertor/fold{}/images/{}'.format(fold,path2save)):
                os.makedirs('convertor/fold{}/images/{}'.format(fold,path2save))
            sh.copy(data_path+"/{}/{}.jpg".format(source,name),'convertor/fold{}/images/{}/{}.jpg'.format(fold,path2save,name))
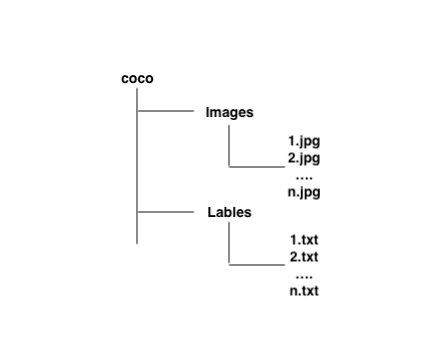
The following code would generate a folder named “converter/fold0” which contains Images and Labels folders that you need to copy, and paste inside cloned YoloV5 repository “YoloV5/coco/” folder.
Creating YAML file for training
Once dependencies are installed and data is ready now we need to configure a YAML file to train the model. For that, you open any text editor and create a file “coco.yml” inside the folder “YoloV5/data/”. The content of the file would be like this:
# train and val data as 1) directory: path/images/, 2) file: path/images.txt, or 3) list: [path1/images/, path2/images/]
train: /Users/gouravbais/yolov5/coco/images/train2017
val: /Users/gouravbais/yolov5/coco/images/val2017
please keep the classes in the same order that you get while converting the CSV dataset to COCO dataset.
Yolov5 training
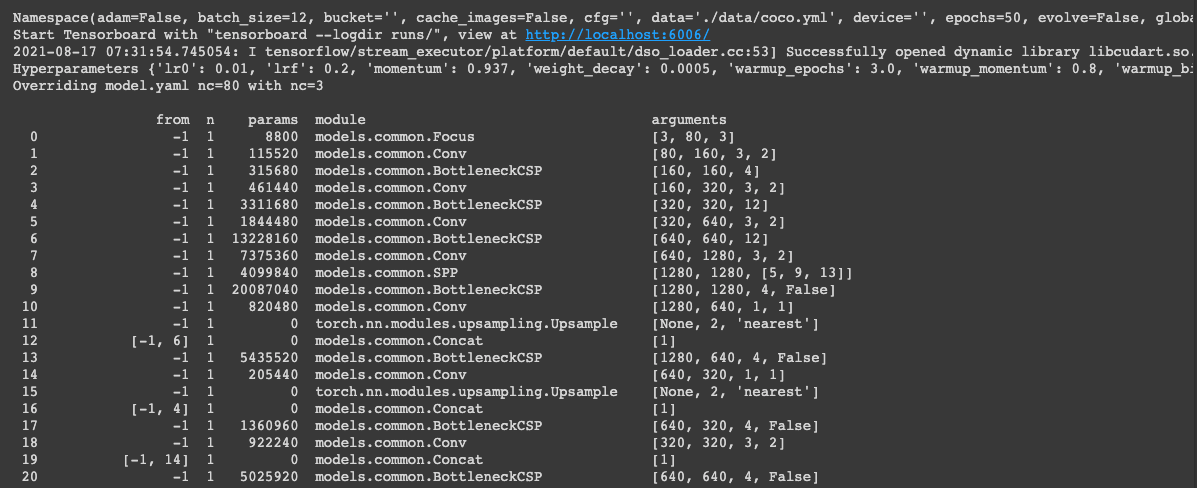
Setup of the YAML file leaves nothing much to do afterwards, now we just need to write the command and provide it with the data and weights to train the model on our custom dataset. You need to traverse to the YoloV5 folder through terminal or anaconda prompt and run the following command:
$ python train.py --img 416 --batch 12 --epochs 50 --data ./data/coco.yml --weights ./weights/yolov5x.pt
Command explanation:
train.py: python file containing the training code.
img: image size defaulted to 640, depending on the GPU or CPU memory you can change it.
batch: batch size which is again directly dependent on your memory.
data: the path of your YAML file.
weights: the path of weights file that we have downloaded at step 1.
Once you run the mentioned command the training of the model would start. The training file that we are using has the code that checks for GPU if it’s available then training takes place on GPU otherwise training continues on CPU. We need not explicitly code to use GPU or CPU.
Once training is completed you can find the trained weights in the “YoloV5/runs/train” folder, which would have two weights file “best.pt” and “last.pt” you can use either of them based on your training (“best.pt” recommended). You can copy the file and paste it inside the “YoloV5/weights” folder. One thing that you will have to observe here is that if the loss is still decreasing after 50 epochs you can run it for more epochs depending on your data.
YoloV5 Inferencing
In conclusion, what you need is a Deep Learning model that works on your testing data. So to test your model on testing data you will have to use the “YoloV5/detect.py” script present at the same location as “train.py”. Command to test the model on your data is as follows:
$ python detect.py --img 416 --source ./detect/test_data --weights ./weights/best.pt --conf-thres 0.4
Command explanation:
detect.py: python file for inferencing.
img: image size which must be the same as training image size.
source: the path of testing data or testing image file.
weights: the path of trained weights file.
conf-thres: confidence threshold above which object must be detected.
Running the above command would create a folder “YoloV5/runs/detect” which would have all the resultant files on which you have run the model.
Now you are ready to apply this knowledge of Object Detection to your use case.
Thanks for reading this article do like if you have learned something new, feel free to comment See you next time !!! ❤️