


This article was published as a part of the Data Science Blogathon.
Introduction
As most of us are doing our jobs or attending school/college virtually, we often have to attend online meetings and we can’t expect each of our places to always be quiet. Some of us may live in a noisy environment where we can hear horn sounds or other people’s voices or even sometimes our earphones are at fault which is certainly undesirable for the receiver at the other end. Would it be better if we remove the noises at the sender end by using a deep learning model? Let’s take a look.
Table of Contents
- What is Audio Denoising?
- A brief history of different denoising methods
- Spectral Subtraction
- Wiener Filter
- Spectral Gating
- Deep Learning-based models
- Facebook Denoiser – A Deep Learning model
- Setting up the FB Denoiser model
What is Audio Denoising?
The definition is so simple and self-explanatory, which will go like this,
Audio Denoising is the process of removing noises from a speech without affecting the quality of the speech
Here, the noises are any unwanted audio segments for the human hearing like vehicle horn sounds, wind noise, or even static noise.
It is also known as speech enhancement as it enhances the quality of speech. Speech enhancement is an important task and it is used as a preprocessing step in various applications such as audio/video calls, hearing aids, Automatic Speech Recognition (ASR), and speaker recognition. We’ll see how to remove the noises in an audio signal in the rest of this article.
A Brief History of Different Denoising Methods
In this section, let’s summarize the different audio denoising techniques used-
- Spectral Subtraction
- Wiener Filter
- Spectral Gating
- Deep Learning-based models
Spectral Subtraction
The development of speech enhancement methods traces back to 1979 when Boll S proposed a noise suppression method based on Spectral Subtraction. But, what is spectral subtraction? Let’s understand this.
The first thing they’ve done is to convert the audio signal to the frequency domain. For this, they’ve used one of the influential algorithms in digital signal processing, the Fast Fourier Transform (FFT), and some variations of FFT like Short-Time Fourier Transform (STFT) which will extract both time and frequency related features. Then they’ll simply subtract the frequency components of noises from the noisy audio to get a cleaned/enhanced speech and hence the name Spectral Subtraction.
But the spectral subtraction came up with two major shortcomings-
- We have to choose a noise from the audio signal to remove it, which is not practical at all.
- The noise should be present in the entire audio. So, this kind of method didn’t work well for audio signals having rare noises like car horns, making it ineffective for real-world applications.
Wiener Filter
The next one is Wiener filtering, which is an industry-standard for audio denoising and is used widely in hearing aids, smartphones, and communication devices. This filtering also requires both the noisy speech and a sample of noise present in the speech. The Wiener filter finds a statistical estimate of the clean speech from the noisy speech and the noise itself to minimize mean squared error under certain assumptions on the noise.
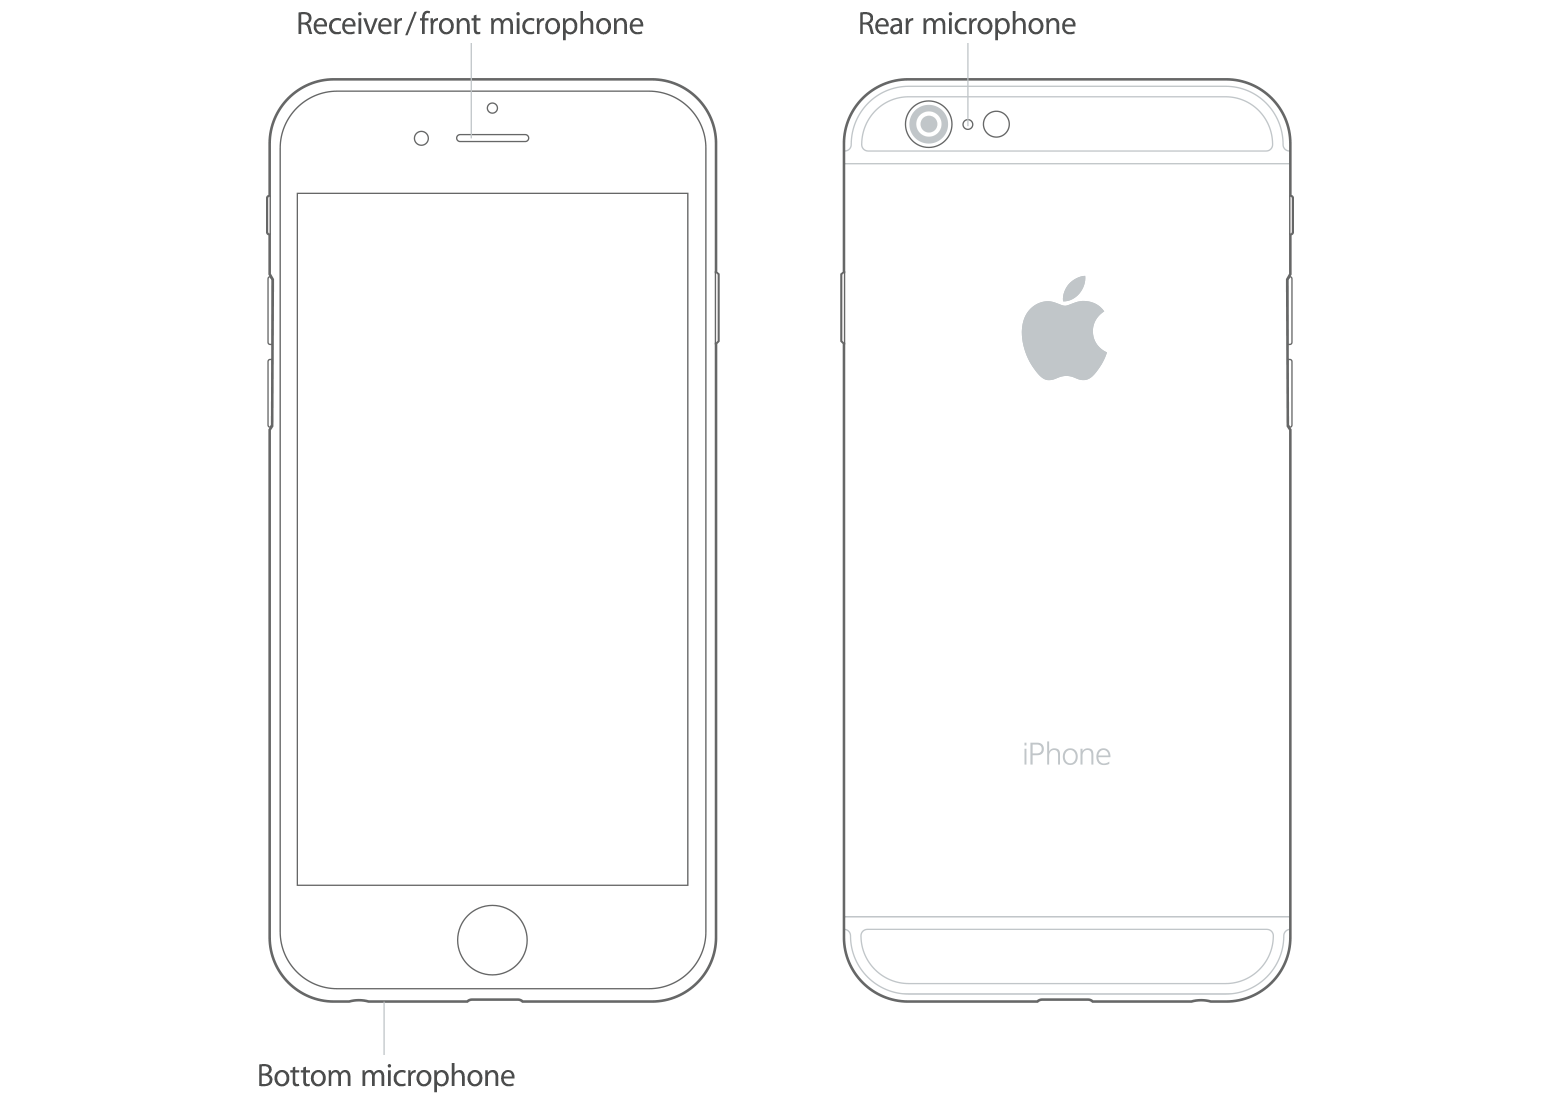
However, the Wiener filter comes in handy in the case of smartphones where we can have two microphones, one for recording our speech with noise and another one is for only the noise. (In your smartphone, the mic at the bottom is to record speech and the mic at the top is to record noise). So, we’re using some kind of Wiener filter every day without even realizing it. This is amazing, isn’t it?
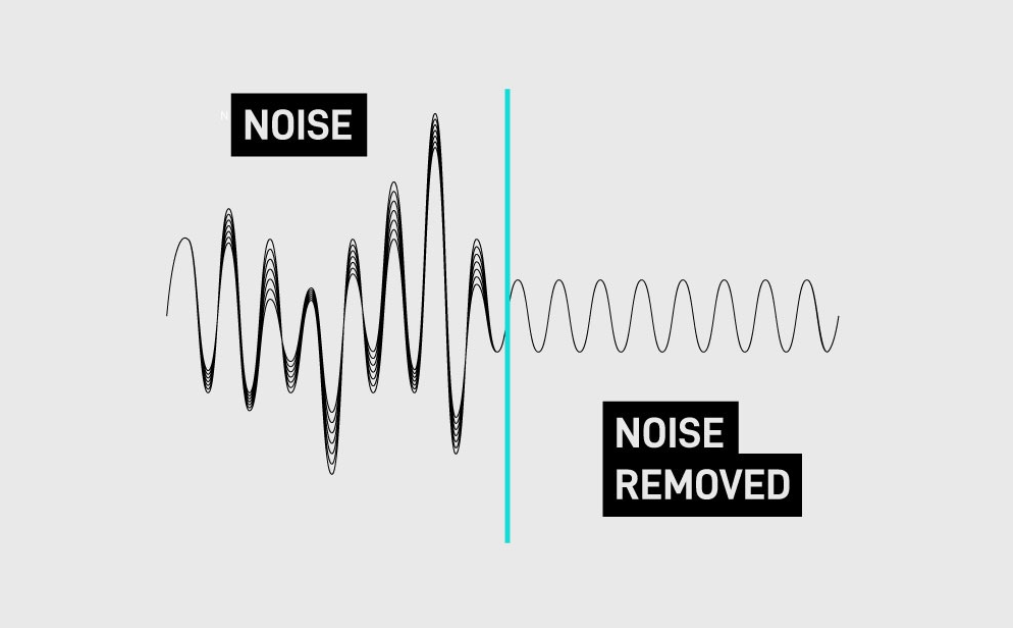
Spectral Gating
Below is an audio waveform of a noisy speech, and the enhanced speech. These results were generated from noisereduce python module, which uses spectral gating under the hood – a traditional method as well. These kinds of traditional noise filters work well in filtering static noise but not for some rare noises, that is one of the reasons for developing Deep Learning models for speech enhancement.

Deep Learning Model
Deep Learning models are getting popular these days because of their generalization to learn and solve a task (in an end-to-end manner) without the hassle of feature engineering. This includes audio denoising too and there are some good models which will even work in real-time! Deep Learning models for audio denoising can be divided into categories, mask-based and mapping-based.
Mask-based models compute masks (boolean arrays) in the time/frequency domain based on the input noisy speech to attenuate the noises in the signal. On the other hand, the mapping-based methods aim to get them cleaned speech directly from the noisy speech if we’re provided with plenty of noisy and cleaned speech (plenty of training data!).
Next, let’s discuss Facebook Denoiser, one of the State Of The Art (SOTA) models for speech enhancement!
Real-Time Speech Enhancement in Waveform Domain – Facebook Denoiser
This model was proposed by Alexandre Défossez et al. in Facebook AI Research (FAIR) in the year 2020. The speciality of the model is it can run in real-time on a laptop CPU. Bear in mind that the proposed architecture would be as simple as possible to work in real-time systems. I’ll show how to use this model in real-time at the end of this article.
The model has an encoder-decoder U-Net architecture with skip-connections and a sequence modelling network applied to the encoder’s output. But, why does this encoder-decoder part have skip-connections in between them? Seems like the skip-connections have to be there for learning fine-grained features at the decoder part. You can also refer to this article to learn more about skip-connections. Below is the overall architecture of the model.
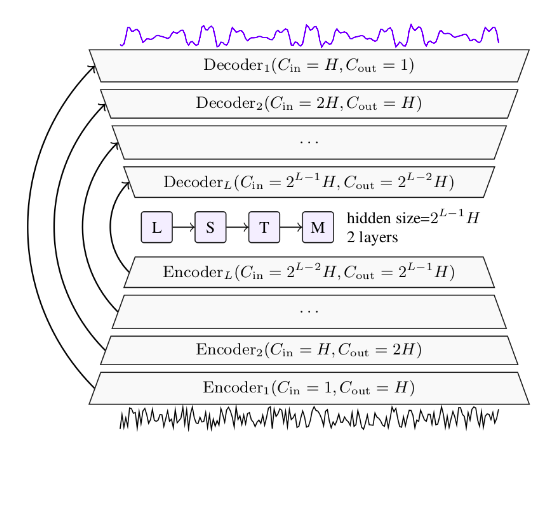
The architecture of Facebook Denoiser
Each layer in the encoder has a 1D convolution layer followed by ReLU activation. It also has 1⨯1 convolution to double the number of channels at the encoder with GLU (Gated Linear Unit) activation. Each layer in the decoder has a similar structure as the encoder except that it has 1D transposed convolution (deconvolution) in place of the convolution layer.
The sequence modelling layer at the middle of the architecture can either be unidirectional LSTM or bidirectional LSTM based on the complexity of the model. The architecture proposed in this paper is called DEMUCS. Pretty simple right?
Unlike most of the models in audio processing, this works with raw wave files in the time domain itself and hence the name Speech Enhancement in Waveform domain. But, the model optimizes in both time and frequency domain, here is how.
The authors have used L1 loss over the waveform which is the absolute difference between the noisy and cleaned audio as a loss (this works in the time domain). They’ve also computed the Short-Time Fourier Transform (STFT) for the noisy and cleaned audio and derived a loss from the computed STFT (this works in the time-frequency domain).
The model works really well in practice as the authors claimed that it could be considered as one of the SOTA models for speech enhancement. Here is the result from the paper,

Comparative results of FB denoiser model
I think it is enough to know the scale of each evaluation metric used in the paper rather than the complex theory behind the evaluation metrics. Think of PESQ as an evaluation metric with a scale of 0.5 to 4.5, 0 to 100 for STOI, 1 to 5 for MOS measures. Let’s set up and run this model in our local system. I’ll guide you step by step for setting up this model in your local system.
Setting up the FB Denoiser Model
First of all, we need to install the denoiser module from pypi. If you have any Linux distro or Mac OS, you’re on the side of luck! The authors didn’t provide any official support for other OSes like Windows as of now.
This is the GitHub repository of the denoiser model we’re going to use. If you have any doubts in the middle of the installation, feel free to leave comments below.
Step 1:
They have provided the model in pypi that is just “pip install denoiser” will work. If you don’t want to mess up with the Python libraries you already have, just create a virtual environment (venv) and then install the denoiser. I’ll show you how to do this.
You can skip the first and second line if you don’t want to create a separate environment for the installation of denoiser.
Step 2:
Linux users should check whether you have PulseAudio installed in your system. If you don’t, install with the command,
Also install PulseAudio Volume Control with the command,
Mac OS users must have SoundFlower installed on their system to use this model. Follow this link to install SoundFlower and you can skip Step 3.
Step 3:
Run the commands for creating virtual streams which is exactly we’re going to use,
This will add a “Monitor of Null Output” to the list of microphones to use. Select it as input in your software. Open another terminal and run “pavucontrol”. This will open the volume controller window.
Step 4:
Mac users can run the command,
This will load the model and add a microphone, you can choose this and the other end can enjoy your enhanced speech now!
For Linux users, run the command,
The model will start denoising the input audio from the mic. I’ve tested it on a laptop running on Intel i5 8th gen with 8 GB of RAM but the model shows some noticeable delay in creating the denoised output. You can also use this model to denoise at the receiver end. You can refer to the model’s repository to know how to do this.
EndNotes
In this article we’ve learned, what is audio denoising along with its deep learning model. We’ve also got to know the brief history of traditional speech enhancement techniques and a deep learning model-Facebook Denoiser and how to set them up in our system.
Hope you enjoyed reading my article on the deep learning model – Audio Denoiser. Have a good day!
The media shown in this article is not owned by Analytics Vidhya and are used at the Author’s discretion.