This article was published as a part of the Data Science Blogathon.
An end-to-end guide on dog breed classification using stacked pre-trained CNN models
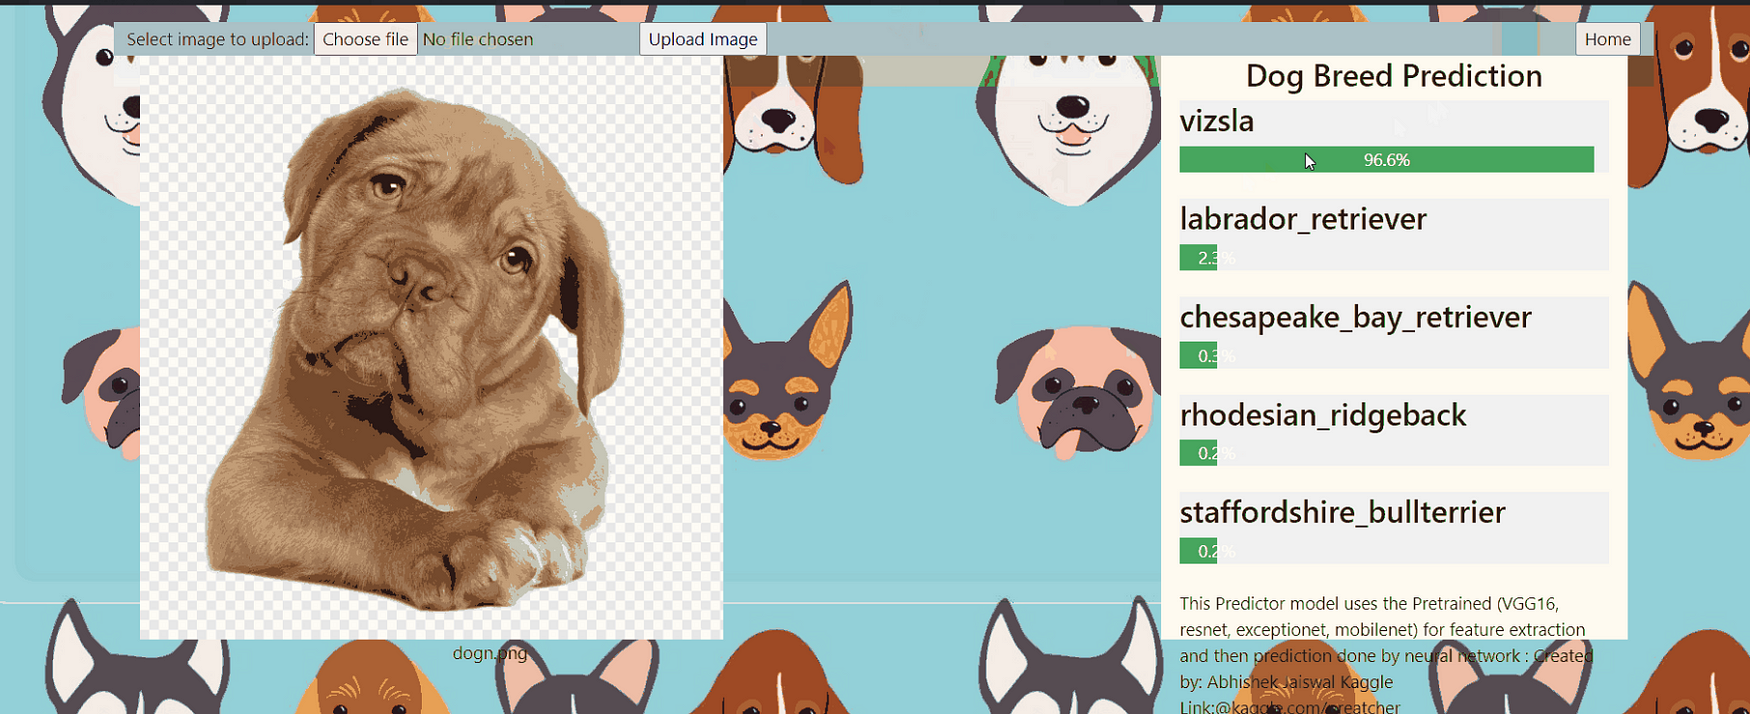
Hey folks!!!
In the last article, we have talked about facial emotion detection by stacking multiple layers, if you haven’t read yet refer to this link. In this article, we are going to see how to stack various pre-trained models for fine-detailed classification.
I assume that you have a good understanding of using pre-trained models like RESNET50 and VGG16 and other pre-trained models.
The Idea is simple first we freeze intermediate layers and then fine-tune the output layers or sometimes stack the output layers of multiple pre-trained models.
Classifying dog-breed, X-ray, leaves diseases are not simple, these tasks are very finely detailed objects which we need to capture in our training, for these purposes stacking various pre-trained models increases the capacity of learning of minor details in our training.
Table of Content
- Introduction
- Workflow
- Model Stacking
- Implementation
Introduction
There might be several ways to classify dog breeds, but in this article, we are going to make use of the pre-trained stacked model for this purpose. In our dataset, there are 120 dog breeds and we need to classify them.
I tried to stack Resnet50V2, Densenet121 and it gave me good results after bottleneck feature extraction. These pre-trained models on trained on imagenet open dataset.
Workflow
Before moving further let’s look at the workflow of our task.
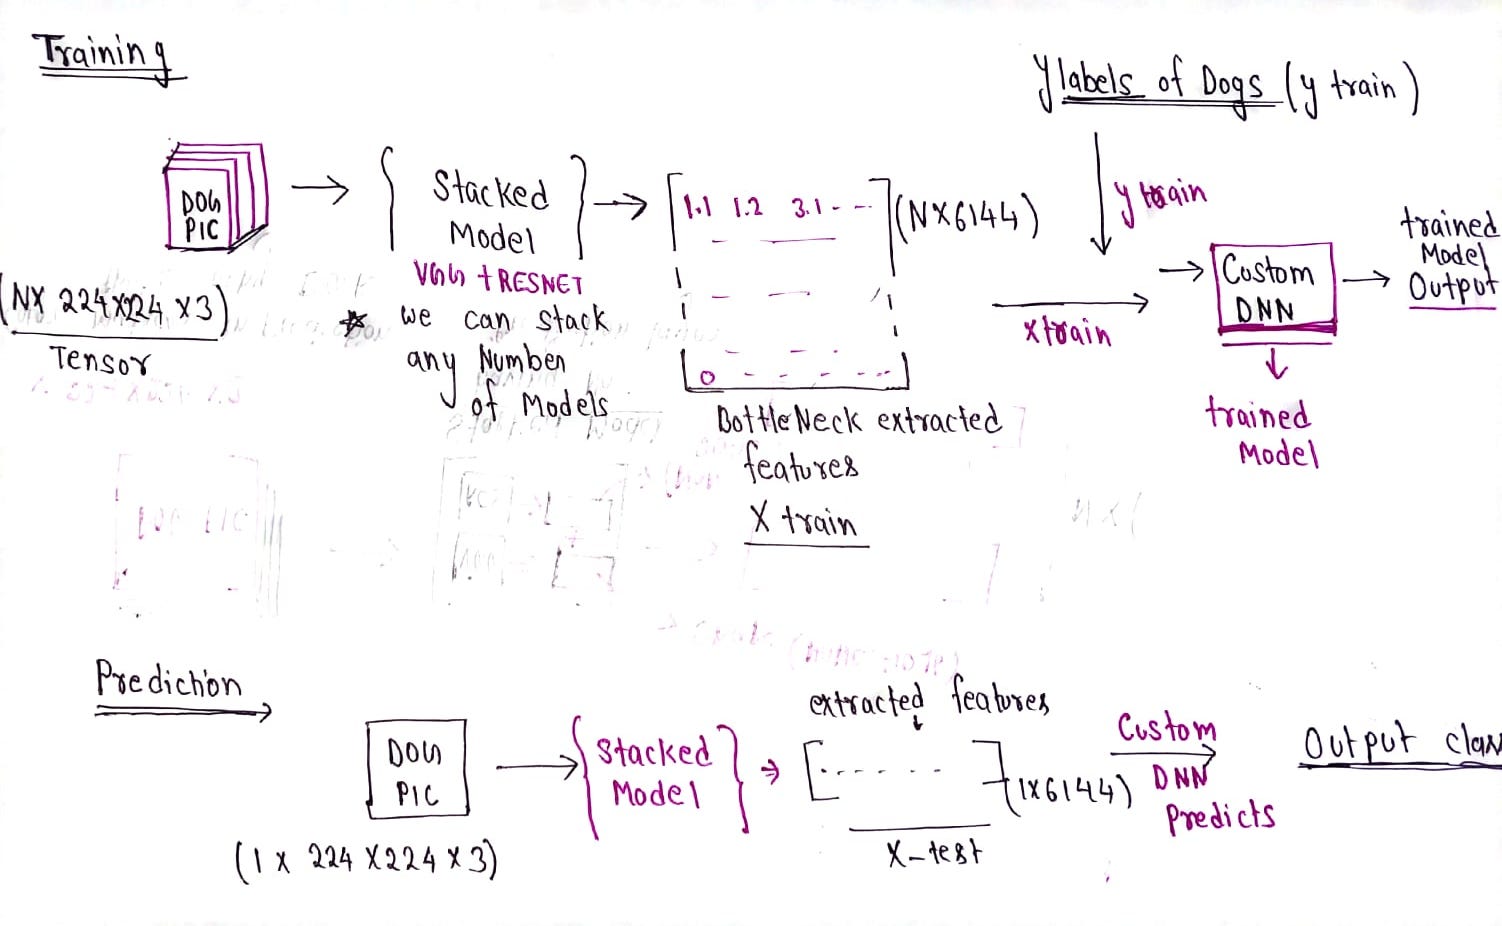
Training →
We will first extract bottleneck features using the stacked pre-trained model and then we will train a simple dense neural network for the classification of extracted features on their labels.
Testing →
For the testing or prediction part, we will take input extract the features, and pass the extracted features as input to the simple DNN model for the final prediction. the prediction will be class number later we will convert that class number into their respective dog breed label.
Model Stacking
The idea of model stacking is very simple, just concatenate the outputs of multiple models using concatenate layer.
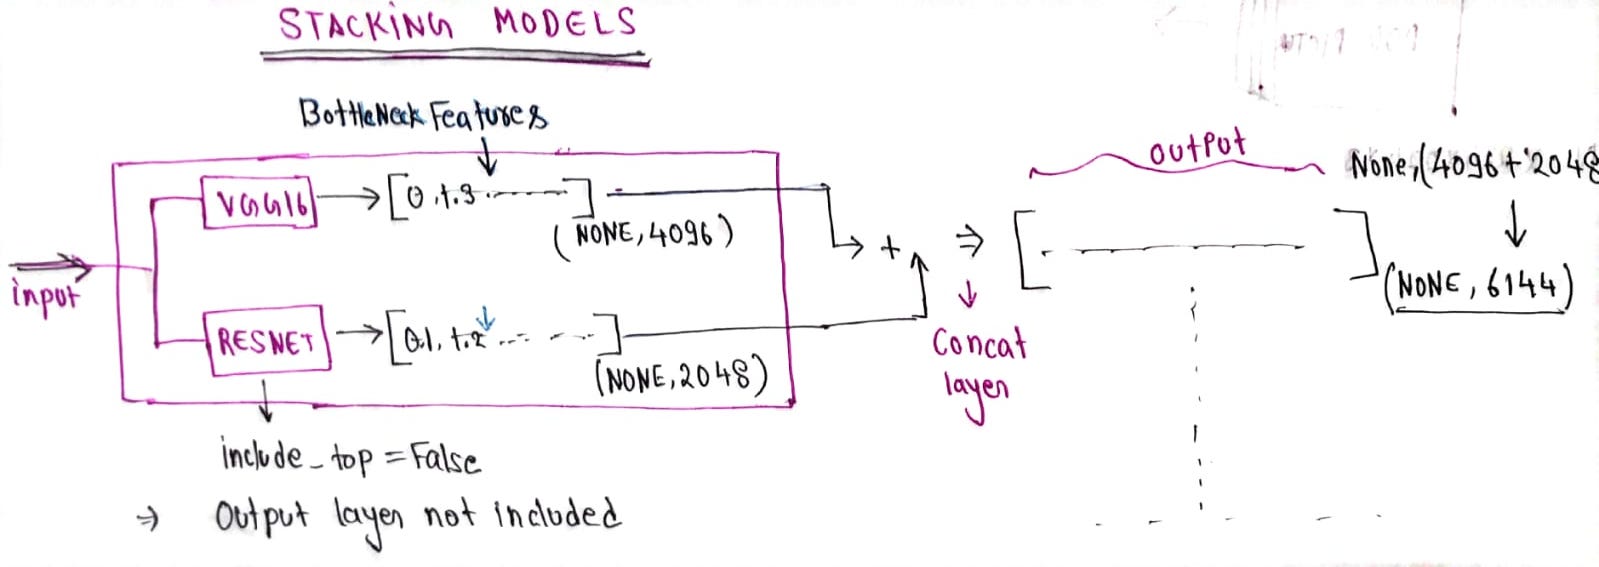
We will use the Stacked model for the bottleneck feature extraction
from keras.applications.densenet import DenseNet121, preprocess_input as preprocess_densenet
from keras.applications.resnet_v2 import ResNet50V2 , preprocess_input as preprocess_resnet
from keras.layers.merge import concatenate
input_shape = (331,331,3)
input_layer = Input(shape=input_shape)
#first feature extractor
preprocessor_resnet = Lambda(resnet_preprocess)(input_layer)
resnet50v2 = ResNet50V2(weights = 'imagenet',
                                     include_top = False,input_shape = input_shape,pooling ='avg')(preprocessor_resnet)
preprocessor_densenet = Lambda(densenet_preprocess)(input_layer)
densenet = DenseNet121(weights = 'imagenet',
                                     include_top = False,input_shape = input_shape,pooling ='avg')(preprocessor_densenet)
merge = concatenate([resnet50v2,densenet])
stacked_model_final = Model(inputs = input_layer, outputs = merge)
stacked_model_final.summary()
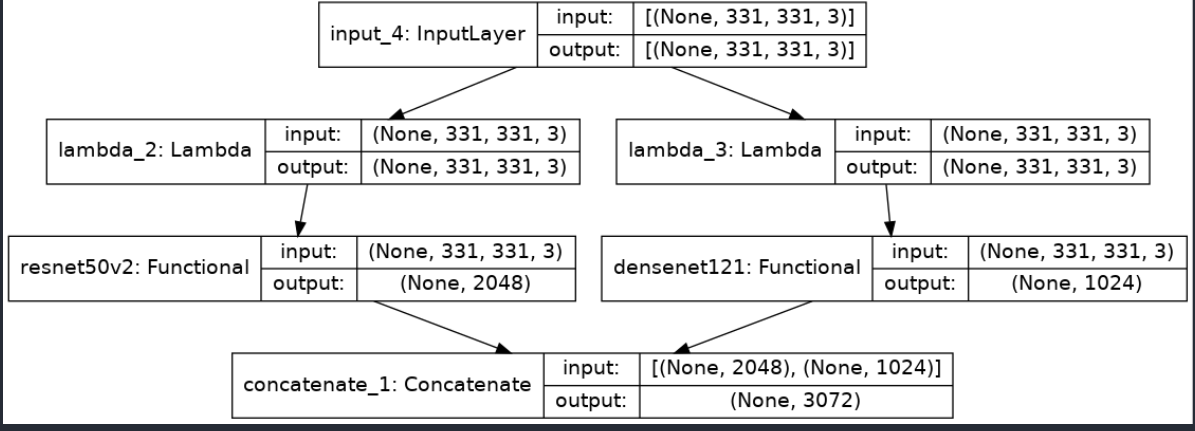
- we have stacked Densenet121 and resnet50v2.
include_top = False→ we don’t want output, we just want bottleneck features.- using concatenate layer we are concatenating the features extracted by both pre-trained models.
Implementation
We are going to implement a Dog breed classifier using Keras and various other libraries. In the next article, we will host this trained model on a website.
1. Loading the Data
The dataset we are going to use is available on Kaggle, the download link is here.
Note: I encourage you to make a Kaggle notebook using this dataset instead of downloading the dataset into your local machine.
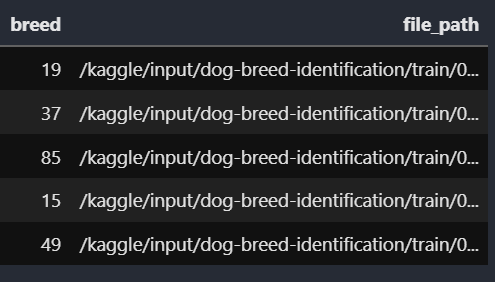
Creating a data frame labels_dataframe containing dog breed class numbers with the path of images.
here we have mapped every dog breed label with some numbers
#Data Paths
train_dir = '/kaggle/input/dog-breed-identification/train/'
labels_dataframe = pd.read_csv('/kaggle/input/dog-breed-identification/labels.csv')
dog_breeds = sorted(list(set(labels_dataframe['breed'])))
n_classes = len(dog_breeds)
class_to_num = dict(zip(dog_breeds, range(n_classes)))
labels_dataframe['file_path'] = labels_dataframe['id'].apply(lambda x:train_dir+f"{x}.jpg")
labels_dataframe['breed'] = labels_dataframe.breed.map(class_to_num)
Converting the class Id into categorical data using to_categorical
from keras.utils import to_categorical
y_train = to_categorical(labels_dataframe.breed)
2. Extract bottleneck features
This step is very crucial and time-consuming, here we are going to extract features of all images using the stacked model. we will extract features in batches in order to avoid ram insufficiency problems.
Extracted features will be our new X_train and class Id will be our y_train.
# dataframe contains image path and  breed columns
def bottleneck_feature_extractor(df):
    img_size = (331,331,3)
    data_size = len(df)
    batch_size = 20
    X = np.zeros([data_size,3072], dtype=np.uint8)
    datagen = ImageDataGenerator()
    generator = datagen.flow_from_dataframe(df,
    x_col = 'file_path', class_mode = None,
    batch_size=20, shuffle = False,target_size = (img_size[:2]),color_mode = 'rgb')
    i = 0

    for batch_input in tqdm(generator):
        batch_input = stacked_model_final.predict(batch_input)
        X[i * batch_size : (i + 1) * batch_size] = batch_input
        i += 1
        if i * batch_size >= data_size:
            break
    return X
X_train = bottleneck_feature_extractor(labels_dataframe)
X_traincontains all the extracted features which gonna be input for the final predictor model.
3. Final Predictor Model:
We have X_train (extracted features ) y_train (categorical values of class id), it’s time to build a final predictor model that will be trained on X_train and y_train and returns the final predicted class id.
import keras
final_model = keras.models.Sequential([
    InputLayer(X.shape[1:]),
    Dropout(0.7),
    Dense(n_classes, activation='softmax')
])
final_model.compile(optimizer='adam',
              loss='categorical_crossentropy',
              metrics=['accuracy'])
For efficient training, we can make use of callbacks.
from keras.callbacks import EarlyStopping,ModelCheckpoint, ReduceLROnPlateau
# Callbacks
EarlyStop_callback = keras.callbacks.EarlyStopping(monitor='val_loss', patience=10, restore_best_weights=True)
checkpoint = ModelCheckpoint('/kaggle/working/checkpoing',
                             monitor = 'val_loss',mode = 'min',save_best_only= True)
## Reducer of learning rate on the basis of improvement
lr = ReduceLROnPlateau(factor = 0.5,patience = 3,monitor = 'val_loss',min_lr = 0.00001)
my_callback=[EarlyStop_callback,checkpoint]
We have an early stopper, learning rate reducer if training doesn’t improve further.
4. Training Phase
Training the final_model on X_train and y_train and our X_test ,y_test with the help of validation_split .
#Training the final_model on extracted features.
history_graph = final_model.fit(X_train , y_train,
            batch_size=128,
            epochs=60,
            validation_split=0.1 ,
           callbacks = my_callback)
use validation_split = 0.1 , the dataset will be split into (90%) and (10%).
5. Plot the Result
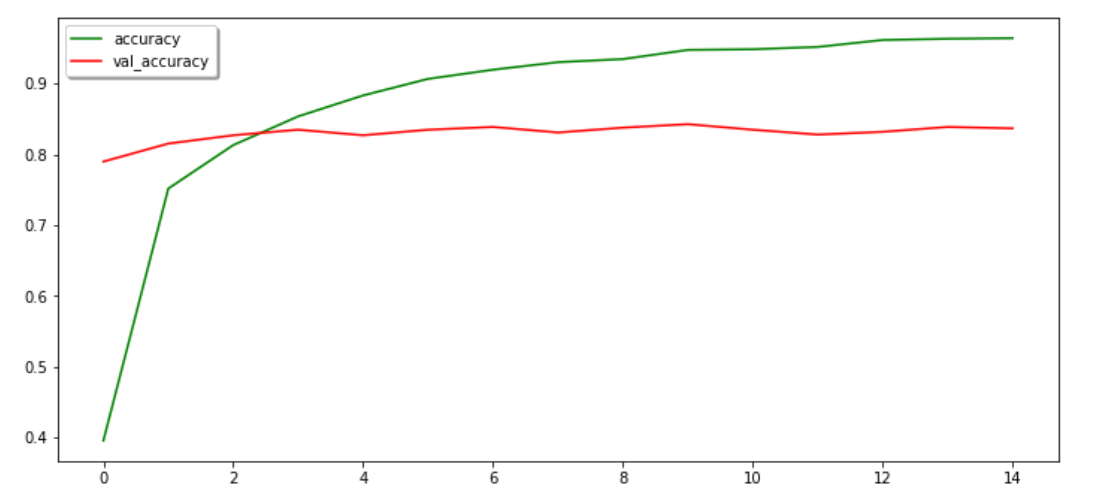
Plotting the training history gives us an idea about the performance and training. here history_graph’ is the history object that contains all the training graphs for every epoch.
import matplotlib.pyplot as plt
fig, (ax_1, ax_2) = plt.subplots(2, 1, figsize=(14, 14))
ax1.plot(history_graph.history[‘loss’],color = ‘b’,label = ‘loss’)
ax1.plot(history_graph.history[‘val_loss’],color = ‘r’,label = ‘val_loss’)
ax_1.set_xticks(np.arange(1, 60, 1))
ax_1.set_yticks(np.arange(0, 1, 0.1))
ax_1.legend([‘loss’,’val_loss’],shadow = True)
ax_2.plot(history_graph.history[‘accuracy’],color = ‘green’,label = ‘accuracy’)
ax_2.plot(history_graph.history[‘val_accuracy’],color = ‘red’,label = ‘val_accuracy’)
ax_2.legend([‘accuracy’,’val_accuracy’],shadow = True)
plt.show()
WOW!
Finally, we have trained our model and got a validation accuracy of 85%, this is a good start. though it’s not an end, we can further improve this accuracy by using some fine-tuning.
6. Model Saving
Saving the trained model for further development. Using the saved model we can host the model on a website, can create an android app that will be able to classify dog breeds.
final_model.save('/kaggle/working/dogbreed.h5')
stacked_model_final.save('/kaggle/working/feature_extractor.h5')
7. Testing and Prediction
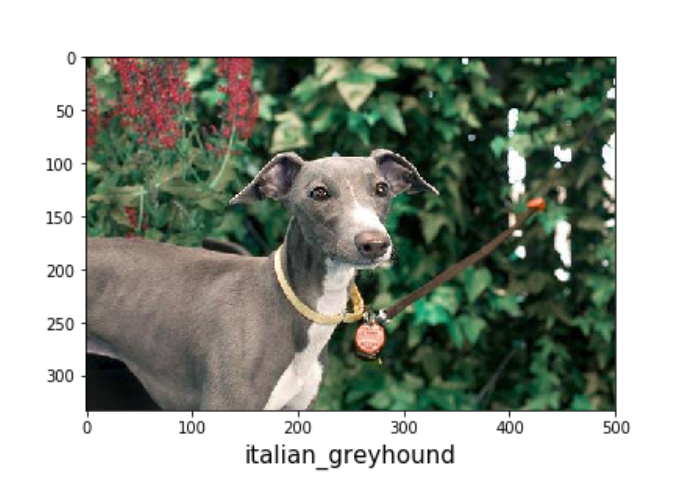
We need to follow the same workflow we followed in the process of training. first using stacked_model_final we need to extract bottleneck features of the single image then convert them into a tensor and pass them into our final model as input. final model will return the class id of dog breed.
first, we will extract bottleneck features of test_images stacked_model_final and then we will pass extracted features to final_model get class values
img = load_img(img_path, target_size=(331,331))
img = img_to_array(img)
img = np.expand_dims(img,axis = 0) # this is creating tensor(4Dimension)

extracted_features = stacked_model_final.predict(img)
y_pred = predictor_model.predict(extracted_features)
y_pred is a prediction array containing the probability of all 120 dog breed’s class id. we need to pick up only the class id having the highest probability. After getting the class id we will convert the class id back to the class label using the dictionaryclass_to_num.
def get_key(val):
        for key, value in class_to_num.items():
         if val == value:
             return key

pred_codes = np.argmax(y_pred, axis = 1)
predicted_dog_breed = get_key(pred_codes)
Prediction:
Conclusion
In this article, we discussed how to build a dog breed classifier using stacked (densenet121, resnet50v2) and we successfully got a validation accuracy of over 85%. We can also improve its accuracy a little further. In the next article, we will discuss hosting the trained model as a website.
Improving the Result
- Apply Image augmentation before feature extraction
- Stack more dense pre-trained models (VGG19, VGG16, etc.)
- Increase the dimension of extracted features.
all codes and resources are taken from my kaggle link.
Thanks for reading my article on the stacked pre-trained model!
The media shown in this article is not owned by Analytics Vidhya and are used at the Author’s discretion.


