Writing today’s article was a fascinating experience for me and would also be for the readers of this blog. What’s so different? Two things: firstly the article is about something I always wanted to do since I was a 5-year old; secondly this topic / tools / algorithm are new to me as well. I am no way a master of image processing, but the utility of this field simply blew my mind.
Imagine, if you can create an application of auto-tagging a photograph as that of Facebook, or create your own face recognition password to your laptop. In this article, I will pick up a very simple but interesting application of Image processing. We will use Python to do the image processing. In next few articles, I will take over more complex examples of Image Processing. Here is the problem I will be working on in this article:
Problem Statement
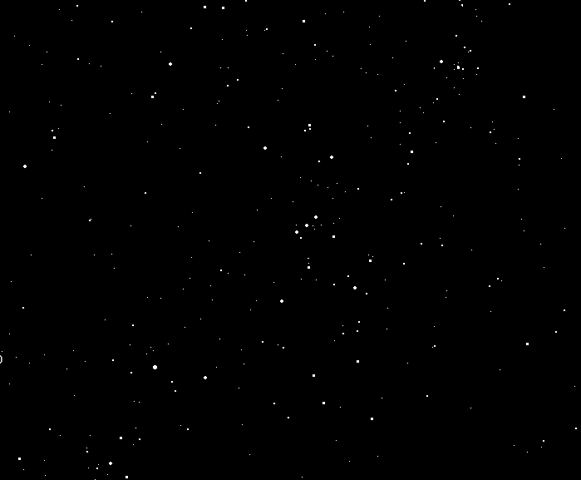
Guess what is this image?
You are right, it’s a typical picture of an open sky. I took this picture last to last night in Bangalore from my terrace. At that point of time, I had no clue that this can be such an exciting and rewarding exercise. As a kid, I used to spend hours counting these stars but almost always failed to go beyond 50-60. I wanted to complete this exercise using some help from my machine. I had no clue that this was even possible till last Sunday, and today I have completed this long pending task using Python.
Let’s get started
Step 1: Import the required library
Skimage package enables us to do image processing using Python. The language is extremely simple to understand but does some of the most complicated tasks. Here are a few library you need to import to get started,
Step 2 : Import the image
Once we have all the libraries in place, we need to import our image file to python. Following is the code you can use to import the image file. Note that the image is imported in grey scale, which basically means that each pixel is a shade of grey. And each pixel essentially becomes one cell in a matrix. In this case the image is matrix of 480*581 cells (or image of 480*581 pixels).
Python Code:
Step 3 : Find the number of Stars
Now comes the critical part where our major labor is done by a few commands. These few command go out for searching continuous objects in the picture. Blobs_log gives three outputs for each object found. First two are the coordinates and the third one is the area of the object. The radius of each blob/object can be estimated using this column (area of the object).
As we can see that the algorithm has estimated 308 visible stars. Let’s now look at how accurate are these readings.
Step 4 : Validated whether we captured all the stars
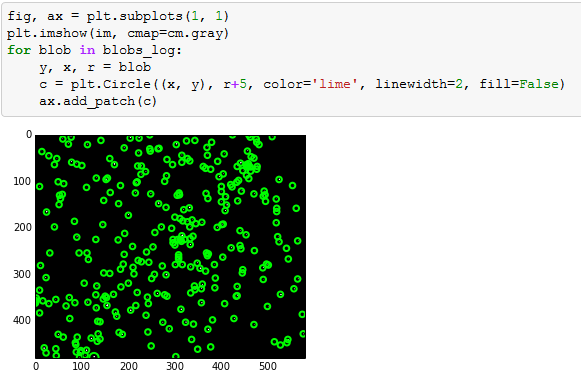
The number 308 is still coming out of a black box. Let’s look at whether we have spotted all the stars correctly. For this I am circling each estimated star position. And the look at the image if we are missing any star.
Here is the complete code :
[stextbox id=”grey”]
from matplotlib import pyplot as plt
from skimage import data
from skimage.feature import blob_dog, blob_log, blob_doh
from math import sqrt
from skimage.color import rgb2gray
import glob
from skimage.io import imread
example_file = glob.glob(r"C:UsersTavishDesktopwint_sky.gif")[0]
im = imread(example_file, as_grey=True)
plt.imshow(im, cmap=cm.gray)
plt.show()
blobs_log = blob_log(im, max_sigma=30, num_sigma=10, threshold=.1)
# Compute radii in the 3rd column.
blobs_log[:, 2] = blobs_log[:, 2] * sqrt(2)
numrows = len(blobs_log)
print("Number of stars counted : " ,numrows)
fig, ax = plt.subplots(1, 1)
plt.imshow(im, cmap=cm.gray)
for blob in blobs_log:
    y, x, r = blob
    c = plt.Circle((x, y), r+5, color='lime', linewidth=2, fill=False)
    ax.add_patch(c)

[/stextbox]
End Notes
Image Processing is fascinating! I started my journey with Python Image Processing not more than 5 days. For the benefit of the community, I will encourage any suggestions or best practices to be shared on this forum. This exercise might not have any practical application but similar analysis can be done for purity estimations. For instance, in glass industry we need the number of silica particles in the glass at a microscopic level. By capturing the frames in a video, you can use this simple code to do a lot of things. For example, estimation of traffic through CCTV footage. This code can easily be tailored to achieve the same.
Did you find the article useful? If you have done similar pieces of work on Python Image processing, please share them with us. Do let us know your thoughts about this article in the box below.


