What is Streamlit?
Although using Flask is simple, yet the user has to create HTML pages manually and serve them using the routes created.
But, if our project needs just a simple UI with a few fields then this process seems tedious. This is where the Streamlit library comes in. It allows us to write all the code in a single python file without needing to write HTML and CSS ourselves. We can use several widgets provided by Streamlit to create our UI and integrate with python code. In case you need to fine-tune the styling streamlit also provides functionality to custom CSS styles if needed.
Saving your models
Let us have a look at how we can create a UI for a simple regression task. Before getting to UI let’s look at how we can export our simple ML model.
from sklearn.datasets import load_iris
from sklearn.model_selection import train_test_split, RandomizedSearchCV
import numpy as np
import pandas as pd
from sklearn.linear_model import LogisticRegression
import random
from sklearn.metrics import accuracy_score
import pickle
data = load_iris()
X = data.data
y = data.target
X_train, X_test, y_train, y_test = train_test_split(X, y, stratify=y, test_size=0.2, random_state=10)
clf = LogisticRegression(C=0.01)
clf.fit(X_train, y_train)
pickle.dump(clf, open('final_model.sav', 'wb'))
Here we create a very simple Machine Learning model for the classification of Iris Species. As this is just for demonstration we don’t perform any feature engineering or Hyperparameter tuning. Once our model is built we need to export it so that we can directly import it and make our predictions. For this, we can use the Pickle library. Once we export the model we get a final_model.sav file which we will use in our UI to predict results.
Getting started with Streamlit
Installing Streamlit
Streamlit can be easily installed via pip using the following command:
$ pip install streamlit
Running Streamlit Apps
To run or start a Streamlit we use the streamlit run command followed by the name of the python file which contains the code. In our case, our main file would be app.py
$ streamlit run app.py
1. st. title(string)
- It’s used to print the header of the webpage. This is similar to using tag in HTML
2. st.markdown(string)
- It allows us to print any data or text on the web page. As the name suggests the string we pass to this function can also support Markdown. So we can use Markdown syntax and the function renders the markdown on the web page.
3. st.text_input( Label, Placeholder)
- When we want to read text from the user we can use text_input. It takes 2 arguments i.e a Label for that text_input and some placeholder text for the Text field. We can assign the text entered in the text field to be stored in a variable.
sepal_length = st.text_input('Enter sepal_length', '')
- Here whenever the User types or edits text in this textbox the value is automatically updated in the sepal_length variable which can then be used anywhere in the code just like any normal string.
4. st.button(label)
- It creates a button with a label specified. Whenever the user clicks on a button streamlit updates the value of the button as True, so using this code we can run a function whenever the user clicks a particular button.
if st.button(“Predict”):
predict_class()
Project Structure
In our project, we would mainly have 2 files: app.py and model_methods.py. Let’s have a look at the content of each file.
model_methods.py
In this file, we will create methods that load our model and make predictions. These predictions will be displayed using the UI. Here we import all the libraries needed and write our code for prediction in the predict() function.
import numpy as np
import pandas as pd
from sklearn.linear_model import LogisticRegression
import pickle
def predict(arr):
    # Load the model
    with open('final_model.sav', 'rb') as f:
        model = pickle.load(f)
    classes = {0:'Iris Setosa',1:'Iris Versicolor',2:'Iris Virginica'}
    # return prediction as well as class probabilities
    preds = model.predict_proba([arr])[0]
    return (classes[np.argmax(preds)], preds)
In the predict() function, we get the data to be predicted as a list. We then load the model from the final_model.sav file which we had exported previously and then predict the classes using our model. This function returns the predicted class label as well as the probabilities of each class so that we can plot some charts using the probabilities of each class. As our model was a Logistic Regression model, to get the probabilities of the data belonging to each class we use the model.predict_proba() function.
As our use case was a simple one we could directly use the data for predictions, if any preprocessing of text or scaling needs to be done it could be included here as well. This file would act as the prediction pipeline for our Machine Learning model.
app.py
This file is the entry point to our application. We first import the required libraries including the streamlit library itself.
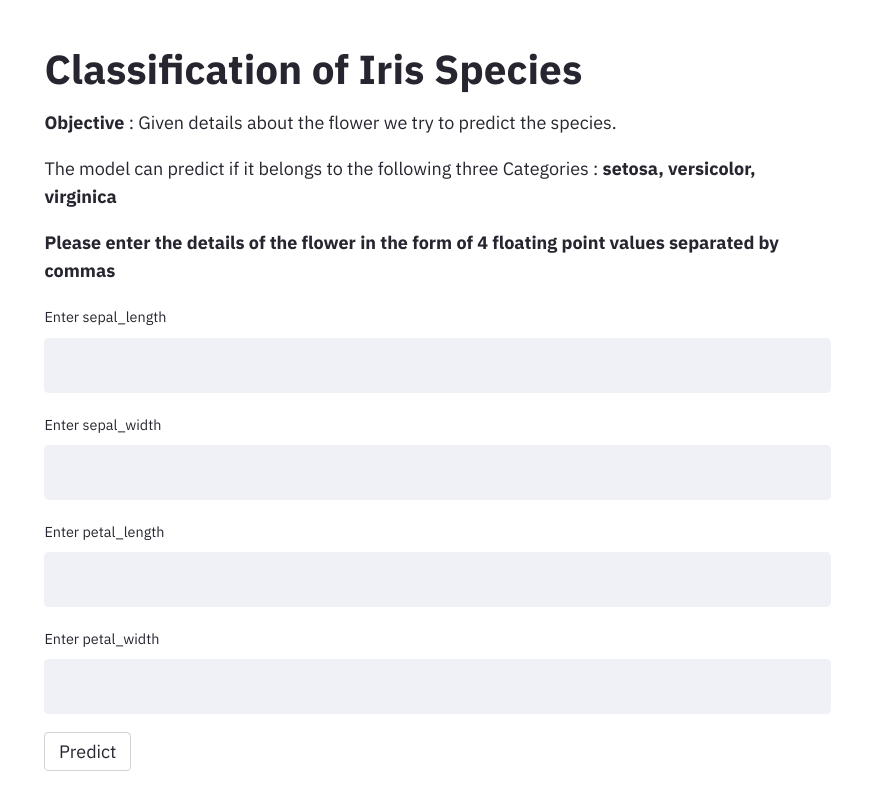
To render the UI, we add a title and a description of our app. We then define 4 text input tags (sepal_length,sepal_width,petal_length, petal_width) to read the values from the user. We add a button with a Label as “Predict”. Whenever enters the data in the four text fields and then clicks on the Predict button we trigger a function predict_classes() which is defined below
import streamlit as st
import numpy as np
import pandas as pd
import seaborn as sns
import matplotlib.pyplot as plt

from model_methods import predict
classes = {0:'setosa',1:'versicolor',2:'virginica'}
class_labels = list(classes.values())
st.title("Classification of Iris Species")
st.markdown('**Objective** : Given details about the flower we try to predict the species.')
st.markdown('The model can predict if it belongs to the following three Categories : **setosa, versicolor, virginica** ')
def predict_class():
    data = list(map(float,[sepal_length,sepal_width,petal_length, petal_width]))
    result, probs = predict(data)
    st.write("The predicted class is ",result)
    probs = [np.round(x,6) for x in probs]
    ax = sns.barplot(probs ,class_labels, palette="winter", orient='h')
    ax.set_yticklabels(class_labels,rotation=0)
    plt.title("Probabilities of the Data belonging to each class")
    for index, value in enumerate(probs):
        plt.text(value, index,str(value))
    st.pyplot()
st.markdown("**Please enter the details of the flower in the form of 4 floating point values separated by commas**")
sepal_length = st.text_input('Enter sepal_length', '')
sepal_width = st.text_input('Enter sepal_width', '')
petal_length = st.text_input('Enter petal_length', '')
petal_width = st.text_input('Enter petal_width', '')
if st.button("Predict"):
    predict_class()
In this file, the function predict_class() gets called automatically when the user clicks on the “Predict” button.
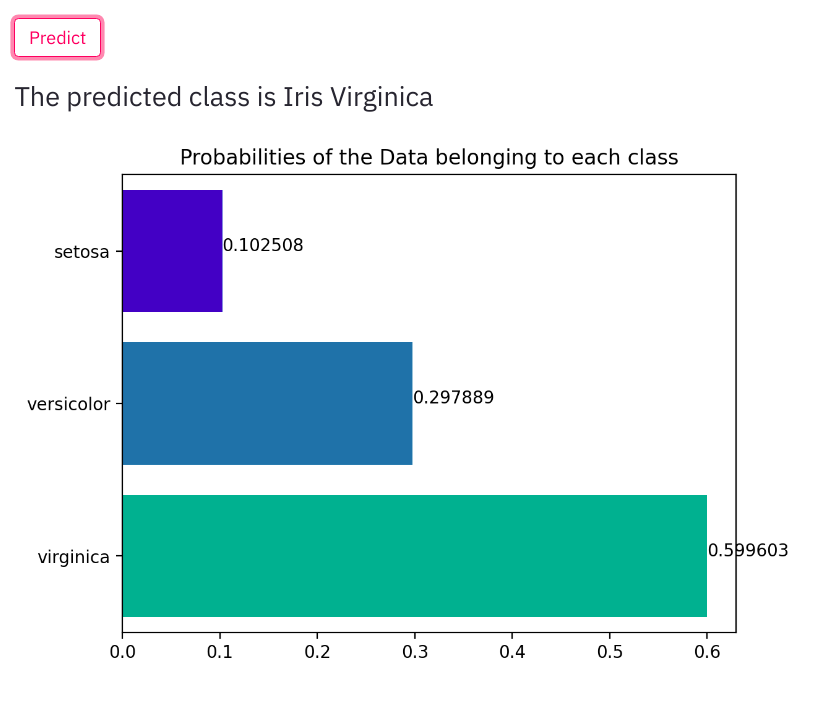
In the predict_class function first, we read all the data entered by the user. By default the values are strings, so we convert them to float first. We then call the predict() function we had previously created in the model_methods.py file. We get the predicted result and also the probabilities. We print the Result to the webpage. Also, we get the probabilities of each class. using which we plot a bar graph. For this, we can use the Seaborn library. Streamlit will automatically print our output on the webpage.
Let us run our app and check how the results look like.
$ streamlit run app.py

When a user enters the details along with predicted output we also display the predicted class probabilities.

Changes to be made for Deploying to Heroku
1. Procfile
web: sh setup.sh && streamlit run app.py
2. setup.sh
mkdir -p ~/.streamlit/
echo "
[server]n
headless = truen
port = $PORTn
enableCORS = falsen
n
" > ~/.streamlit/config.toml
Our final Project structure would have the following files:
- app.py
- model_methods.py
- final_model.sav
- Procfile
- setups.sh
Conclusion
This was just a quick introduction to Streamlit. You can visit the official documentation at https://streamlit.io/ to explore all the features and functionality offered.


