This article was published as a part of the Data Science Blogathon.
Overview
In this article, we will be working to develop an application that will help in the image-segmentation. It is very easy to use this application, on the first window with mouse drag we will select a part of the picture, and then on the other window, we will be able to see that part of the image only i.e. image segmentation.
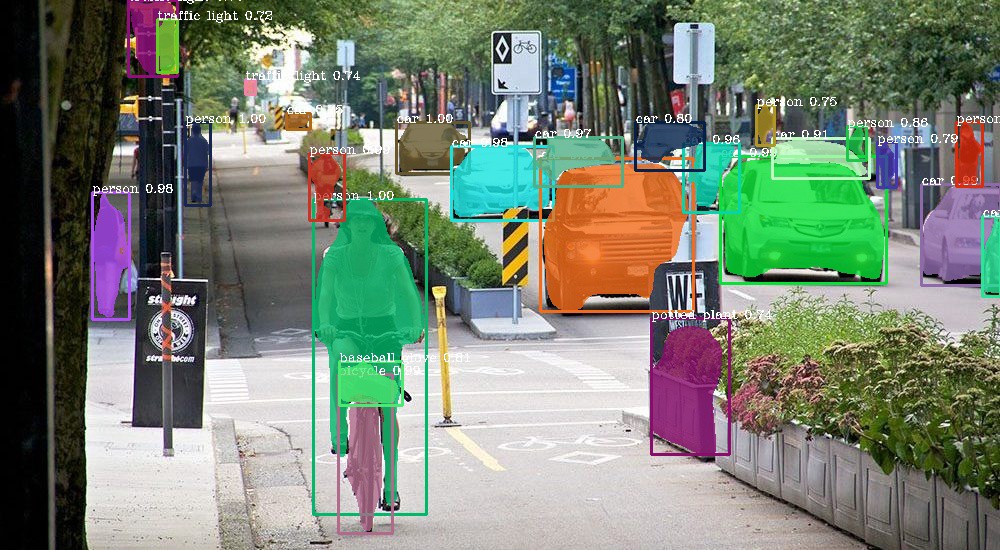
Application of Image Segmentation
- Machine Vision: It is the technology that is based on image-based inspection and analysis which can be achieved by segmenting different individuals.
- Traffic control system: This can be helpful when the traffic police can segment the different vehicles.
- Video surveillance: For security purposes also we can use the application of image segmentation.
So, let’s get started!
Steps Involved in Image Segmentation
- Import the libraries
- Reading the sample image on which we will be performing all the operations.
- Creating the function that will draw the bounding box.
- Explaining the GrabCut algorithm.
- The main function is to run the complete process all at once.
- Key takeaways from this article.
- Conclusion
Importing Library for Image Segmentation
Firstly we will import all the libraries.
- cv2: For performing computer vision and image processing operations.
- NumPy: To perform some mathematical operations (if required).
- matplotlib: To show the images/figure as we are working on the Jupyter notebook.
Let’s look at the Image
Function to Draw the Real-Time Bounding Box on the Image
The following function will draw the bounding box in real-time on the image. First, let’s check what kind of parameters it has.
- click: This parameter will hold which kind of button will be clicked.
- x: This parameter will hold the X value of the cursor.
- y: This parameter will hold the Y value of the cursor.
- Then there are some default parameters.
def draw_bounding_box(click, x, y, flag_param, parameters):
    global x_pt, y_pt, drawing, top_left_point, bottom_right_point, original_image

    if click == cv2.EVENT_LBUTTONDOWN:
        drawing = True
        x_pt, y_pt = x, y

    elif click == cv2.EVENT_MOUSEMOVE:
        if drawing:
            top_left_point, bottom_right_point = (x_pt,y_pt), (x,y)
            image[y_pt:y, x_pt:x] = 255 - original_image[y_pt:y, x_pt:x]
            cv2.rectangle(image, top_left_point, bottom_right_point, (0,255,0), 2)

    elif click == cv2.EVENT_LBUTTONUP:
        drawing = False
        top_left_point, bottom_right_point = (x_pt,y_pt), (x,y)
        image[y_pt:y, x_pt:x] = 255 - image[y_pt:y, x_pt:x]
        cv2.rectangle(image, top_left_point, bottom_right_point, (0,255,0), 2)
        bounding_box = (x_pt, y_pt, x-x_pt, y-y_pt)

        grabcut_algorithm(original_image, bounding_box)
Code-breakdown:
- Before writing the main code we will be declaring some global variables which one can see in the code.
- Then with the help of the IF condition, we will be detecting whether the left button is clicked or not, and if it encounters the same event it will parse the True value to the flag variable and initialize the global x and y variables with the parameter values.
- As we know, while making the bounding box we need to drag the mouse as well to cover the distance between the source and the destination for that reason we will be detecting the movement of the mouse. Hence, we will be initializing the top-left and bottom-right points (source and destination) and then we will use the
cv2.rectanglefunction to draw the bounding box.
- So, we have implemented the button-down and button movement functionality now we need to complete the functionality of the button-down as well. First of all the flag variable should be re-initialized to False because now there would be no need to draw the rectangle but the other variables will still hold the values (updated one) and after that, we will make the rectangle.
- At the last, we will call the
Grab algorithmfunction – which we will discuss later.
Grab Cut Algorithm
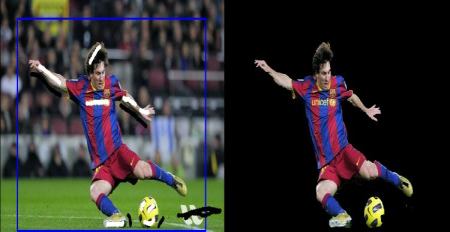
What is the Grabcut algorithm in OpenCV?
A few things may get clear with the name itself i.e. The user will be grabbing the particular part of the image and cut it down by making the bounding box around that part this is not the only thing that the Grabcut algorithm performs there is also some technicalities behind this, This algorithm keeps the note of colour attribution of that object by using the Gaussian model.
This function will take only 2 parameters:
- original_image: The image on which we want to imply the image segmentation.
- bounding_box: This is the same variable that we had at the end of
draw_bounding_boxthe function which was holding the values of top-left and bottom-right.
def grabcut_algorithm(original_image, bounding_box):

    segment = np.zeros(original_image.shape[:2],np.uint8)

    x,y,width,height = bounding_box
    segment[y:y+height, x:x+width] = 1

    background_mdl = np.zeros((1,65), np.float64)
    foreground_mdl = np.zeros((1,65), np.float64)

    cv2.grabCut(original_image, segment, bounding_box, background_mdl, foreground_mdl, 5,
    cv2.GC_INIT_WITH_RECT)

    new_mask = np.where((segment==2)|(segment==0),0,1).astype('uint8')

    original_image = original_image*new_mask[:,:,np.newaxis]

    cv2.imshow('Result', original_image)
Code-breakdown:
- The very first step will be to give some valid values to the segmentation variable i.e. providing the attributes of the image.
- Now. we will extract the values that will be needed while making the bounding box and when we will be having those values then it can be easily passed on to cut the ROI.
- Then we are declaring two more variables (background model and foreground model) that will be responsible for the look of the masked part when the rectangle will be created.
- Finally, we will be using the Grabcut function using
cv.grabCutto perform our main work and it will take all the valid parameters like the main image, segmented variable, both foreground, and background model andGC_INIT_WITH_RECTthis is very important to notice as this means we are going with the rectangle segmentation and not the masking segmentation.
- Now we will pluck out the new mask and store it in the variable and then will apply the above mask to the original image only.
- At the last, we will display the image when the function is called.
Main Function
if __name__=='__main__':
    drawing = False
    top_left_point, bottom_right_point = (-1,-1), (-1,-1)

    original_image = cv2.imread("robert.jpg")
    original_image = cv2.resize( original_image ,(500,500))
    image = original_image.copy()
    cv2.namedWindow('Frame')
    cv2.setMouseCallback('Frame', draw_bounding_box)

    while True:
        cv2.imshow('Frame', image)
        c = cv2.waitKey(1)
        if c == 27:
            break

    cv2.destroyAllWindows()
Output:
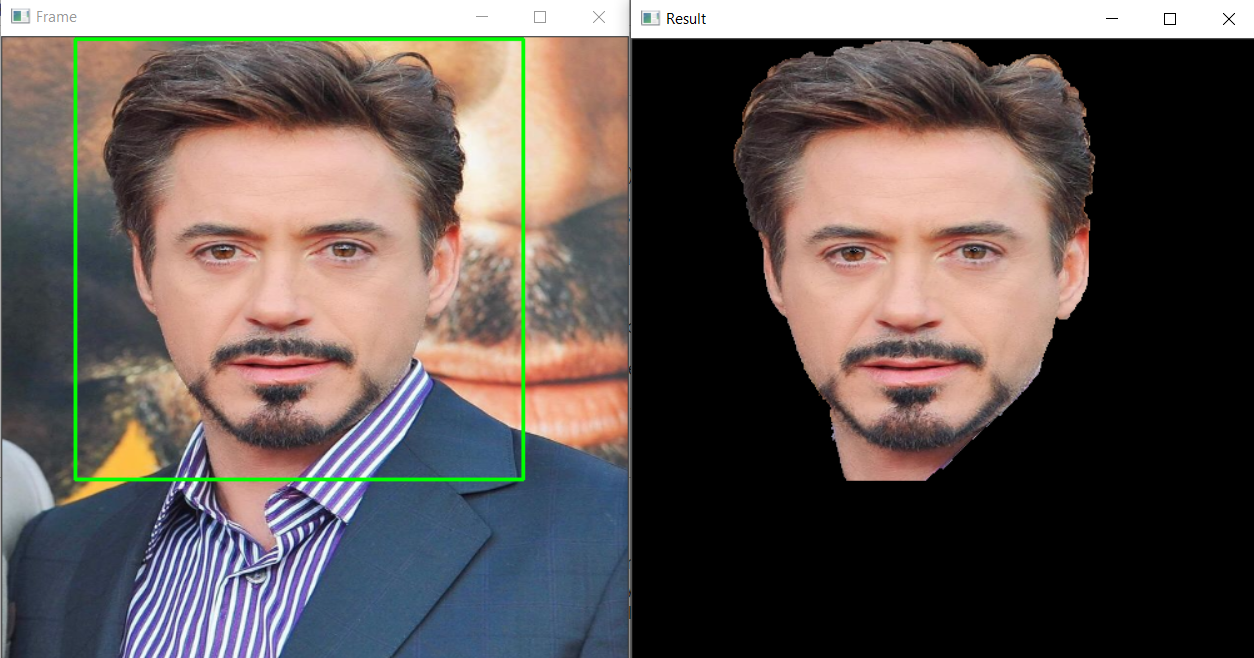
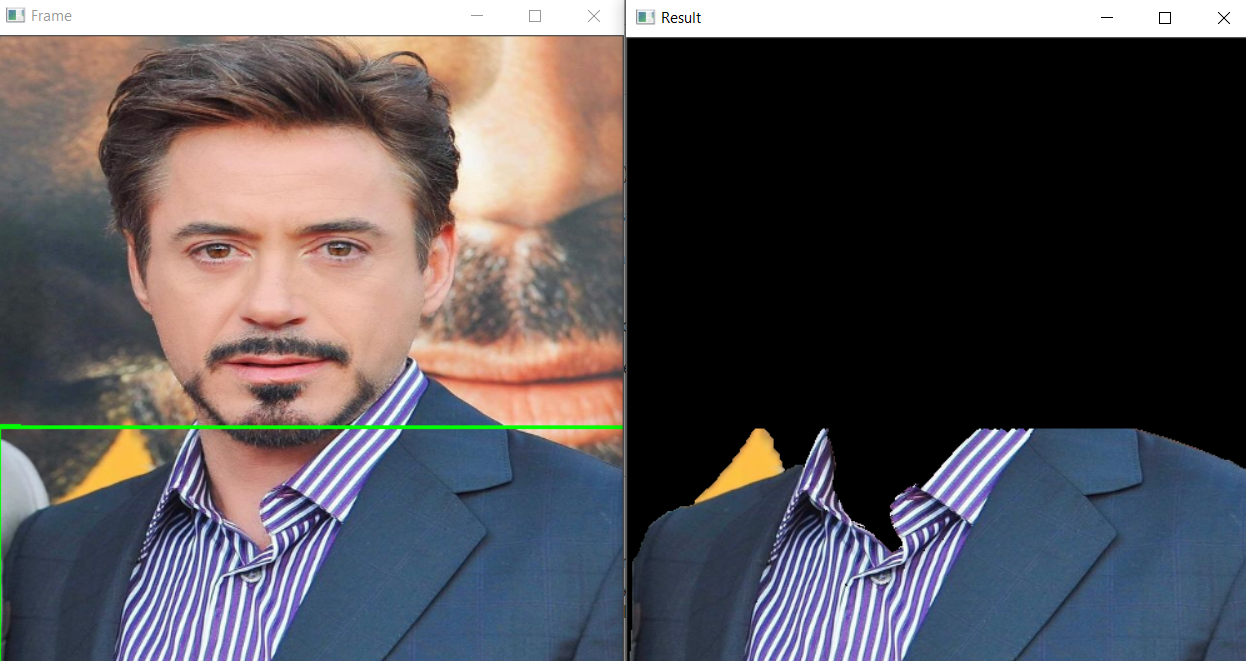
Code-Breakdown
This is the part of the code that will be executed first (name == ‘main‘)
- First, we will initialize the flag variable to False just so that there is no garbage value in it and the same for the top left and bottom right variables.
- Then we will read the image (
cv2.imread()) on which we will apply all the segmentation techniques and resize the image usingcv2.resize()function.
- For naming the window we have used
cv2.namedWindow()function.
- Then for calling the
draw_bounding_boxthe function we will use is the Callback function it will help to call the function only when the button is clicked.
- Then inside the infinite loop we will see the application along with that we are also giving the exit point i.e. window will be destroyed when
escthe key is pressed and the application will be closed.
Conclusion
- Firstly we learned about how to draw the bounding box on pour detected object which is very important in any kind of detection process.
- Then we learned about the new algorithm that extracts the Region of Interest for us i.e. Grab cut algorithm.
- We also learned how the Gaussian Blur technique helps in building the basic blocks of the grab cut algorithm.
Endnotes
Here’s the repo link to this article. Hope you liked my article on Image Segmentation using OpenCV. If you have any opinions or questions, then comment below.
Read the latest articles on the AV blog.
About the Author
Greeting to everyone, I’m currently working in TCS and previously, I worked as a Data Science Analyst in Zorba Consulting India. Along with full-time work, I’ve got an immense interest in the same field, i.e. Data Science, along with its other subsets of Artificial Intelligence such as Computer Vision, Machine Learning, and Deep learning; feel free to collaborate with me on any project on the domains mentioned above (LinkedIn).
The media shown in this article is not owned by Analytics Vidhya and are used at the Author’s discretion.


