


Creating presentations with Google Slides is a breeze. Slides has a simple interface, collaboration features, and a soothing design. It’s a solid alternative for people who don’t use Microsoft PowerPoint. The service works across most devices, including Android phones, tablets, iPhones, desktop PCs, and laptops. The best part is that it’s free.
Making slideshows can take time, no matter how much you enjoy it. Tasks like moving around, formatting, and adjusting objects feel never-ending when you’re dealing with many elements. Work smarter and use the app’s grouping feature to save time and effort. This guide shows you how to group and ungroup elements in Google Slides so that you can spend more time churning out creative ideas.
What is object grouping in Google Slides?
Google Slides allows you to group objects like images, shapes, diagrams, text boxes, and charts so that you can manage them as a single set. Moving the group doesn’t disturb the relative position of the elements. While the group shifts, all elements keep the same distance from each other.

How to fix YouTube embeds in Google Slides (AKA Error 150)
Try these troubleshooting methods to iron out video-playback issues
You can perform the same action on multiple items in one go, thus avoiding repetition. For instance, you can add filters, and also move, adjust, color, and resize elements as one group.
How to group elements in Google Slides
Google Slides lets you group shapes, images, and text boxes. However, you can only perform the task on elements on the same slide.
Grouping items on the desktop
You can select the objects and use the grouping option on the items in Google Slides. There are two ways to select them.
Click and drag: Selects all the objects within the rectangle. It’s quick and easy but doesn’t offer flexibility.
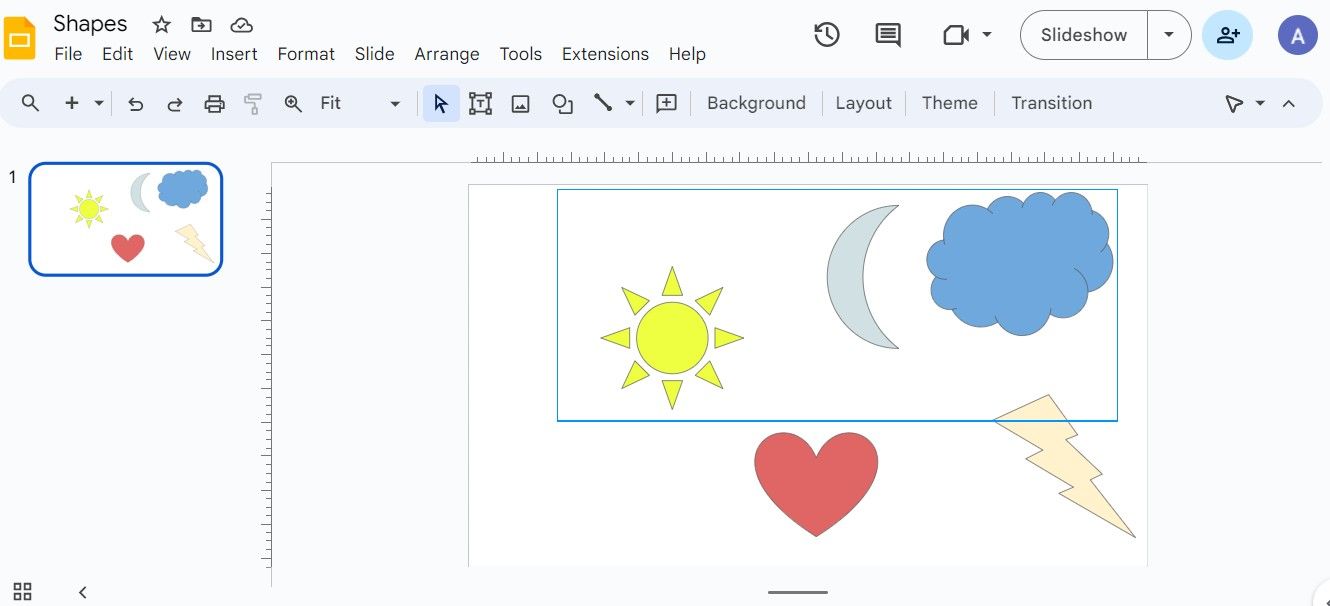
You’ll see a blue outline for the selected elements. We selected the sun, moon, cloud, and lightning bolt in this example. There isn’t a blue outline for the heart.
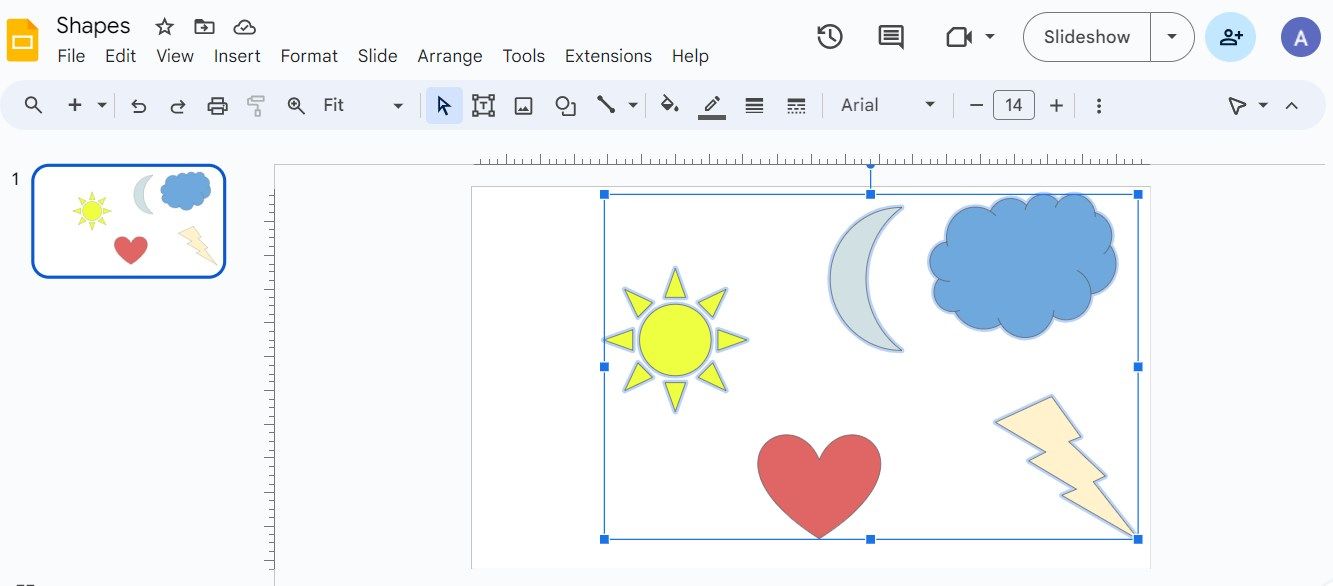
Use the Shift key: Click an object. Press the Shift key and click on the other objects you want to group. We selected the sun, cloud, and lightning bolt in this instance. The moon and heart remain untouched.

Select the elements you want to group using any method listed above. Here’s how to group them:
- Click Arrange from the menu bar at the top and scroll down to select Group.
- Alternatively, right-click within the blue box and choose Group.
To group items on a Windows PC or laptop, select the elements and press
Ctrl + Alt + G
. Mac users can use the shortcut
Cmd + Option + G
.
Grouping items on mobile
We use an Android phone for this section, but iPhone users cano follow along.
Here’s how to select and group elements on the Google Slides mobile app:
- Open the presentation you want to edit.
- Tap and hold the first object in your group.
- Tap the other objects.
- The selection box increases in size as you add elements. The selected items are highlighted with a blue outline.
- Select the Group objects icon at the top of your screen.
How to ungroup elements in Google Slides
You can easily ungroup an item in Google Slides if you add it accidentally.
Ungrouping items on the desktop
Here’s how to ungroup items on the desktop:
- Right-click any one of the elements.
- Select Ungroup.
- Alternatively, click the grouped item and choose Arrange > Ungroup.
Use the shortcut
Ctrl + Alt + Shift + G
on a Windows PC to ungroup an item. On a Mac, press
Cmd + Option + Shift + G
.
Ungrouping items on mobile
Here’s how to ungroup elements on the Google Slides mobile app:
- Tap and hold one of the grouped elements.
- The group option at the top of the screen is active again.
- Select the Group icon to ungroup the item.
Click the
Slideshow
button in the upper-right corner of your Google Slides screen to open your presentation in full-screen mode.
Why can’t I group elements in Google Slides?
You can’t group objects in Google Slides if the group objects option is gray instead of black. There are many reasons behind this. You’ll see the option only if two or more objects are selected. You might miss a few items if you don’t hold the Shift button while selecting them. Another cause could be that you already grouped the elements. In this case, the group feature is grayed out while the ungroup option is active.
Additionally, you can’t group certain elements. For instance, you can’t add tables and YouTube videos to a group. Troubleshoot the issue by checking if the group option is gray when you select a new item.

How to add a hanging indent in your Google Slides presentation
Bring your presentation up to academic standards
Get creative with Google Slides
Grouping elements helps you apply formatting options to the whole group in one go. If you added an item by mistake, you can easily ungroup it. Google Slides has features like a transparency editor, autoplay, and collaboration tools to make your slideshows more engaging and professional-looking. If you don’t have the patience to create beautiful presentations, choose from the best Google Slides templates suitable for work, businesses, and schools.