Overview
- Understand the concept of model deployment
- Perform model deployment using Streamlit for loan prediction data
Introduction
I believe most of you must have done some form of a data science project at some point in your lives, let it be a machine learning project, a deep learning project, or even visualizations of your data. And the best part of these projects is to showcase them to others. This will not only motivate and encourage you about your hard work but will also help you to improve upon your project.
But the question is how will you showcase your work to others? Well, this is where Model Deployment will help you.
I have been exploring the field of Model Deployment for the past few months now. Model Deployment helps you showcase your work to the world and make better decisions with it. But deploying a model can get a little tricky at times. Before deploying the model a lot of things need to be looked into, such as data storage, pre-processing, model building, and monitoring. This can be a bit confusing as the number of tools that perform these model deployment tasks efficiently is few. Enter, Streamlit!
Streamlit is a popular open-source framework used for model deployment by machine learning and data science teams. And the best part is it’s free of cost and purely in python.
In this article, we are going to deep dive into model deployment. We will first build a loan prediction model and then deploy it using Streamlit.
Table of Contents
- Overview of Machine Learning Lifecycle
- Understanding the Problem Statement: Automating Loan Prediction
- Machine Learning model for Automating Loan Prediction
- Introduction to Streamlit
- Model Deployment of the Loan Prediction model using Streamlit
Overview of Machine Learning Lifecycle
Let’s start with understanding the overall machine learning lifecycle, and the different steps that are involved in creating a machine learning project. Broadly, the entire machine learning lifecycle can be described as a combination of 6 stages. Let me break these stages for you:
Stage 1: Problem Definition
The first and most important part of any project is to define the problem statement. Here, we want to describe the aim or the goal of our project and what we want to achieve at the end.
Stage 2: Hypothesis Generation
Once the problem statement is finalized, we move on to the hypothesis generation part. Here, we try to point out the factors/features that can help us to solve the problem at hand.
Stage 3: Data Collection
After generating hypotheses, we get the list of features that are useful for a problem. Next, we collect the data accordingly. This data can be collected from different sources.
Stage 4: Data Exploration and Pre-processing
After collecting the data, we move on to explore and pre-process it. These steps help us to generate meaningful insights from the data. We also clean the dataset in this step, before building the model
Stage 5: Model Building
Once we have explored and pre-processed the dataset, the next step is to build the model. Here, we create predictive models in order to build a solution for the project.
Stage 6: Model Deployment
Once you have the solution, you want to showcase it and make it accessible for others. And hence, the final stage of the machine learning lifecycle is to deploy that model.
These are the 6 stages of a machine learning lifecycle. The aim of this article is to understand the last stage, i.e. model deployment, in detail using streamlit. However, I will briefly explain the remaining stages and the complete machine learning lifecycle along with their implementation in Python, before diving deep into the model deployment part using streamlit.
So, in the next section, let’s start with understanding the problem statement.
Understanding the Problem Statement: Automating Loan Prediction
The project that I have picked for this particular blog is automating the loan eligibility process. The task is to predict whether the loan will be approved or not based on the details provided by customers. Here is the problem statement for this project:
Automate the loan eligibility process based on customer details provided while filling online application form
Based on the details provided by customers, we have to create a model that can decide where or not their loan should be approved. This completes the problem definition part of the first stage of the machine learning lifecycle. The next step is to generate hypotheses and point out the factors that will help us to predict whether the loan for a customer should be approved or not.
As a starting point, here are a couple of factors that I think will be helpful for us with respect to this project:
- Amount of loan: The total amount of loan applied by the customer. My hypothesis here is that the higher the amount of loan, the lesser will be the chances of loan approval and vice versa.
- Income of applicant: The income of the applicant (customer) can also be a deciding factor. A higher income will lead to higher probability of loan approval.
- Education of applicant: Educational qualification of the applicant can also be a vital factor to predict the loan status of a customer. My hypothesis is if the educational qualification of the applicant is higher, the chances of their loan approval will be higher.
These are some factors that can be useful to predict the loan status of a customer. Obviously, this is a very small list, and you can come up with many more hypotheses. But, since the focus of this article is on model deployment, I will leave this hypothesis generation part for you to explore further.
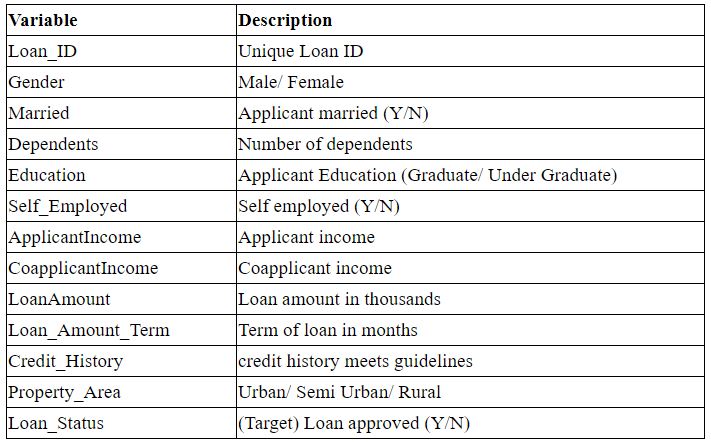
Next, we need to collect the data. We know certain features that we want like the income details, educational qualification, and so on. And the data related to the customers and loan is provided at the datahack platform of Analytics Vidhya. You can go to the link, register for the practice problem, and download the dataset from the problem statement tab. Here is a summary of the variables available for this particular problem:
We have some variables related to the loan, like the loan ID, which is the unique ID for each customer, Loan Amount and Loan Amount Term, which tells us the amount of loan in thousands and the term of the loan in months respectively. Credit History represents whether a customer has any previous unclear debts or not. Apart from this, we have customer details as well, like their Gender, Marital Status, Educational qualification, income, and so on. Using these features, we will create a predictive model that will predict the target variable which is Loan Status representing whether the loan will be approved or not.
Now we have finalized the problem statement, generated the hypotheses, and collected the data. Next are the Data exploration and pre-processing phase. Here, we will explore the dataset and pre-process it. The common steps under this step are as follows:
- Univariate Analysis
- Bivariate Analysis
- Missing Value Treatment
- Outlier Treatment
- Feature Engineering
We explore the variables individually which is called the univariate analysis. Exploring the effect of one variable on the other, or exploring two variables at a time is the bivariate analysis. We also look for any missing values or outliers that might be present in the dataset and deal with them. And we might also create new features using the existing features which are referred to as feature engineering. Again, I will not focus much on these data exploration parts and will only do the necessary pre-processing.
After exploring and pre-processing the data, next comes the model building phase. Since it is a classification problem, we can use any of the classification models like the logistic regression, decision tree, random forest, etc. I have tried all of these 3 models for this problem and random forest produced the best results. So, I will use a random forest as the predictive model for this project.
Till now, I have briefly explained the first five stages of the machine learning lifecycle with respect to the project automating loan prediction. Next, I will demonstrate these steps in Python.
Machine Learning model for Automating Loan Prediction
In this section, I will demonstrate the first five stages of the machine learning lifecycle for the project at hand. The first two stages, i.e. Problem definition and hypothesis generation are already covered in the previous section and hence let’s start with the third stage and load the dataset. For that, we will first import the required libraries and then read the CSV file:
Here are the first five rows from the dataset. We know that machine learning models take only numbers as inputs and can not process strings. So, we have to deal with the categories present in the dataset and convert them into numbers.
Python Code:
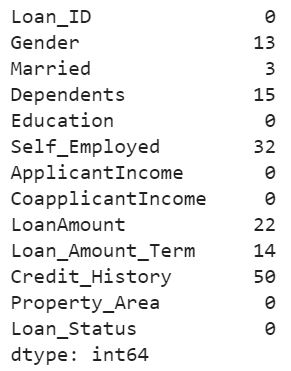
Here, we have converted the categories present in the Gender, Married and the Loan Status variable into numbers, simply using the map function of python. Next, let’s check if there are any missing values in the dataset:
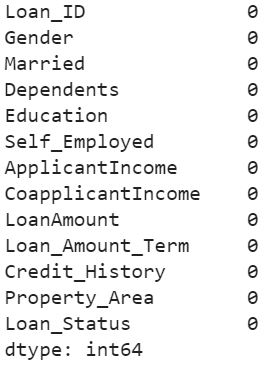
So, there are missing values on many variables including the Gender, Married, LoanAmount variable. Next, we will remove all the rows which contain any missing values in them:
Now there are no missing values in the dataset. Next, we will separate the dependent (Loan_Status) and the independent variables:
For this particular project, I have only picked 5 variables that I think are most relevant. These are the Gender, Marital Status, ApplicantIncome, LoanAmount, and Credit_History and stored them in variable X. Target variable is stored in another variable y. And there are 480 observations available. Next, let’s move on to the model building stage.
Here, we will first split our dataset into a training and validation set, so that we can train the model on the training set and evaluate its performance on the validation set.
We have split the data using the train_test_split function from the sklearn library keeping the test_size as 0.2 which means 20 percent of the total dataset will be kept aside for the validation set. Next, we will train the random forest model using the training set:
Here, I have kept the max_depth as 4 for each of the trees of our random forest and stored the trained model in a variable named model. Now, our model is trained, let’s check its performance on both the training and validation set:
The model is 80% accurate on the validation set. Let’s check the performance on the training set too:
Performance on the training set is almost similar to that on the validation set. So, the model has generalized well. Finally, we will save this trained model so that it can be used in the future to make predictions on new observations:
We are saving the model in pickle format and storing it as classifier.pkl. This will store the trained model and we will use this while deploying the model.
This completes the first five stages of the machine learning lifecycle. Next, we will explore the last stage which is model deployment. We will be deploying this loan prediction model so that it can be accessed by others. And to do so, we will use Streamlit which is a recent and the simplest way of building web apps and deploying machine learning and deep learning models.
So, let’s first discuss this tool, and then I will demonstrate how to deploy your machine learning model using it.
Introduction to Streamlit
As per the founders of Streamlit, it is the fastest way to build data apps and share them. It is a recent model deployment tool that simplifies the entire model deployment cycle and lets you deploy your models quickly. I have been exploring this tool for the past couple of weeks and as per my experience, it is a simple, quick, and interpretable model deployment tool.
Here are some of the key features of Streamlit which I found really interesting and useful:
- It quickly turns data scripts into shareable web applications. You just have to pass a running script to the tool and it can convert that to a web app.
- Everything in Python. The best thing about Streamlit is that everything we do is in Python. Starting from loading the model to creating the frontend, all can be done using Python.
- All for free. It is open source and hence no cost is involved. You can deploy your apps without paying for them.
- No front-end experience required. Model deployment generally contains two parts, frontend, and backend. The backend is generally a working model, a machine learning model in our case, which is built-in python. And the front end part, which generally requires some knowledge of other languages like java scripts, etc. Using Streamlit, we can create this front end in Python itself. So, we need not learn any other programming languages or web development techniques. Understanding Python is enough.
Let’s say we are deploying the model without using Streamlit. In that case, the entire pipeline will look something like this:
- Model Building
- Creating a python script
- Write Flask app
- Create front-end: JavaScript
- Deploy
We will first build our model and convert it into a python script. Then we will have to create the web app using let’s say flask. We will also have to create the front end for the web app and here we will have to use JavaScript. And then finally, we will deploy the model. So, if you would notice, we will require the knowledge of Python to build the model and then a thorough understanding of JavaScript and flask to build the front end and deploying the model. Now, let’s look at the deployment pipeline if we use Streamlit:
- Model Building
- Creating a python script
- Create front-end: Python
- Deploy
Here we will build the model and create a python script for it. Then we will build the front-end for the app which will be in python and finally, we will deploy the model. That’s it. Our model will be deployed. Isn’t it amazing? If you know python, model deployment using Streamlit will be an easy journey. I hope you are as excited about Streamlit as I was while exploring it earlier. So, without any further ado, let’s build our own web app using Streamlit.
Model Deployment of the Loan Prediction model using Streamlit
We will start with the basic installations:
We have installed 3 libraries here. pyngrok is a python wrapper for ngrok which helps to open secure tunnels from public URLs to localhost. This will help us to host our web app. Streamlit will be used to make our web app.
Next, we will have to create a separate session in Streamlit for our app. You can download the sessionstate.py file from here and store that in your current working directory. This will help you to create a session for your app. Finally, we have to create the python script for our app. Let me show the code first and then I will explain it to you in detail:
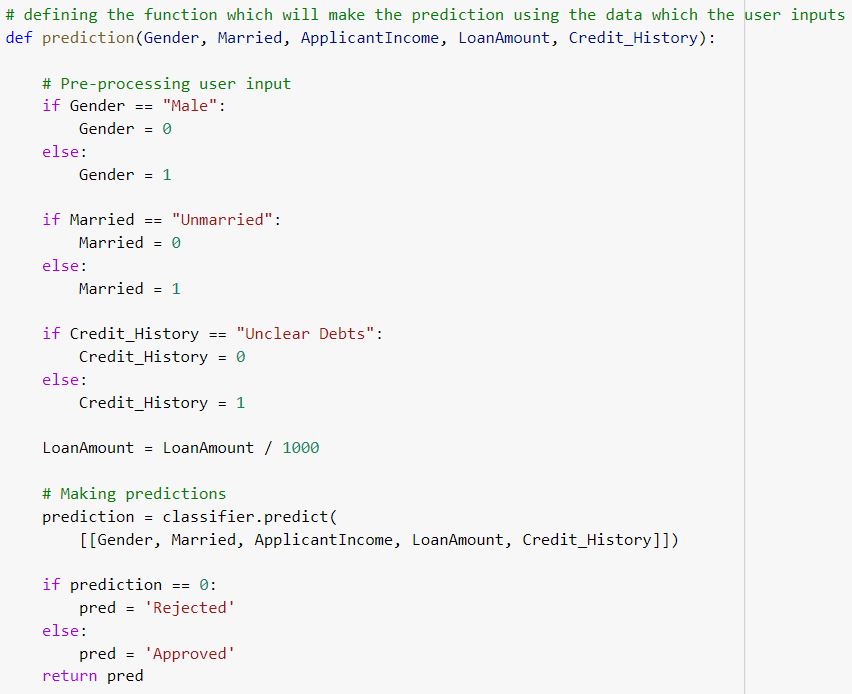
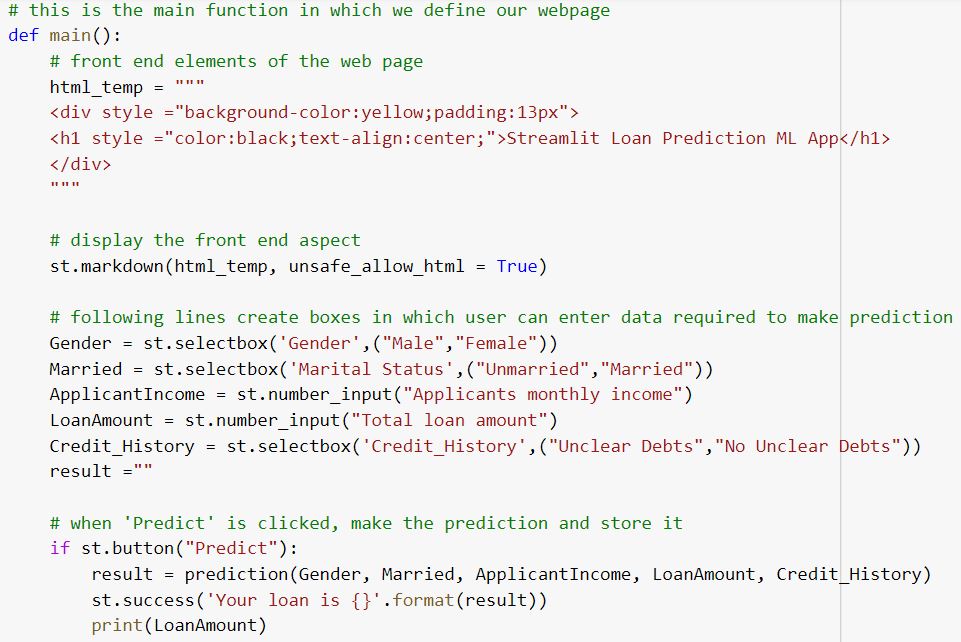
This is the entire python script which will create the app for us. Let me break it down and explain in detail:
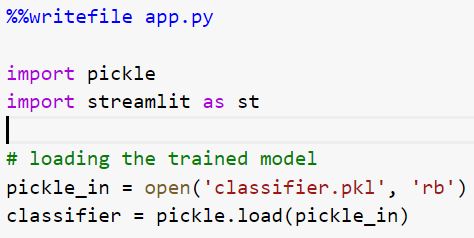
In this part, we are saving the script as app.py, and then we are loading the required libraries which are pickle to load the trained model and streamlit to build the app. Then we are loading the trained model and saving it in a variable named classifier.
Next, we have defined the prediction function. This function will take the data provided by users as input and make the prediction using the model that we have loaded earlier. It will take the customer details like the gender, marital status, income, loan amount, and credit history as input, and then pre-process that input so that it can be feed to the model and finally, make the prediction using the model loaded as a classifier. In the end, it will return whether the loan is approved or not based on the output of the model.
And here is the main app. First of all, we are defining the header of the app. It will display “Streamlit Loan Prediction ML App”. To do that, we are using the markdown function from streamlit. Next, we are creating five boxes in the app to take input from the users. These 5 boxes will represent the five features on which our model is trained.
The first box is for the gender of the user. The user will have two options, Male and Female, and they will have to pick one from them. We are creating a dropdown using the selectbox function of streamlit. Similarly, for Married, we are providing two options, Married and Unmarried and again, the user will pick one from it. Next, we are defining the boxes for Applicant Income and Loan Amount.
Since both these variables will be numeric in nature, we are using the number_input function from streamlit. And finally, for the credit history, we are creating a dropdown which will have two categories, Unclear Debts, and No Unclear Debts.
At the end of the app, there will be a predict button and after filling in the details, users have to click that button. Once that button is clicked, the prediction function will be called and the result of the Loan Status will be displayed in the app. This completes the web app creating part. And you must have noticed that everything we did is in python. Isn’t it awesome?
Alright, let’s now host this app to a public URL using pyngrok library.
Here, we are first running the python script. And then we will connect it to a public URL:
This will generate a link something like this:
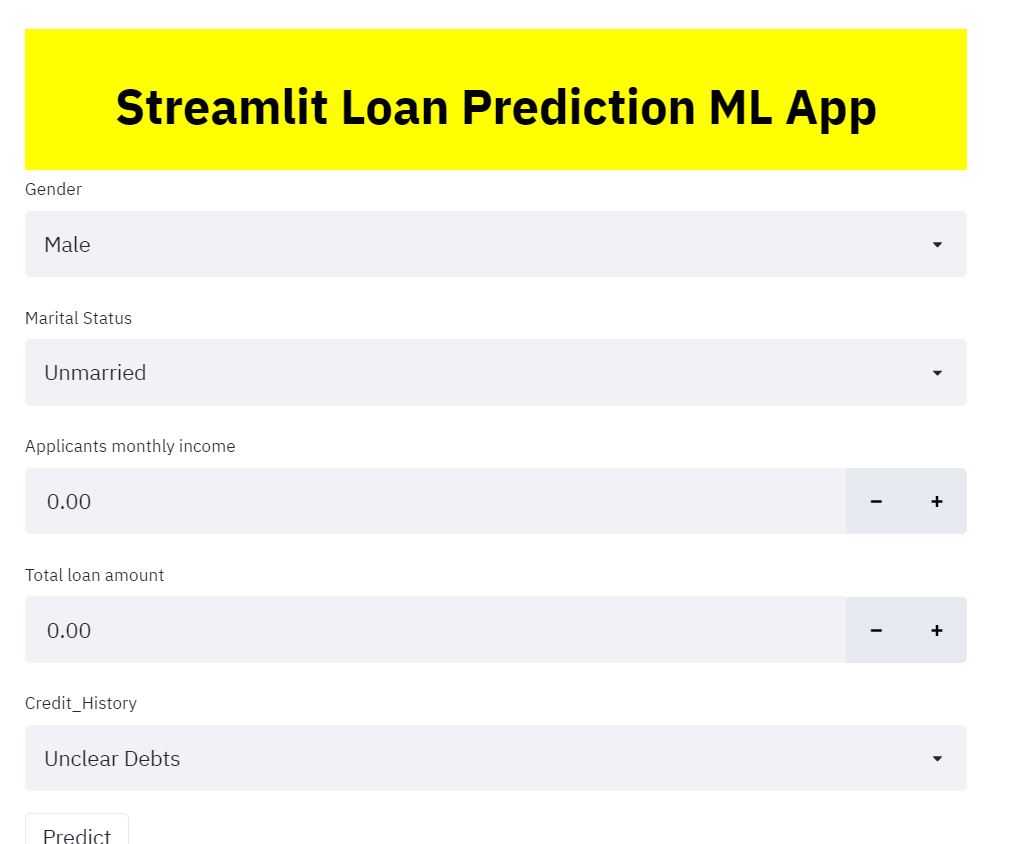
Note that the link will vary at your end. You can click on the link which will take you to the web app:
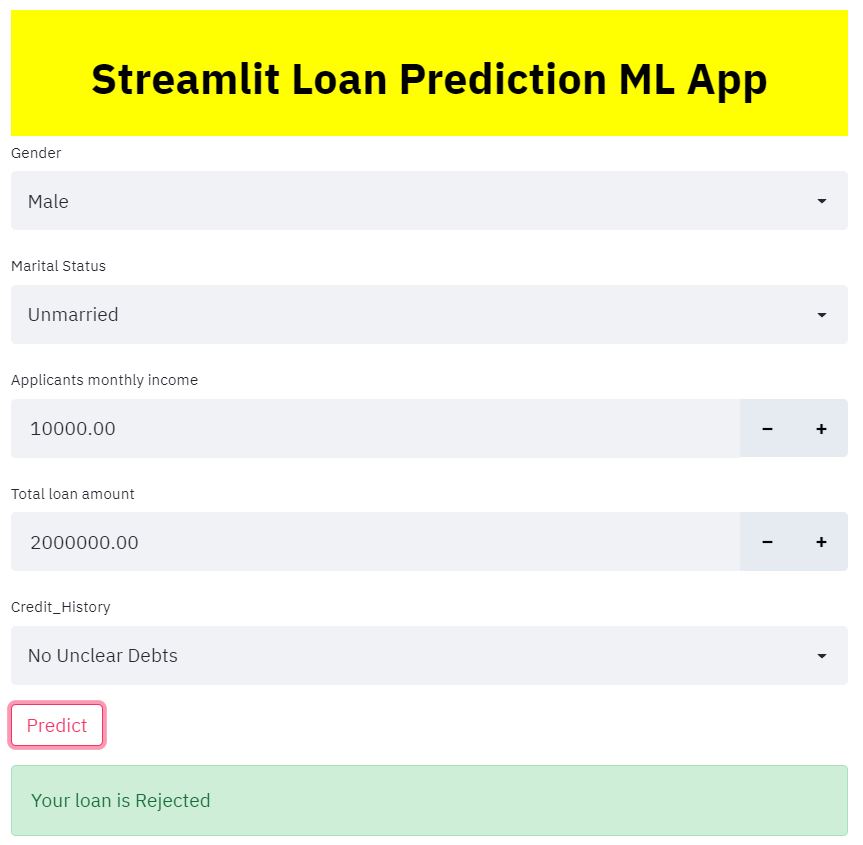
You can see, we first have the name displayed at the top. Then we have 5 different boxes that will take input from the user and finally, we have the predict button. Once the user fills in the details and clicks on the Predict button, they will get the status of their loan whether it is approved or rejected.
And it is as simple as this to build and deploy your machine learning models using Streamlit.
End Notes
Congratulations! We have now successfully completed loan prediction model deployment using Streamlit. I encourage you to first try this particular project, play around with the values as input, and check the results. And then, you can try out other machine learning projects as well and perform model deployment using streamlit.
The deployment is simple, fast, and most importantly in Python. However, there are a couple of challenges with it. We have used Google colab as the backend to build us and as you might be aware, the colab session automatically restarts after 12 hours. Also, if your internet connection breaks, the colab session breaks. Hence, if we are using colab as the backend, we have to rerun the entire application once the session expires.
We recommend you go through the following articles on model deployment to solidify your concepts-
- The Power of Azure ML and Power BI: Dataflows and Model Deployment
- Deployment of ML models in Cloud – AWS SageMaker (in-built algorithms)
- Deploy an Image Classification Model Using Flask
To deal with this, we can change the backend. AWS can be the right option here for the backend and using that, we can host our web app permanently. So, in my next article, I will demonstrate how to integrate AWS with Streamlit and make the model deployment process more efficient.
Lastly, I would love to hear your feedback and suggestions for this article. If you have any questions related to the article, post them in the comments section below. I will be actively looking at and answering them.


