This article was published as a part of the Data Science Blogathon.
This article will provide you with a hands-on implementation on how to deploy an ML model in the Azure cloud. If you are new to Azure machine learning, I would recommend you to go through the Microsoft documentation that has been provided in the references section which will cover the basics of Azure Machine Learning.
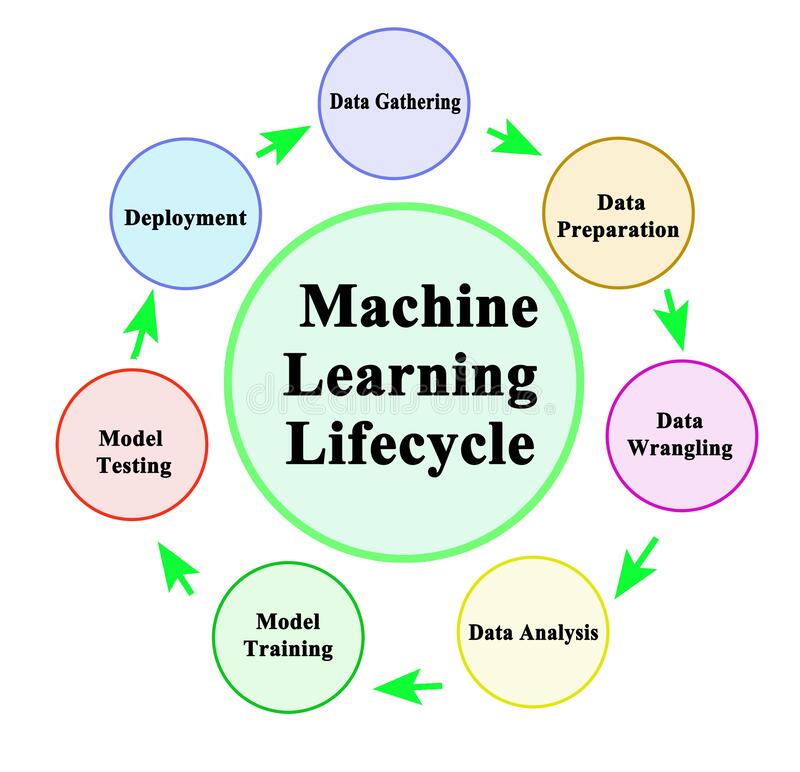
Image 1
If you are a beginner in the field of machine learning, you would have explored the other phases of the machine learning lifecycle which includes data preparation and analysis, model training, and model testing, but have you tried out or thought of deploying it somewhere so that others can access it to solve the same problem that you had solved using your model. If you have not thought of it, then this is the best time to learn one of the crucial parts of the machine learning life cycle i.e model deployment. In simple words, when you deploy a model, it is being added to the production environment so that the end-users avail the service to solve their problem. Today, a lot of companies rely on the output from these deployed models to take critical decisions in their field. Cloud platforms like Microsoft Azure promise a reliable and efficient service for the client in these cases.
For getting hands-on experience on deploying a model, a simple problem has been taken here. The steps that are followed here while deploying the model are:
1. Registering the ML model
2. Deploying the model
3. Accessing the endpoint for making the prediction
All these steps are explained and implemented in the coming sections of the article. It is recommended to have an Azure subscription for implementing these from your side. If you are a student, you can use your university email id for creating a student’s account. Azure will provide you with 100 credits for one year. If you aren’t a student and if you want to just explore Azure, then you should opt for the free trial after registering with your credentials. You will have access to almost all the Azure services for 30 days.
In this article, I had taken the Iris-Setosa dataset and trained an SVM model in my local system. After training the model, I had saved it in a pickle file format. Here I had used only one feature to train the model(Our focus isn’t getting a high-performance model here. We will focus more on the deployment. In your use-case, try to bring the best deployment model).
import pandas as pd
import sklearn
from sklearn.svm import SVC
import pickle
import joblib
from sklearn.model_selection import train_test_split
dataset = pd.read_csv("https://archive.ics.uci.edu/ml/machine-learning-databases/iris/iris.data", header = None, names= colnames )
dataset = dataset.replace({"class":  {"Iris-setosa":1,"Iris-versicolor":2, "Iris-virginica":3}})
X = dataset.drop(['class'], axis=1)[:,0]
y = dataset['class']
X_train, X_test, y_train, y_test = train_test_split(X, y, test_size = 0.25, random_state = 0)
classifier = SVC(kernel = 'linear', random_state = 0)
#Fit the model on training data
classifier.fit(X_train, y_train)
#Make the prediction
y_pred = classifier.predict(X_test)
## Save as a pickle file
filename= 'final_mod_v1.pkl'
joblib.dump(classifier,open(filename, 'wb'))
Next, we will Register the model in the Azure Model Registry
1. Registering the model in Model Registry
The model registry helps to keep a record of all the trained models in your machine learning workspace. The ML model can be either registered through the UI or by using the script. Here, we will register the model using the UI. Since I already had a workspace created, I am not creating a new one. For creating a workspace from your local system, you can use the below script. Within some time, a new workspace will be created in your resource group.
from azureml.core import Workspace
ws = Workspace.create(name='sample',
               subscription_id='**********',
               resource_group='sample_group',
               create_resource_group=True,
               location='location'
               )
Before registering the model, you need to prepare the:
a) Scoring Script
b) YAML file which contains the packages used by the model
The scoring script plays an intermediate role between the deployed model and the client who uses it. When the client sends the input data, the scoring script will receive the data and pass it to the model. It will return the model’s output to the client. The script contains mainly two functions.
(1) init function
(2) run function
init functions help to load your model and the run function to run your model on the input data that the client has passed.
import json

import numpy as np

import os

import pickle

import joblib

from sklearn.svm import SVC

from azureml.core import Model

def init():

    global model

    model_name = 'classifier'

    path = Model.get_model_path(model_name)

    model = joblib.load(path)

def run(data):

    try:

        data = json.loads(data)

        result = model.predict(data['data'])

        return {'data' : result.tolist() , 'message' : "Successfully classified Iris"}

    except Exception as e:

        error = str(e)

        return {'data' : error , 'message' : 'Failed to classify iris'}

Save the above-written scripts in a .py file.
For creating the YAML file, a sample template has been provided here. You can edit that file to add the necessary packages. Now let’s register the model.
First, open the machine learning workspace through the Azure portal and launch the Machine learning Studio.
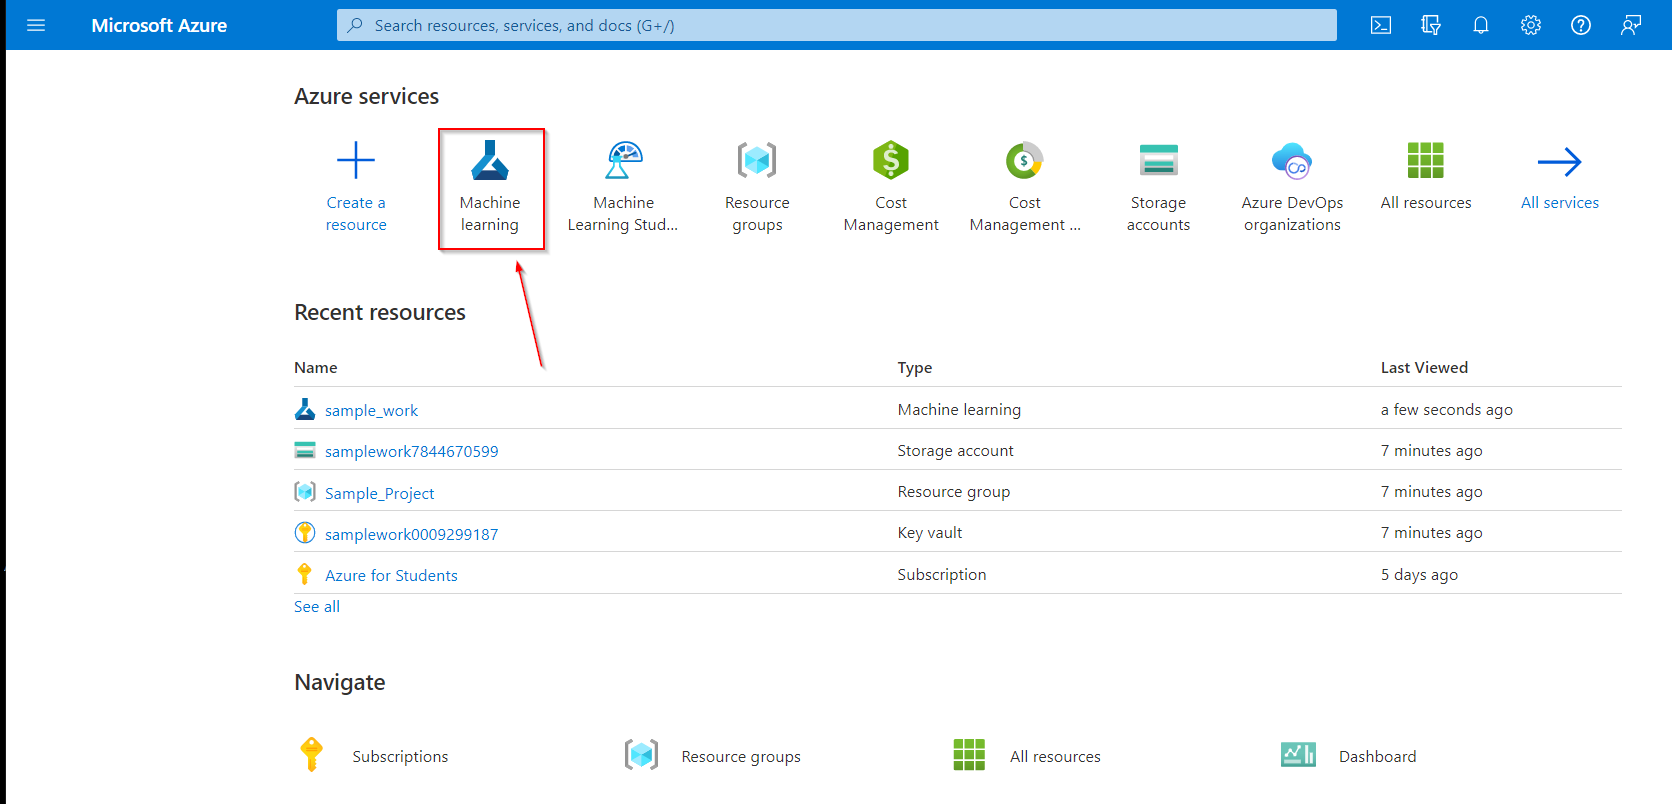
Image 2
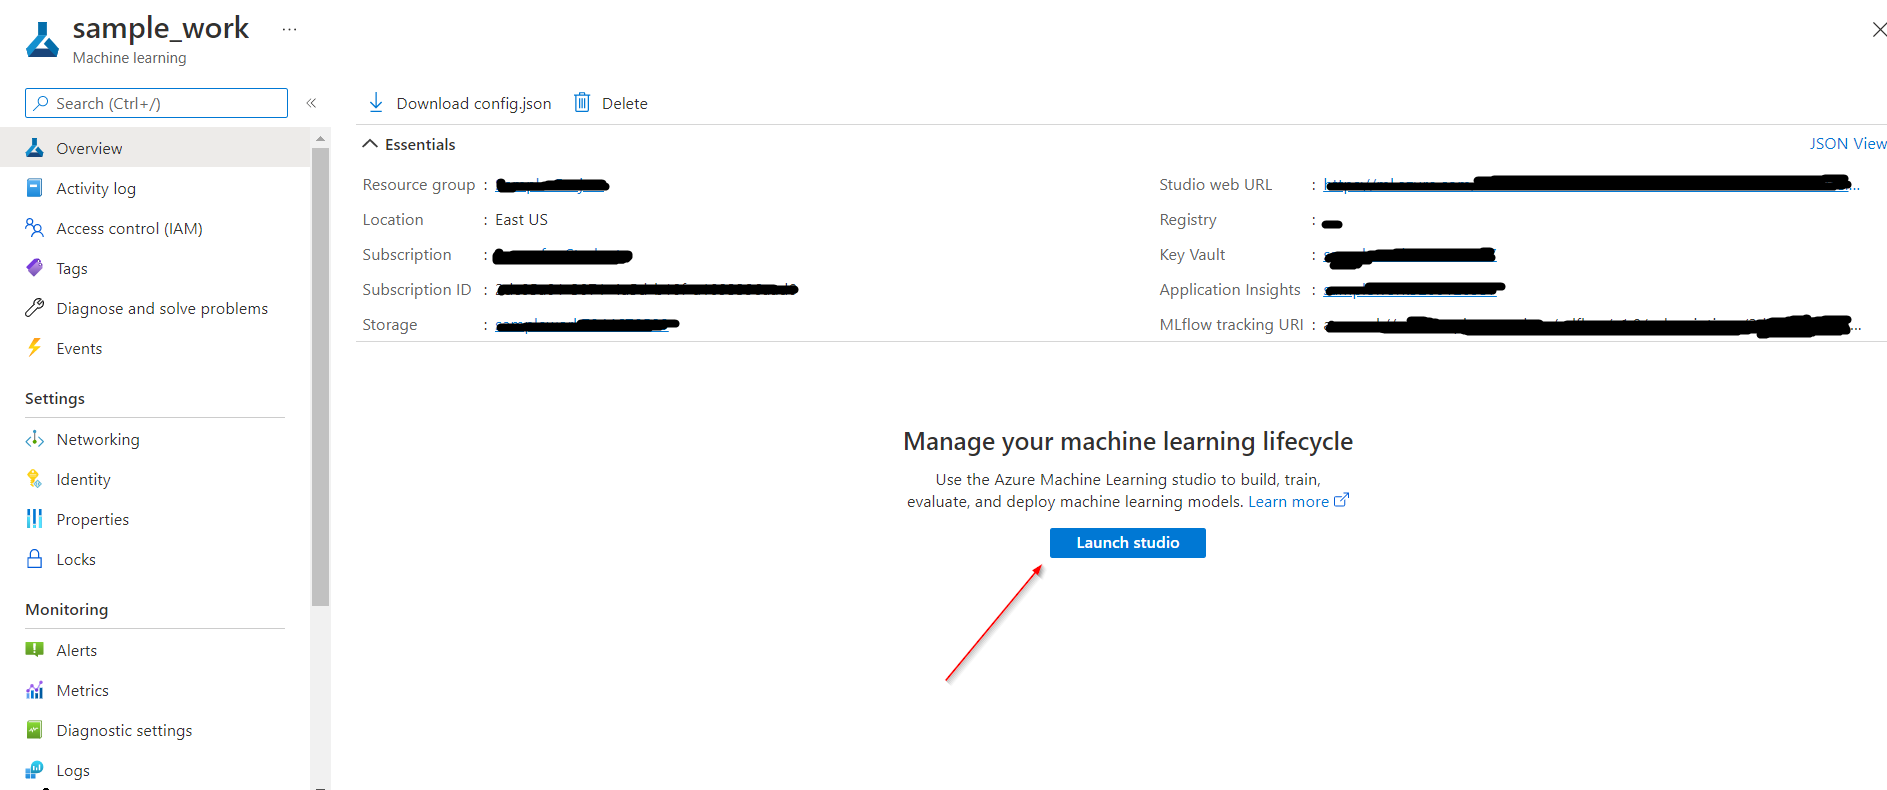
Image 3
For the model registry, select “model” from the left sidebar and then the “create” option.
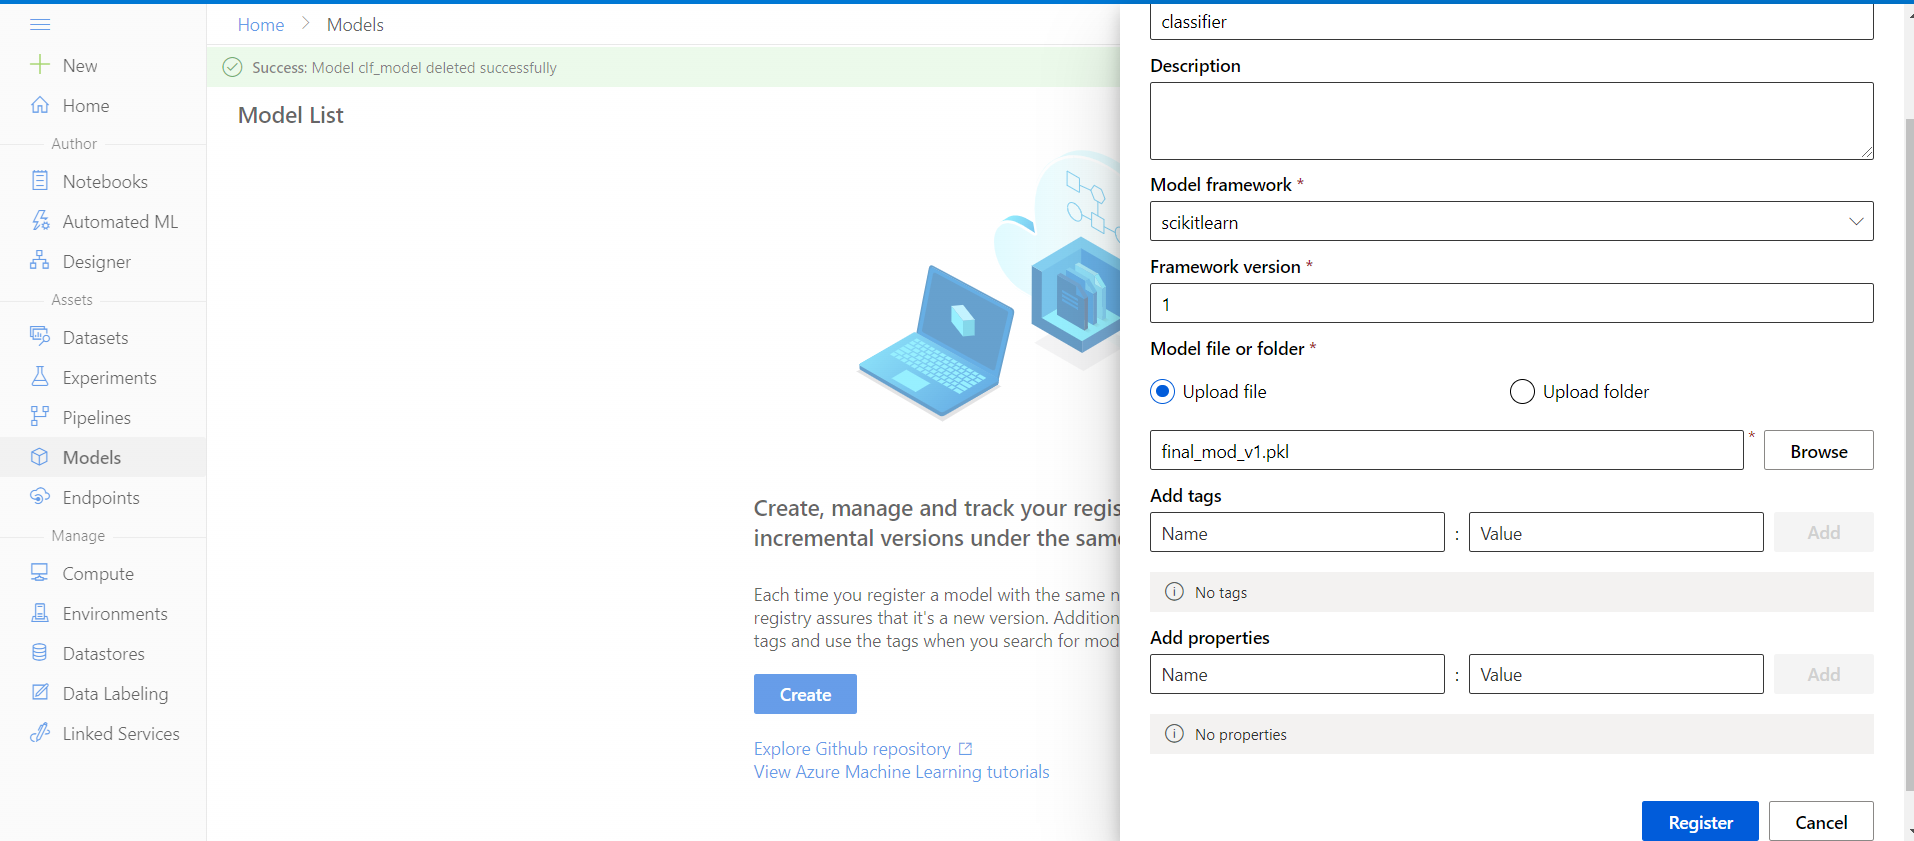
Image 4
For the current problem, we had used the Scikit learn to build the model. If you need, versioning of the model is possible in the model registry. The same model with multiple versions will be displayed separately in the model registry. At last, upload the trained model from your local system.
After clicking register, you can see your model in the model registry.

Image 5
2. Deploying the model
Select the model from the model registry, click deploy and select deploy to a web service.

Image 6
After selecting the option ” Deploy to a web service”, you will need to upload the scoring script that we created along with the YAML file containing the package dependencies.
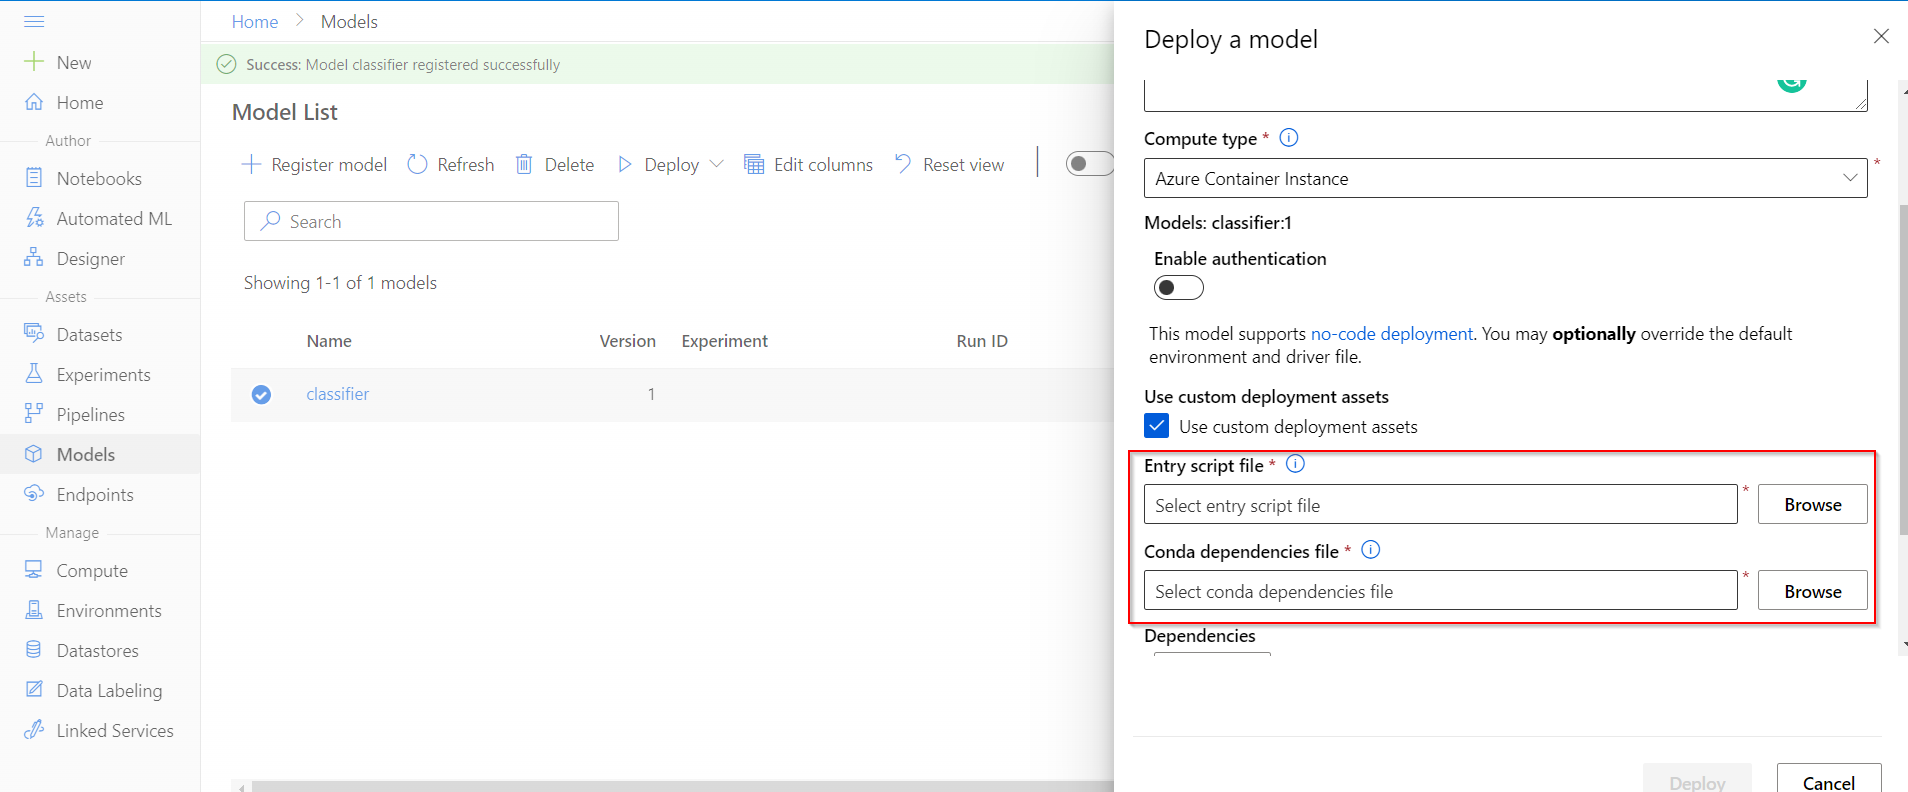
Image 7
After deploying the model, go to the endpoint section. It may take approximately 6-10 minutes for the model to get deployed. If some error occurs while deploying the model, you can check the deployment logs to understand further.
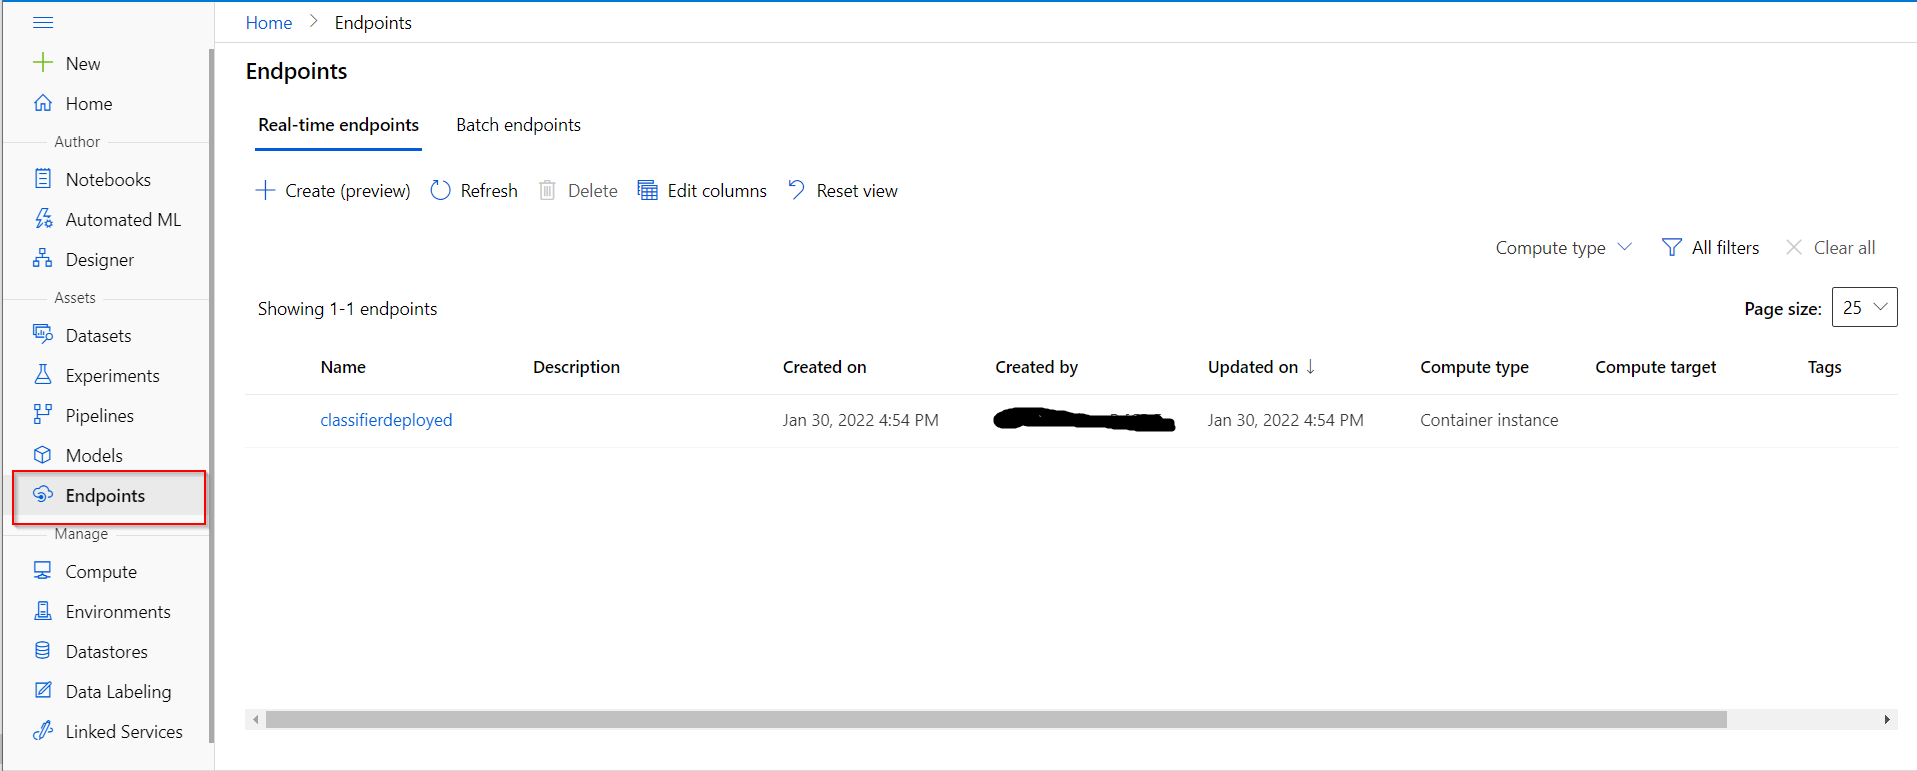
Image 8
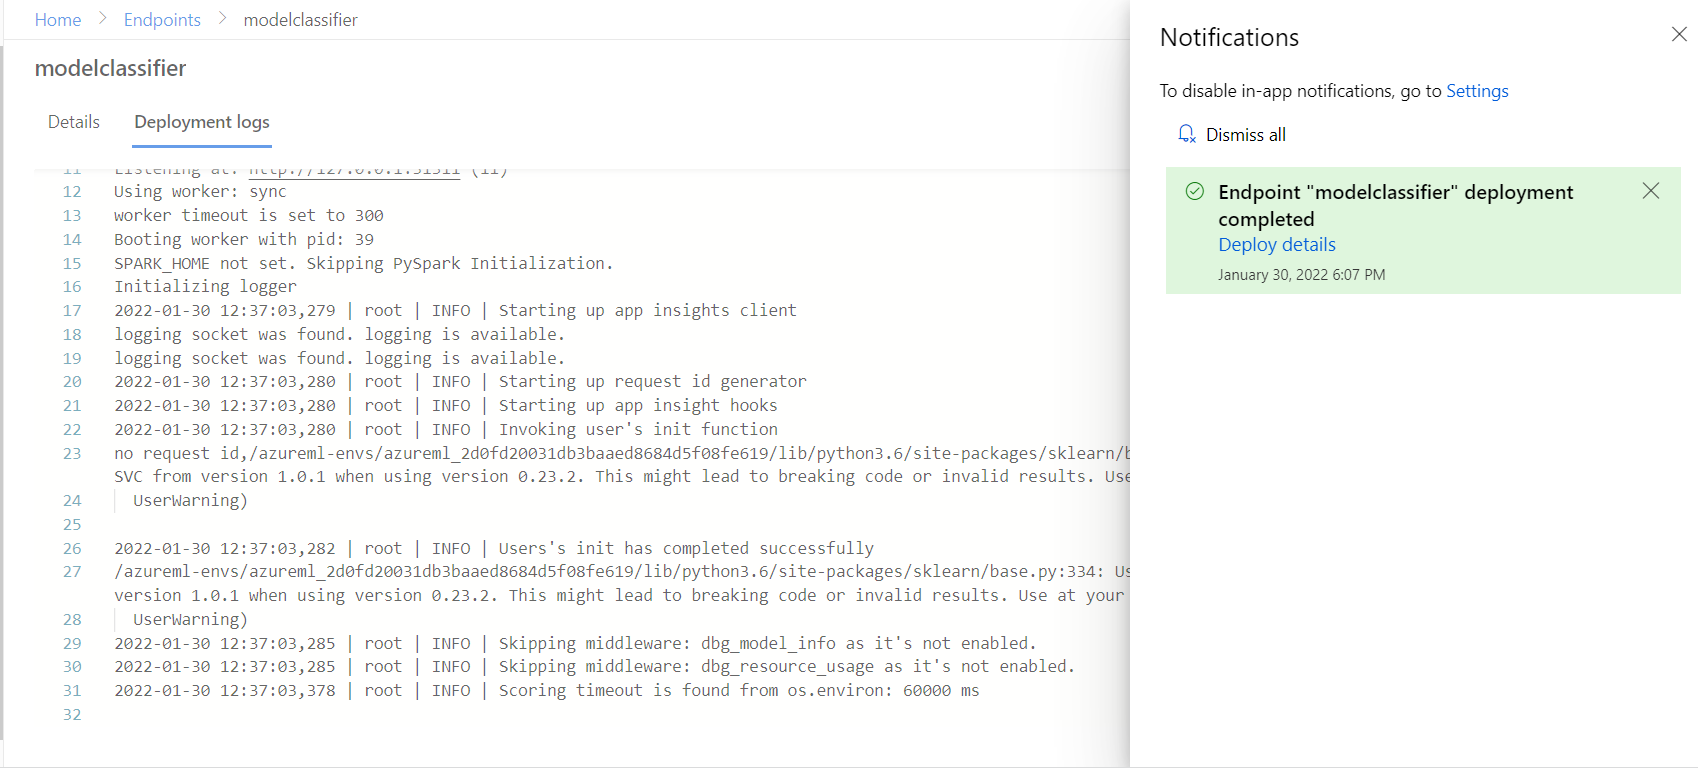
Image 9
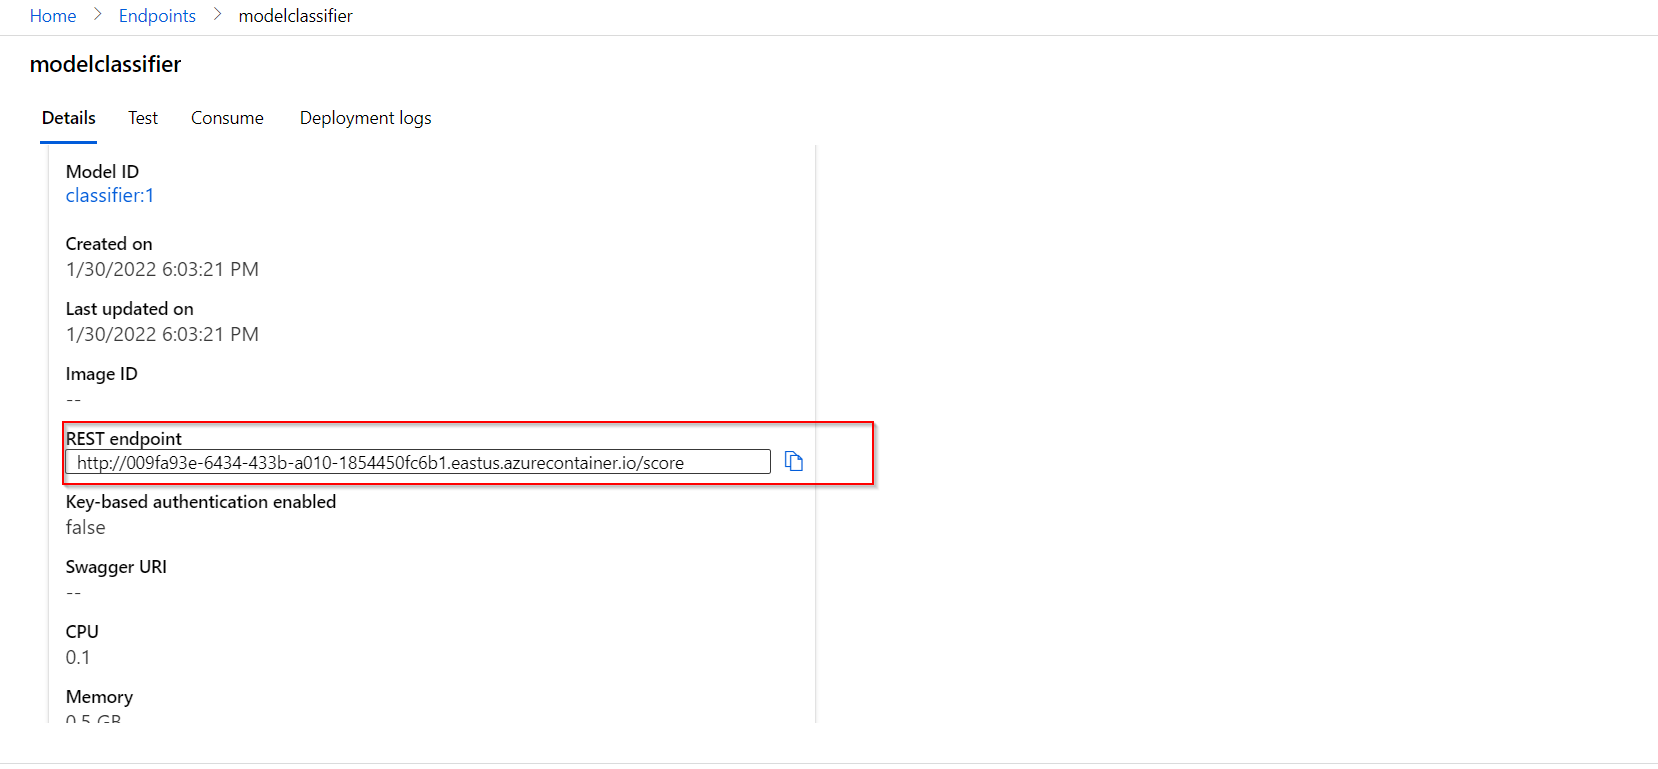
Image 10
3. Using the REST endpoint
For making a prediction, let’s use the endpoint to send the input to the model that has been deployed in the cloud.

Image 11
It’s working fine!! The model has predicted the label as Iris-Setosa(label 1).
EndNote
As the next step of learning, you may try to understand MLOps which has been built based on the principles of DevOps. Mainly It helps in automating the ML life cycle. You may go through the documentation of MLOps using Azure that has been provided in the reference section. If you are using the Azure services for the first time, try to manage using Azure services properly, or else your free credits may decrease drastically. I had the experience of losing $36 credits because I forgot to delete an unused disk for 30 days.
Read more blogs on Azure Cloud on our website.
References
1. Documentation for concepts related to Azure machine learning-https://docs.microsoft.com/en-us/azure/machine-learning/concept-azure-machine-learning-architecture
2. Deploying ML models to Azure – https://docs.microsoft.com/en-us/azure/machine-learning/how-to-deploy-and-where?tabs=azcli
3. MLOps with Azure Machine Learning – https://docs.microsoft.com/en-us/azure/machine-learning/concept-model-management-and-deployment
Image Reference
1.ML-life cycle – https://www.dreamstime.com/components-machine-learning-lifecycle-components-machine-learning-lifecycle-image200203062
About the Author
Hi, myself Adwait Dathan. I am pursuing Mtech in AI and Data Science. Feel free to connect with me on LinkedIn. Please leave your comments after reading the article.
The media shown in this article is not owned by Analytics Vidhya and are used at the Author’s discretion.


