This article was published as a part of the Data Science Blogathon.
Prelude
People like being people. They don’t care what content they are producing. So there can be abusive, illegal, sensitive, and scam content too which is highly dangerous to society and can have an adverse effect.
Thus platforms such as youtube, Meta, Twitter spend a massive sum of money and Man hours to filter all these out. But what if we can leverage the power of ML to automate the process?
So I bring you this article which explores a simple way to perform the same operation in the least possible code for content moderation ML.
I hope you enjoy the read!
Introduction
Let’s think of a general scenario🤔
Assume you want to search for some information on youtube, so you went there and searched it. As a general case, you watched the video found something quite disturbing or harmful, which led you to wonder how you ended up being there and why Youtube hasn’t removed these from their sites?
I hope you don’t get into these, but these are pretty common on most platforms, and due to the amount of content available, it’s now tough to moderate all. Due to all these, many companies are moving to the Ml approach to fix the issue.
The reasons to use content moderation ML for these types of tasks are:
- Less time Consuming: You only need to train the model once, and that’s all the time taken.
- Repeatability: The model can be retrained if a new malicious content emerges.
- Automation: Can be concatenated with automation script to reduce the man’s efforts.
Also, one of the companies that started using AI for content moderation is AssemblyAI which also provides many helpful APIs for NLP tasks, especially audio and video. So let’s look over how to use these to make our lives easy by implementing content moderation over TED talks😀.
Approach
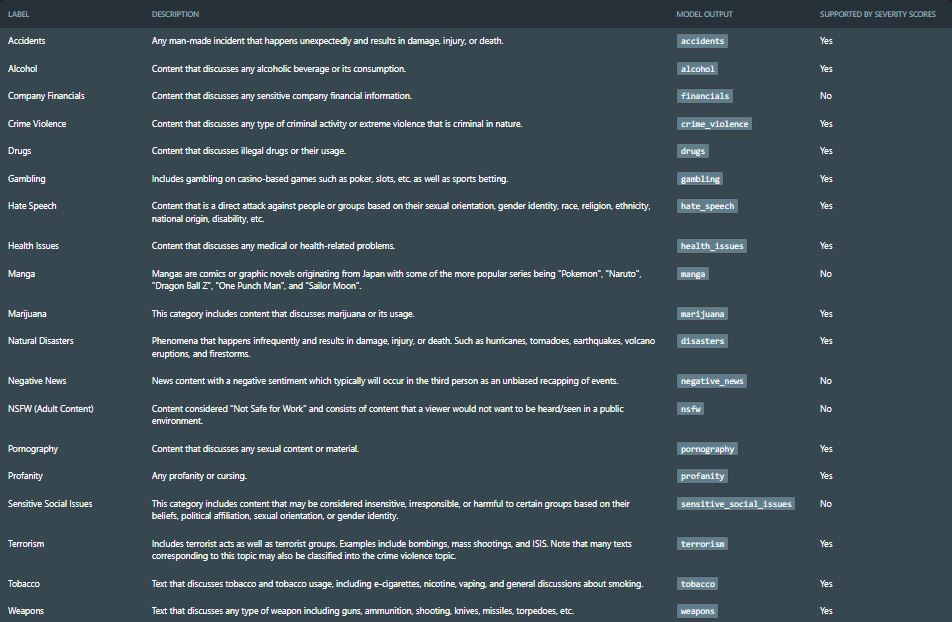
Our approach is to take the ted talk video link and pass It to the API using the request library, which will then be detected under one of the following labels:

Quite impressive, right?
The Assembly AI can do even more; with the help of content safety detection, it can also pinpoint the time at which the content is said or displayed.
Setting Up Workspace
It’s highly suggested to follow along using Jupyter-Notebook and Anaconda to make the process smooth and quickly verify the results.
Next up, an AssemblyAI account is needed(Free or Paid), which can be made as :
Visit Official Website-> Click on Get Started -> Fill details -> Create Account.
After successful creation of an account, one can see something like this:

Image By Author
See that yellow mark; that’s the API key for use.
Next Up, let’s define our API key as constant by pasting it in the Constants.py file. This will help retrieve the constant without hindering the API key(friendly practice!).
Constants.py
API_KEY = "your key goes here"
Note: We will be using the request library extensively in the tutorial, so knowing it will give you an upper edge.
Having done our setup, let’s get started on the fun part😉
Coding time
The code here is divided into 3 sections:
- Creating The Transcripts
- Retrieving The Results
- Creating Transcripts According To User Defined Confidence Score
Part1 – Creating The Transcripts
Transcripts here mean files in JSON format, which will contain all the desired results required. Creating a thesis straight forward and will require only 5 steps.
1. Necessary Imports
import requests, Constants
2. Creating Endpoint
Since we are using a request library, we will create an endpoint that will hold the URL of the API.
end_point = "https://api.assemblyai.com/v2/transcript"
Fetching API Key
As the Constans file is imported, we will simply use it. Operator to fetch the api_key variable.
api_key = Constants.API_KEY
3. Adding Authorization
The API expects all the necessary metadata as key: value pair. Some options include authorization and content_type.
headers = {
    "authorization": api_key,
    "content-type": "application/json" # our content is json file
}
4. Defining Our Json Files Path
Our model will require the file path to fetch the video file and parse it. Also, an optional parameter can be passed to pinpoint the exact location and time of malicious content.
json = {
    "audio_url": "https://download.ted.com/products/95327.mp4",
    "content_safety": True,
}
The ted talk we are using here is: Why Smart Statistics Is Key To Fighting Crime By Anne Milligram,
For curious readers, the way to get the link is by visiting the file, -> Clicking the share button -> Right-Click the video icon -> copy the link address -> trim till mp4.
5. Sending Post Request
All the variables are in place. One can simply send the post request to the app and fetch the returned result in the response variable. Optionally it can be printed:
response = requests.post(end_point, json=json, headers=headers)
print(response.json())
The Result

Image By Author
Note: Copy the above id and keep it separate as required later.
Optionally, let’s go to the dashboard and go to the developers-> processing queue and check the status. Once done, we will get your transcription file.

Image By Author

Image By Author
Part 2 – Retrieving The Results
So we have our processed file. Now the only thing to do is fetch the file and save it. Again the steps are pretty simple and take less than 4 steps.
1. Creating Result Endpoint
We can fetch the result by sending a get request which will again require an endpoint(to the processed file), so it’s worth creating.
format:- “https://api.assemblyai.com/v2/transcript/id” shown above*👆
end_point_res = "https://api.assemblyai.com/v2/transcript/og50102ug1-d570-4788-955c-4e58a01e2227"
2. Adding authorization
For any transactions, they need to validate through key so storing it in auth variable
auth = {
    "authorization": apiKey
}
3. Sending Get Request & Display
Like we did for a post request, accept no JSON file will be passed as we are not sending any info, just fetching it.
response_final = requests.get(end_point_res, headers=auth)
4. Saving To File
Finally, let’s save the final result(the transcripted file) with all the work done. One can use file io to perform the operation.
with open('result.json', 'wb') as f:
    f.write(response_final.content)
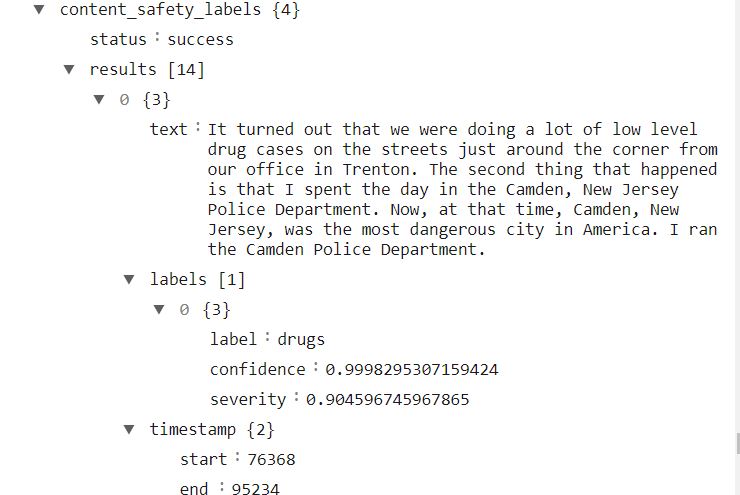
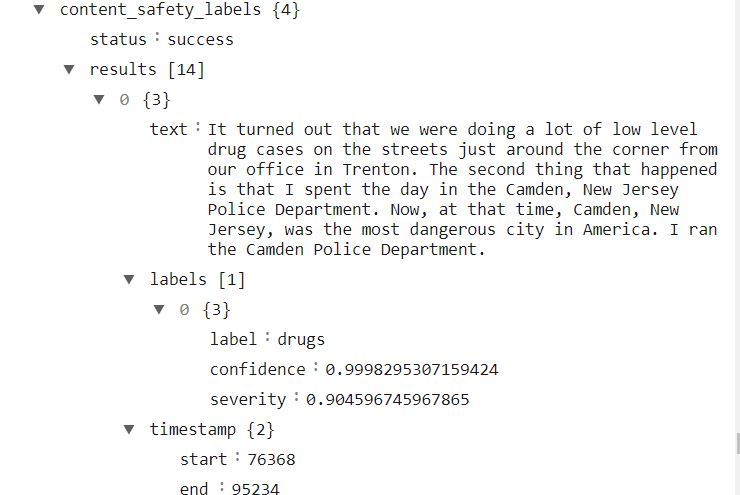
Let’s check the file. I am using JSON viewer formatted output.

Image By Author
Part 3 – Results As Per Desired CI Scores
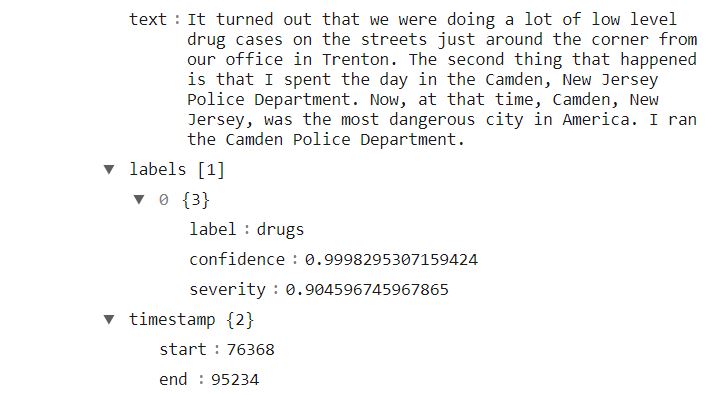
The model generally returns the labels for confidence score > 50% or 0.50, but we can tweak it per need. This can be done by introducing a new argument called “content_safety_confidence” while creating JSON variable and following steps of section 1 -(here variables differ).
# adding new argument
json_ci = {
    "audio_url": "https://download.ted.com/products/95327.mp4",
    "content_safety": True,
    "content_safety_confidence" : 80 # checking for >80% CI
}
# creating new authorization
auth_ci = {
    "authorization": api_key
}
# post request and print response
# creating result end point
end_point_ci = "https://api.assemblyai.com/v2/transcript/og57ldxw4s-df89-4f97-b70f-21f71404c6d0"
# getting response
response_ci = requests.get(end_point_ci, headers=auth_ci)
# saving file
with open('result_ci.json', 'wb') as f:
    f.write(response_ci.content)
Result:

Image By Author
As can be seen, the file only contains labels whole CI >80%.
Conclusion
To summarise, as the demand for the content will increase, more approaches will emerge, and here we have only seen a glimpse of what is to come in the next 2 years. But here are a few key takeaways:
- As the amount of content on platforms increases, we will require even more sophisticated and fast–paced algorithms/ methods to moderate the content.
- This article shares a straightforward and naive way of utilizing the request library’s GET and POST method for an API call, which can be altered according to requirements.
- Lastly, we learned how to work with JSON files using file io and its interpretation using the JSON viewer.
I hope you had an excellent time reading, implementing my article on content moderation ML . Feel free to connect me @LinkedIn or @Twitter for any issue or suggestion. For reading more informative content like this, you can check my @AV Profile.
Here are some of the resources to get you started:
Code Files: Github
Inspiration: CodeBasics, Smitha Kolan
Get Started With API: AssembyAI Docs
The media shown in this article is not owned by Analytics Vidhya and are used at the Author’s discretion.


